When you need to interact with an REST API in PowerShell, you will need to use the Invoke RestMethod cmdlet. This cmdlet lets you send HTTP(S) requests to a REST web service from your command line or PowerShell script.
REST APIs can be used to manage all kinds of services or to pull data out of them. But keep in mind that there are often PowerShell Modules available for popular services, like Azure, Graph, GitHub, etc. So make sure you check that before you start!
In this article
In this article, we are going to take a look at how to make REST API calls from PowerShell with the Invoke-RestMethod cmdlet.
PowerShell Invoke-RestMethod
The PowerShell Invoke-RestMethod cmdlet allows you to work with REST APIs. It supports all required HTTP methods, like Get, Post, Put, etc, and authentication. An advantage of the cmdlet is that it will automatically convert JSON or XML responses to pscustomobjects objects in PowerShell
To make a REST API call you will need the URI to send the request to, probably the authentication method, and of course know which method to use. By default, the cmdlet will use the GET method, but other commonly used methods are:
- GET – Retrieves data from a specific endpoint.
- POST – Sends data to the server to create a new resource
- PUT – Updates an existing resource on the server.
- PATCH – Similar to PUT, but sends only the data that is changed to the server
- DELETE – Removes resources from the server
Retrieving Data
We are going to start with the basics, retrieving data from an API. To retrieve data, we will need to know which URI (endpoint) to use. Pretty much all APIs have documentation, where you can look at the different URI that you can use.
Note
For the examples below we will be using this free REST API https://restful-api.dev/ . This API doesn’t require any authentication, and allows you to do put request as well, which is great for learning.
To get all objects from the API, we only need to use the Invoke-RestMethod cmdlet with a URI from which we want to receive the data. This is an open API, so no authentication is required.
Invoke-RestMethod -Uri 'https://api.restful-api.dev/objects'
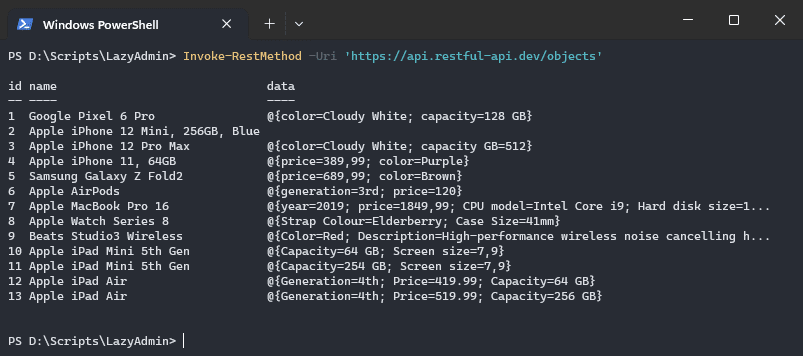
The API returns JSON, which is automatically converted to a PowerShell object by the Invoke-RestMethod cmdlet. But when the API returns multiple objects, then objects are received as an array.
Selecting specific objects from a REST API is often done by either using a query or by specifying the object ID. For example, to select the Google Pixel 6 from the objects, we can specify the ID 1:
https://api.restful-api.dev/objects/1
And because now only a single object is returned, we can also directly use the select-object cmdlet to return only the name of the object:
https://api.restful-api.dev/objects/1 | Select name

# Result
name
----
Google Pixel 6 Pro
Using Query Parameters
To select specific objects from an API you will need to use query parameters. These parameters can be part of the URI in the Invoke-RestMethod cmdlet or we can use a JSON body. Which parameters you can use really depends on the API.
You will need to look in the documentation of the API to see which query parameters you use. For example, the endpoint that we are using in this example only accepts IDs as a query parameter:
Invoke-RestMethod -uri 'https://api.restful-api.dev/objects?id=3&id=5'

# result
id name                    data
-- ----                    ----
3  Apple iPhone 12 Pro Max @{color=Cloudy White; capacity GB=512}
5  Samsung Galaxy Z Fold2  @{price=689,99; color=Brown}
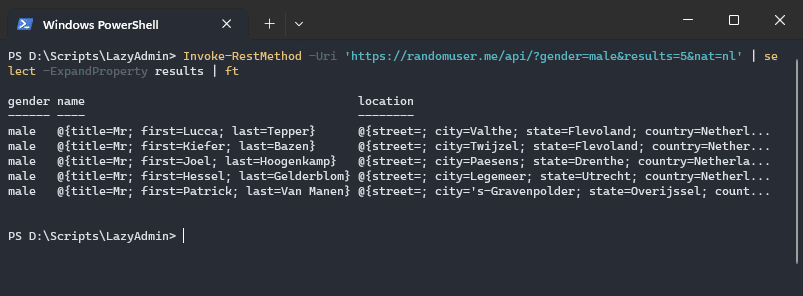
To give you another example we can use the randomuser.me API, which generates random user data. This API accepts multiple parameters that allow you to specify what kind of user data you want to generate.
So for example, we can generate 5 users, that all have the gender male and the Dutch nationality:
Invoke-RestMethod -Uri 'https://randomuser.me/api/?gender=male&results=5&nat=nl' | select -ExpandProperty results | ft
Using a JSON Body
Specifying all parameters in the URI can make your code harder to read. So when you need to specify multiple parameters, it is often better to use a JSON body instead.
The advantage of the JSON body is that they are easier to read and allow you to quickly add or change parameters in the request.
To make the same request as in the example above, we can create a body for the Invoke-RestMethod with a simple hashtable. I have also stored the URI in a variable to make the example a bit more readable:
$uri = 'https://randomuser.me/api/'
$body = @{
    gender = 'male'
    nat = 'nl'
    results = '5'
}

Invoke-RestMethod -Uri $uri -Body $body | select -ExpandProperty results | ft
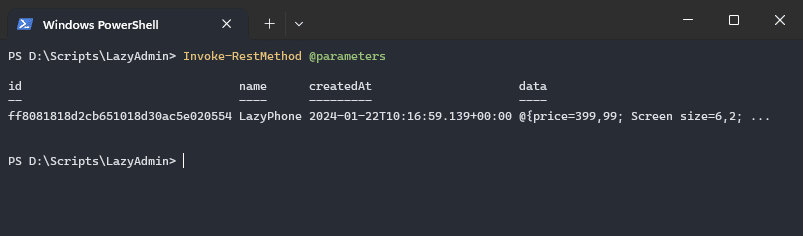
We can even store all the parameters inside a hashtable by using the splatting technique. In this case, it’s always a good idea to specify the request method as well. I have included the body inside the hashtable, but you can also create the body separately if you prefer that.
$parameters = @{
    Method = 'GET'
    Uri = 'https://randomuser.me/api/'
    Body =  @{
            gender = 'male'
            nat = 'nl'
            results = '5'
        }
    }

Invoke-RestMethod @parameters | select -ExpandProperty results | ft
Follow Relation Links
Some REST APIs support the use of relation links. Relation links are commonly used for pagination, so you request 1000s of objects in one call. The relation links are noted in the header of the result.
When using the Invoke RestMethod cmdlet, you can access these relation links by using the FollowRelLink parameter. The parameter MaximumFollowRelLink allows you to determine how many pages you want to request as well.
$url = 'https://api.github.com/repos/ruudmens/lazyadmin/issues'
Invoke-RestMethod $url -FollowRelLink -MaximumFollowRelLink 2
Sending Data
We can also use the PowerShell Invoke-RestMethod to send data to a REST API. To do this we will need to create a JSON body with the data that we want to send. Also, you will need to know the endpoint URI and we will need to use the correct method.
If you want to create a new object/resource, then you will need to use the POST method. For updating an existing resource, you will need to use the PUT or PATH method.
The first step is to create the body with the item that you want to POST to the API. The example REST API that we are using requires the data attribute to be a JSON object as well, but often you can specify the attributes directly without the nested hashtable:
$body = @{
    name = 'LazyPhone'
    data = @{
       year = 2024
       price = 399.99
       'Screen size' = 6.2
    }
}
Before we can POST the new object, we will need to make sure that the body is converted to a JSON object. We can do this with the ConvertTo-JSON cmdlet. We also need to specify the ContentType that we are sending, and of course the method POST:
$parameters = @{
    Method = 'POST'
    Uri = 'https://api.restful-api.dev/objects'
    Body =  ConvertTo-JSON($body)
    ContentType = 'application/json'
}

Invoke-RestMethod @parameters
Most APIs will return the object after you have successfully POST it. You can either store the results in a variable or redirect it to null if you don’t want it to be outputted to the console.
Invoke-RestMethod @parameters | Out-Null
Uploading Files and Mixed Content
When you need to upload a file or image to an API with PowerShell, then you often will need to use multipart/formdata it to submit your object. For this, you will need to use PowerShell 6 atleast, because this allows you to use the -Form parameter.
Just like when using the body parameter, we need to create a hashtable for the form parameter:
$form = @{
    brand = 'LazyPhone'
    model = 'Snap 2'
    released = '2024-01-22'
    image = Get-Item -Path "c:\marketing\LazyPhone\"
}

$parameters = @{
    Method = 'POST'
    Uri = 'https://api.example.dev/phones'
    Form = ConvertTo-JSON($form)
    ContentType = 'application/json'
}

Invoke-RestMethod @parameters
Updating an Object
Updating an object is done in pretty much the same way as creating one. The only difference here is that you will need to specify the object that you want to update.
There are two methods that you can use to update an object, PUT and PATCH. The first will replace all the attributes of the object, whereas the latter only replaces the attributes that you send.
$body = @{
    name = 'LazyPhone'
    data = @{
        color = 'Cloudy White'
        'capacity GB' = 512
    }
}

$parameters = @{
    Method = 'POST'
    Uri = 'https://api.restful-api.dev/objects/3'
    Body =  ConvertTo-JSON($body)
    ContentType = 'application/json'
}
Authentication
Until now we have used REST APIs in our example that don’t require any authentication. But most REST APIs require that you authenticate before you can interact with it. Three authentication methods are commonly used:
- Basic – Simple username / password-based authentication
- Bearer – Requires a Token parameter
- API Key – Combination of access key and secret key
The authentication details are supplied in the header of the call. You do this with the Invoke-RestMethod cmdlet by using the -headers parameter.
Basic Authentication
Basic authentication consists of a username and password that are encoded with base64. They are not the safest option to use these days, so you won’t come across them a lot. To use basic authentication you will first need to create a credential object in PowerShell
$cred = Get-Credential
We can then add the credential object to the header of the REST API request. If you are using PowerShell 6 or higher, you can use the -authentication and -credential parameter:
Invoke-RestMethod -uri 'https://api.restful-api.dev/objects/' -Credential $cred -Authentication Basic
When using PowerShell 5, you can use only the credential object, and you will need to create the header with a JSON object:
$headers = @{
    Authorization = "Basic"
}

Invoke-RestMethod -uri 'https://api.restful-api.dev/objects/' -Headers $header -Credential $cred
Bearer
The bearer token is a more commonly used authentication method. It uses a token that you often first need to request from the REST API. It depends on the API on how the token is requested and how long the token is valid.
To use the token we can either use the -Token parameter (in PowerShell 6 or higher) or add the token in the header.
$token = 'token-from-api'

Invoke-RestMethod -Uri $uri -Authentication Bearer -Token $token
Or when using PowerShell 5.x:
$headers = @{
    'Authorization' = "Bearer $Token"
}

Invoke-RestMethod -Uri $uri -Headers $header
API Key – Secret
The last authentication option that I want to show you is the API Key/Secret method. Lots of APIs these days allow you to create a unique key/secret combination that you can use for your application.
To use the key and secret for authentication, we will need to use the X-ApiKeys header. Just like with the other header, you will need to create a header object with the X-ApiKeys header rule:
$parameters = @{
    Method = 'PUT'
    Uri = 'https://api.restful-api.dev/objects/'
    Headers = @{
        "X-ApiKeys" = "accessKey=$($accessKey); secretKey=$($secretKey)"
    }
    ContentType = 'application/json'
}

Invoke-RestMethod @parameters
Wrapping Up
REST APIs are a great way to exchange information with other systems. Keep in mind that there are PowerShell Modules available for a lot of popular services. So make sure that you check that first before you start.
The PowerShell Invoke RestMethod cmdlet is easier to use in PowerShell 7.x, so I really recommend that you use the latest version when working with a REST API.
I hope you found this article helpful. If you have any questions, just drop a comment below.


I like the idea get-children, however in this case I don’t think I can use a CIF share. The API needs a URL for the location of the files.so I provide that with a few other properties to complete the body and use the rest method to make the call to the destination. I wondered if I created variables for the different properties and out the inputs in a csv file. Would that be able to pull that or is it just as easy to do an array?
You can use a CSV for that, the method of using the data is the same. The only difference is you either reference an array, or a variable with the imported data.
Good article, I am relatively a newbie when it comes to scripting. I have a current need to upload iso and qcow2 files to a system and I can do a single one with the current code I have. What I want to do is be able to upload as many files as are needed. In my lab its 3, but in production it can be 5 or more or 1. Just depends on if its a new file or updated version of an existing file.
How can I chain or preferably execute all the calls I need to run.
using a foreach loop and a get-childitem would do the trick.