When you need to move a lot of files or move specific files on multiple computers, then PowerShell is a great tool to use. With PowerShell, we can quickly write a script that will move a file and even add some logging to it if needed.
Moving files is a quite common task, you may, for example, want to archive all files older than x days to a different location. By leveraging PowerShell, we can write a script and schedule it to run automatically.
In this article
In this article, I will explain how you can move a file with PowerShell and give you some examples.
Move a File with PowerShell
Moving a single file with PowerShell is done with the Move-Item cmdlet. It requires a path to the source file and a destination to move a file. The example below moves the readme.txt file to the d:\archive folder:
Move-Item -Path "C:\temp\files\readme.txt" -Destination "D:\archive\"
Important to note is that the destination folder will need to end with a \. The reason for this is, that if the destination folder, archive in this case, doesn’t exist, then PowerShell will move the file to D:\, and name it archive, without any file extensions.
If you want to see which files are copied in the console, then you can use the -PassThru parameter. This will output an object with all the files that are moved.
Moving all Files in a Folder
You can move all the files in a folder by using the wildcard * character. If you only want to move the files, and not any subfolders, then use *.* in the path parameter:
# Move only all the files
Move-Item -Path "C:\temp\files\*.*" -Destination "D:\archive\"
To move all the subfolders, and their content as well, you can simply use a * as wildcard:
# move all files and subfodlers
Move-Item -Path "C:\temp\files\*" -Destination "D:\archive\"
Moving Specific Files
Sometimes you only want to move specific files. You can do this by using the wildcard character and specifying the file extension of the files that you want to move. So for example, to move all .csv files from the folder, we can use the following command:
Move-Item -Path "C:\temp\files\*.csv" -Destination "D:\archive\"

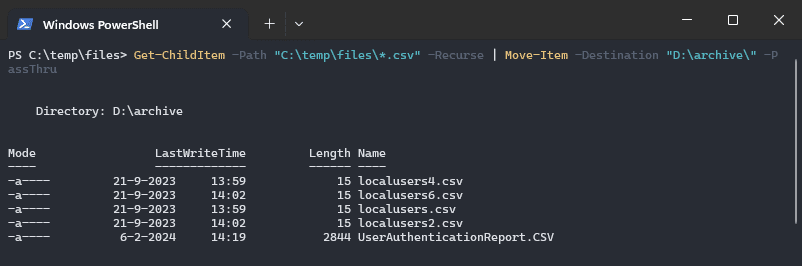
In the example above, only CSV files in the given folder are moved to the destination. If you want to move files CSV files from the subfolders as well, then we will first need to get all the items with the Get-ChildItem cmdlet.
The Get-ChildItem cmdlet will get all items from the given path. By using the -Recurse parameter, it will also get all the items from the subfolders. We can then pipe the Move-Item cmdlet to it, to move the selected files to the new destination:
Get-ChildItem -Path "C:\temp\files\*.csv" -Recurse | Move-Item -Destination "D:\archive\"
Using Include and Exclude Parameters
The Move-Item cmdlet has an -Include and -Exclude parameter that you could use. They allow you to specify file types that you want to move or not to the destination.
Move-Item -Path "c:\temp\files\*" -Include "*.txt","*.csv" -Destination "d:\archive\"
Now if you are trying to use these parameters in PowerShell 5.x, then you will probably notice that it throws an error, “… does not exist” on all the items that don’t match the include or exclude parameter.
The problem is solved in PowerShell 7, but if you are using PowerShell 5.x then you can work around this issue by using the Get-ChildItem cmdlet first. Another option is to specify multiple Paths with all the file types that you want to move:
Move-Item -Path "c:\temp\files\*.csv", "c:\temp\files\*.txt" -Destination "d:\archive\"
Force overwriting Files
When you try to move a file that already exists in the destination folder, then you will get an error that the file exists. To overwrite the existing file, simply use the -Force parameter.
Advanced Move File Examples
You should now have a good idea of the basics when it comes to the move-item cmdlet. Let’s take a look at some more advanced examples.
Moving Files older than x Days
A common practice when cleaning up directories is to archive only files that are older than x days. To do this, we will first need to calculate the file date. Let’s say we want to archive or move all files that are older than 30 days, we then first need to get the date from 30 days ago:
# Get the date from today minus 30 days

$dateTime = (Get-Date).AddDays(-30)
The next step is to get all files that are older than the given date. To do this we are going to compare the lastwritetime of the file with the datetime that we calculated:
Get-ChildItem -Path $Path -Recurse -File | Where-Object { $_.LastWriteTime -lt $dateTime }
We then only have to pipe the Move-Item cmdlet behind it to actually move the files to a new location
$dateTime = (Get-Date).AddDays(-30)
$path = "C:\temp\files\"

# Move all files from the given path and subfolders that are older than 30 days
Get-ChildItem -Path $Path -Recurse -File | Where-Object { $_.LastWriteTime -lt $dateTime } | Move-Item -Destination "D:\archive\"
Move Files Larger Than
Another common action is to move only the large files from a given folder. Just like with moving older files only, we are first going to get the items with the Get-ChildItem cmdlet.
$path = "C:\temp\files\"

# Set file size
$sizeInMb = 500

# Calculate actual file size
$size = $sizeInMb*1024*1024

# Move all files that are larger then given size
Get-ChildItem -Path $Path -Recurse -File | Where-Object { $_.length -gt $size } | Move-Item -Destination "D:\archive\"
Wrapping Up
Moving files with the Move-Item cmdlet is pretty straightforward. If you want to select only particular files or want to use advanced files, then you can use the Get-ChildItem cmdlet to select the files that you need.
If you want to create a log file of the files that are moved, then make sure you read this article as well. Also, you can read more about scheduling your scripts in this article.
I hope you liked this article, make sure that you subscribe to the newsletter or follow me on Facebook to get the latest article. If you have any questions, just drop a comment below.


