Renaming a single file can best be done in Explorer, but what if you need to rename multiple files? Then it’s better to use PowerShell to rename the files. With PowerShell, we can easily get a selection of files and rename them quickly.
In PowerShell, we can use the Rename-Item cmdlet to rename files and registry items. The cmdlet only requires a path and a new file name to work.
In this article
In this article, we will look at how to rename files with PowerShell, rename multiple files, and rename registry items.
Rename Files with PowerShell
To rename a file with PowerShell we are going to use the Rename-Item cmdlet. This cmdlet requires a path of the file that you want to rename and the new name of the file. Good to know is that the cmdlet doesn’t show any output when it has renamed the file. Let’s say we want to rename the file test.txt to newtest.txt:
Rename-Item C:\temp\test.txt -NewName newtest.txt
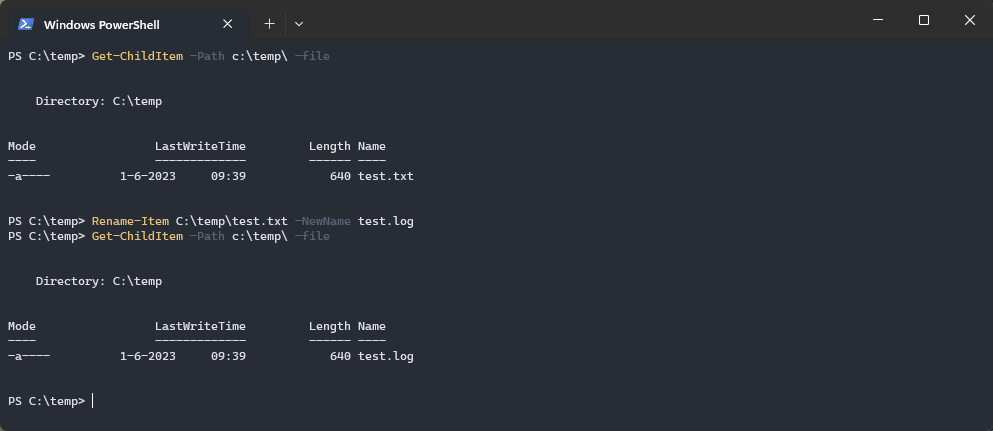
We are not limited to the file name alone, we can also change the extension with the cmdlet:
# Change the extension test.txt to .log
Rename-Item C:\temp\test.txt -NewName test.log
The cmdlet Rename-Item doesn’t come with a lot of parameters that we can use, only the following:
| Parameter | Description |
|---|---|
| -Path | The path and filename of the file to rename |
| -NewName | New name of the file |
| -Force | Rename a read-only or hidden file |
| -Confirm | Prompt for confirmation before renaming |
| -WhatIf | Run in test mode |
Ask for Confirmation before Renaming
When renaming files with a script it’s always important to test and double-check if your script works correctly before you run it. The Rename-Item cmdlet has two options for that, Confirm and WhatIf. The parameter WhatIf is commonly used in PowerShell to see what the cmdlet will do before you actually run it. Confirm will ask for confirmation before executing the cmdlet.
# Ask for confirmation
Rename-Item C:\temp\test.txt -NewName test.log -Confirm

# Result
Confirm
Are you sure you want to perform this action?
Performing the operation "Rename File" on target "Item: C:\temp\test.txt Destination: C:\temp\test.log".
[Y] Yes  [A] Yes to All  [N] No  [L] No to All  [S] Suspend  [?] Help (default is "Y"):
Or when using WhatIf you will see what the cmdlet will do:
Rename-Item C:\temp\test.txt -NewName test.log -WhatIf
What if: Performing the operation "Rename File" on target "Item: C:\temp\test.txt Destination: C:\temp\test.log".
Renaming Hidden and Read-Only files
By default files that are marked read-only or files that are hidden won’t be renamed. If you need to rename read-only files, then you can use the -Force parameter. This way each file that is passed to the cmdlet will be renamed.
Rename-Item C:\temp\test.txt -NewName test.log -Force
Rename Multiple Files with PowerShell
To rename multiple files with PowerShell we will first need to get the files using the Get-ChildItem cmdlet. We can then pipe the Rename-Item cmdlet behind it, which will automatically take the file path. For the new file name, we will need to use the string replace function.
For this example, I have a couple of log files from which I want to change the extension from to .txt:
Get-ChildItem -Path c:\temp\*.log -File | Rename-Item -NewName {$_.Name -replace ".log", ".txt" }
The cmdlet above get’s all the files, take the filename of each file, and replaces the extension .log with .txt. Now this cmdlet doesn’t give any output. This doesn’t have to be a problem, but sometimes you want to see which files your script has processed.
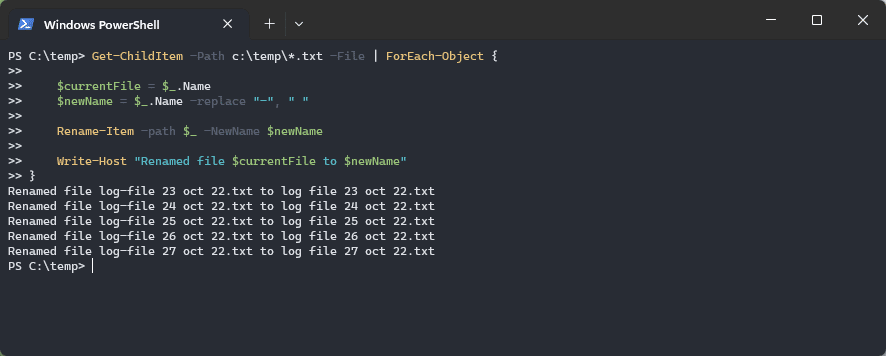
To do this we will need to brake up the script a bit. We will still get the files first with the Get-ChildItem cmdlet, but we pipe a ForEach-Object loop behind it. In the script block of the ForEach loop, we store the current filename and create a new filename, which we also store in a variable.
Get-ChildItem -Path c:\temp\*.txt -File | ForEach-Object {

    $currentFile = $_.Name
    $newName = $_.Name -replace "-", " "

    Rename-Item -path $_ -NewName $newName

    Write-Host "Renamed file $currentFile to $newName"
}
We can then rename each file and write to the console the old and new files. Now instead of writing to the console, you can also create a log file to store the results.
Adding Prefix or Suffix to a Filename
Another common task is to add a prefix to multiple files. Adding a prefix is pretty easy given the example above. We only need to specify the prefix and add it to the new filename.
$prefix = "TEST-"
Get-ChildItem -Path c:\temp\*.txt -File | ForEach-Object {

    $currentFile = $_.Name
    $newName = $prefix + $_.Name

    Rename-Item -path $_ -NewName $newName

    Write-Host "Renamed file $currentFile to $newName"
}
To add the suffix we will need to split up the filename because the name includes the extension by default. We want to place the suffix behind the name and for the extension. To do this we can use the .basename leaf which is part of the filename object.
$suffix = Get-Date -Format "MM-dd-yyyy"
Get-ChildItem -Path c:\temp\*.txt -File | ForEach-Object {

    $newName = $_.BaseName + $suffix + $_.Extension
    Rename-Item -path $_ -NewName $newName
}
Renaming Registry Items
The Rename-Item the cmdlet can also rename registry items. This can come in handy when you need to change registry keys after and software update or don’t want to delete a key, but disable it only temporarily by renaming it.
For example, to rename the license key of an application you can do the following:
Rename-Item -Path "HKLM:\Software\Application\License" -NewName "OldLicense"
This will only rename the key License to OldLicense in the path HKLM:\Software\Application
Wrapping Up
Renaming files with PowerShell is pretty straightforward forward as you can see. To batch rename files you will need to use the Get-ChildItem cmdlet. If you are new to PowerShell, then make sure that you read my getting started with PowerShell guide!
I hope you found this article helpful, if you have any questions, just drop a comment below.


