PowerShell is a great tool to automate tasks and create reports or exports, but at some point, you want to send an email with PowerShell. Maybe when a task failed or too automatically email the report.
For sending emails with PowerShell we could always rely on the send mailmessage cmdlet. But this cmdlet is obsolete now and Microsoft recommends not to use it anymore. So what is currently the best way to send emails with PowerShell?
In this article
In this article, we will look at the alternatives for the Send-MailMessage cmdlet in PowerShell to send email.
Send-MailMessage Obsolete
To send email from PowerShell we could always use the Send-MailMessage cmdlet. This cmdlet allows you to send emails including attachments from an SMTP server that you specify. The problem with the send mailmessage cmdlet is that it doesn’t support modern protocols and authentication.
This means that you can’t use it anymore in combination with Exchange Online for example. You could, however, still use it with other SMTP servers that don’t require a secure connection.
Sending an email with the obsolete Send-MailMessage cmdlet can be done as follows:
$smtpServer = "smtp.mailserver.com"
$smtpPort = 587
$smtpUsername = "user@mailserver.com"
$smtpPassword = ConvertTo-SecureString -String "PassWord123" -AsPlainText -Force
$smtpCredential = New-Object -TypeName System.Management.Automation.PSCredential -ArgumentList $smtpUsername, $smtpPassword

Send-MailMessage -To "john@contoso.com" -From "powershell@lazyadmin.nl" -Subject "SMTP email" -Body "Email body with message you want to send" -SmtpServer $smtpServer -Port $smtpPort -UseSSL -Credential $smtpCredential
Microsoft isn’t updating the Send-MailMessage cmdlet at the moment. But there are a couple of alternatives that we can use to send emails. We will focus on 3 methods:
- Using the PnPOnline module
- Sending emails with Microsoft Graph
- Mailozaurr PowerShell Module
Using PnPOnline module – Send-PnPMail
One of the easier methods to send emails with PowerShell at the moment is to use the PnPOnline module. This module is primarily developed to manage SharePoint Online, but it can do more than that alone.
The Send-PnpMail method uses Microsoft Graph in the background. When you install and register the PnPOnline module, the required permissions are automatically added to the enterprise application that is created in Azure. It’s also possible to use the Exchange Online server directly, but then you are limited to internal email only.
A downside of the Send-PnPMail module is that you can’t add attachments to your emails. So keep that in mind. Also, it requires at least PowerShell 7, which isn’t installed by default on Windows 2022 for example.
Sending email with Send-PnPMail
To send emails with the Send-PnPMail cmdlet we will first need to install the PnPOnline module. Follow this guide on how to install and register the PnPOnline module and information about connecting.
The first step before you can send emails with the PnPOnline module is to connect it. For the connection you will need to specify a URL, this can just be your SharePoint Admin URL:
Connect-PnPOnline -url https://lazydev-admin.sharepoint.com -interactive
To simply send an email you will need to specify the From and To address, subject, and body of the email:
Send-PnPMail -From "user@contoso.onmicrosoft.com" -To "recipient@contoso.com" -Subject "Test message" -Body "This is a test message"
The email will be saved in the send items of the mailbox you specified to send from. This method will work for sending emails to both internal and external recipients.
If we look at the documentation of the Send-PnPMail cmdlet then the content type of the body should be HTML by default. However, during my tests, I noticed that HTML wasn’t parsed correctly. Only after I set the BodyContentType parameter to true was HTML supported:
$EmailParams = @{
    From = "admin@lazyadmin.nl"
    To = "meganb@lazyadmin.nl"
    Subject = "Domain Controller Health Report"
    BodyContentType = "HTML"
    Body = $htmlTable
}

Send-PnPMail @EmailParams
In the example above I am using splatting to configure the parameters for the Send-PnPMail cmdlet. This makes it easier to read and change the parameters.
It’s also possible to use a custom SMTP server and authenticate with a username and password. But it does then make more sense to use the obsolete Send-MailMessage cmdlet:
$EmailParams = @{
    From = "admin@lazyadmin.nl"
    To = "meganb@lazyadmin.nl"
    Subject = "Test Email"
    Body = "This is a test email sent using PowerShell in Office 365."
    Server = "smtp.myisp.com"
    Port = 587
    EnableSsl = $true
    Username = "lazyuser"
    Password = "password123"
}

Send-PnPMail @EmailParams
Send Mail with Microsoft Graph
The new recommended way by Microsoft to send email with PowerShell is to use Microsoft Graph. The PnPOnline, that we looked at earlier, uses Graph in the background. But we can also use Microsoft Graph directly to send emails.
To do this we will need to use the Send-MGUserMail cmdlet. Also, you will need to make sure that you have given the correct permission, Mail-Send, to the Microsoft Graph Enterprise application in Azure. This is done automatically when you connect to Graph with the correct scopes.
So the first step is to connect to Microsoft Graph with the scope Mail-Send:
Connect-MgGraph -Scopes "Mail.Send"
If you do this for the first time, then you will need to grant the extra permissions to send mail as a user:
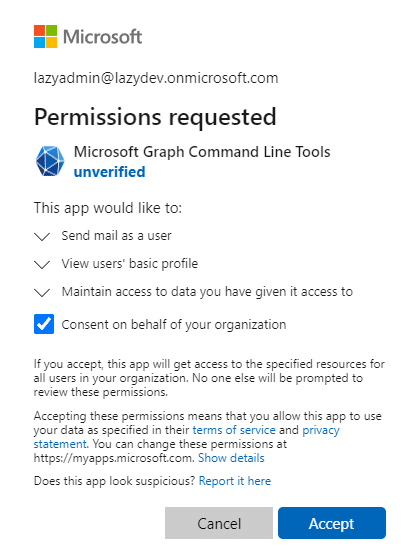
Sending an email with Graph isn’t as straightforward as with PnPOnline or the old Send-MailMessage cmdlet. We will first need to create a hashtable with all the email parameters and body that we want to send:
$userId = "lazyadmin@lazydev.onmicrosoft.com"
$emailParameters = @{
    ToRecipients = @(
        @{
            EmailAddress = @{
                Address = "ruud@pixelsupply.nl"
            }
        }
    )
    Subject = "Test email using MsGraph from PowerShell"
    Body    = @{
        ContentType = "Text"
        Content = "Content for the mail sent from PowerShell using Microsoft Graph."
    }
}
After you have created the hashtable, we can send the email using the Send-MgUserMail cmdlet. It requires a userId which contains the email address from which we send the email.
Send-MGUserMail -UserId $userId -Message $emailParameters
Adding Attachments to Send-MgUserMail
The challenge comes when you want to send attachments with the Send-MgUserMail cmdlet. Instead of simply specifying the path to the attachment or adding a file object to it, we will need to define the contentBytes of the attachment and file type.
Additionally, we can only send attachments up to 3Mb file size. If you want to send larger attachments you will first need to create a draft email, upload the attachment, and then call the send action.
But to send a small attachment we can add the following to the $emailParameters hashtable:
Attachments = @(
    @{
        "@odata.type" = "#microsoft.graph.fileAttachment"
        "name" = "Example.csv"
        "contentBytes" = $(
            [convert]::ToBase64String((Get-Content 'C:\temp\example.csv' -AsByteStream))
        )
    }
)
Using Mailozaurr to Send Email in PowerShell
Mailozaurr is a third-party PowerShell module that aims to provide an easier way to send emails from PowerShell. It supports multiple methods to send emails, including Microsoft Graph, SMTP with oAuth2, and SendGrid API.
To send emails with Mailozaurr, we still need to create a secure connection with the Exchange Online server. There are a couple of ways to do this, but one of the easiest ways to do this is to use an Azure Enterprise Application with the Mail.Send permissions.
Step 1 – Creating Azure Enterprise Application
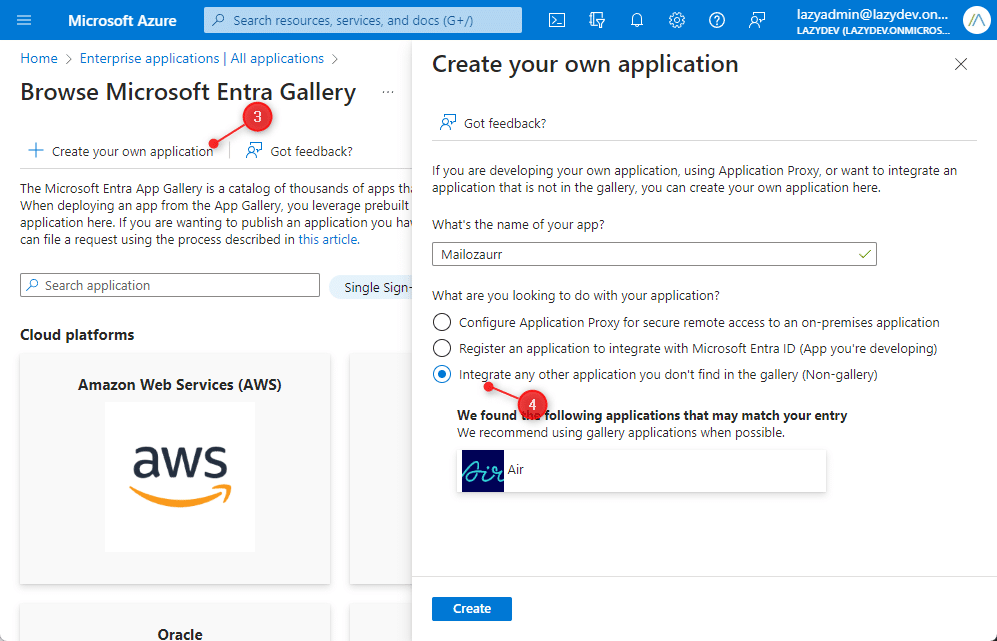
So the first step is to create an application in Azure with the correct permissions. You can also use an exting application for this, but it’s best to use an Azure Enterprise Application for a single purpose. This will make managing credentials a lot easier later on.
- Open portal.azure.com and search or open Enterprise Applications
- Click on + New Application to create a new one
- Select Create your own Application
- Give the application a name (Mailozaurr) and select the last option
- After the application is created, click on Permissions
- Click on App Registration
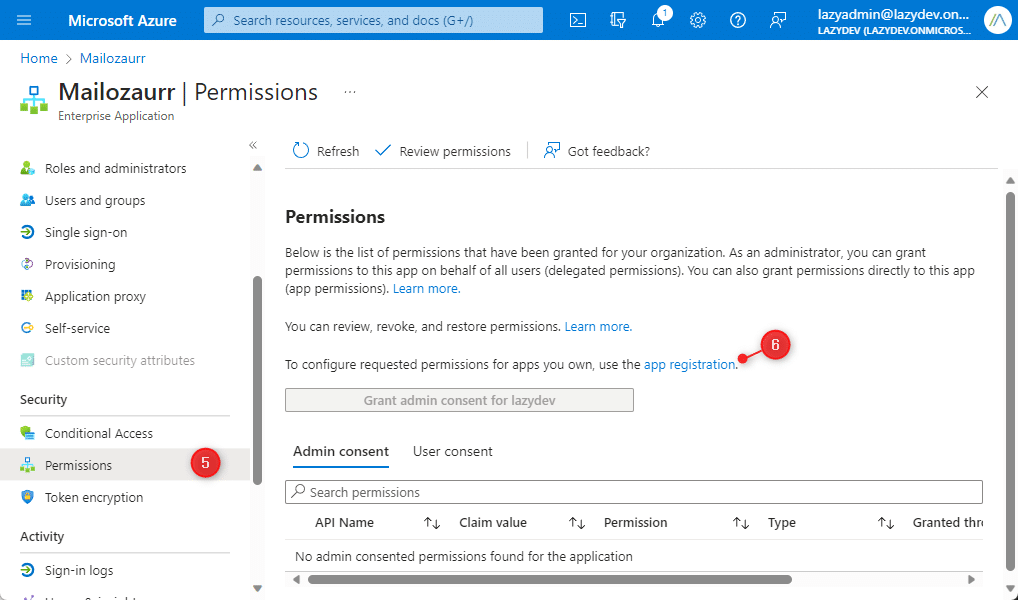
- Click on Add a Permission
- Choose Microsoft Graph -> Application Permissions
- Search for Mail and select the Mail.Send and Mail.ReadWrite permissions
- Click on Add Permission

The last step is to consent to the permissions, click on Grant admin consent for in the overview of the API Permissions.
To use the newly created application, we will need the Application ID, Directory (tenant) ID, and the Secret Value. The first two can be found in the overview of the application:
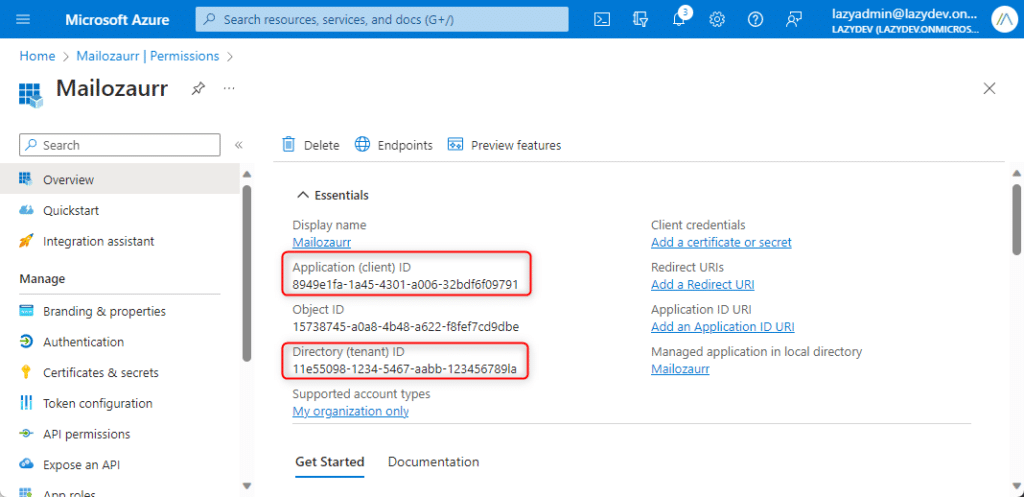
We will need to create the client secret, click on Certificates & secrets, and click on New Client Secret. Give the client secret a new one, set an expiration date, and click on Create. Write down the Value.
Step 2 – Create a Credential Object
With the application created, we can now continue in PowerShell to send an email. We first need to create a credential object with the IDs and Secret Value that we have created:
$appId = "8949e1fa-1234-4301-a006-32bdf6f09791"
$tenantId = "11e55098-1234-5467-aabb-123456789la"
$secretValue = "Tet8Q~ASDKhjln1321_asdnj0123enlazy"

$Credential = ConvertTo-GraphCredential -ClientID $appId -ClientSecret $secretValue -DirectoryID $tenantId
Keep in mind that anyone who has access to the script can use the IDs and secret value above to send emails to other users. The best option is to use a CertificateThumbPrint for the authentication, another option is to encrypt the ClientSecret value. This way the Client Secret can only be used on the same computer in the same user account:
$secureSecret = ConvertTo-SecureString -String $secretValue -AsPlainText -Force  | ConvertFrom-SecureString

$Credential = ConvertTo-GraphCredential -ClientID $appId -ClientSecretEncrypted $secureSecret -DirectoryID $tenantId
You can store the value of $secureSecret in your script.
Step 3 – Send Mail with Mailozaurr
We now have everything ready to send emails in PowerShell with the Mailozaurr module. To simply send an email, with an HTML body and using the Graph connection, we can now use the following command:
Send-EmailMessage -From 'meganb@lazyadmin.nl' -To 'jane@contoso.com' -Credential $Credential -HTML "test" -Subject 'This is another test email' -Graph -DoNotSaveToSentItems
As you can see, the parameter -DoNotSaveToSentItems will make sure that the email isn’t stored in the user’s send items. You can of course remove this if you want to keep the send email.
Adding attachments has also become a lot easier with the Mailozaurr module. Simply specify the path(s) to the attachments that you want to add to the email. You are not limited to the 4MB file size limit anymore. If the attachment is bigger, then the Mailozaurr module with take care of it.
Send-EmailMessage -From 'lazyadmin@lazydev.onmicrosoft.com' -To 'ruud@pixelsupply.nl' -Credential $Credential -HTML "test" -Subject 'This is another test email' -Graph -Attachment "C:\temp\example.csv" -ReplyTo "adelv@lazyadmin.nl" -RequestReadReceipt -RequestDeliveryReceipt
Wrapping Up
Sending emails with PowerShell has become a bit more work compared to the old Send-Mailmessage cmdlet. The PnPOnline method is pretty easy to implement and use. But if you want more options and control, then the Mailozaurr module is a great option.
It does however takes a little bit of work to set up correctly, but ones you have configured the permissions and authentication then it’s the best option to send emails with PowerShell.
I hope you like this article, if you have any questions, just drop a comment below.


Great article, found it immensely helpful. Explaining the background and transition from SMTP was very useful. I used it to help me send mails using a managed identity. Maybe a helpful hint to explain when sending via a managed identity you need to connect to graph as : Connect-MgGraph -Identity
Note: pre-requisite is that you have already granted the ‘Mail.Send’ permission to the MI.
Hey Ruud,
Thank you for the excellent article. I noticed a mistake where it states that you can add attachments in the Send-PnPMail module.
Thank you.
Thanks for pointing out the typo!