SharePoint comes with some templating options, but when you want to quickly roll out a new SharePoint with predefined libraries, for example, then using PowerShell is your best option. To connect to SharePoint from PowerShell we can use the PnPOnline module.
PnP PowerShell is a community-driven PowerShell Module that allows you to not only manage SharePoint Online, but also Teams, Planner, and Flow for example.
In this article
In this article, we will look at how to connect to SharePoint with Connect PnPOnline, and how to perform basic tasks with the PnP PowerShell module.
PnP PowerShell vs SharePoint Online Management Shell
Before we are going to take a look at how to use PnP PowerShell, it’s good to know that there is also a PowerShell module from Microsoft. The SharePoint Online Management Shell (SPO) is the official PowerShell module to manage your SharePoint Online environment.
So what are the differences between the two? Let’s take a brief look:
- SPO is for managing SharePoint at the Tenant level, whereas PnP PowerShell allows you to connect to a specific SharePoint site
- PnP PowerShell cmdlets contain more parameters, which allows you to achieve more (complex) tasks when compared to equivalent SPO cmdlets.
- SPO cmdlets run within the Tenant Admin rights, whereas PnP PowerShell runs the context of the current user (you could of course connect with admin credentials)
Each has its own advantages. If you want to run commands on a specific SharePoint site or within the current user context, go with PnP PowerShell. Do you need to change settings at the Tenant level, use the SPO cmdlets.
How to Connect PnP Online
To connect to SharePoint with PnPOnline, we will first need to install the PnP PowerShell module. The latest stable version of PnP PowerShell is only available for PowerShell 7.2. Installing modules in PowerShell is pretty simple, use the command below to install PnP PowerShell:
Install-Module PnP.PowerShell -Scope CurrentUser
Before we can connect to SharePoint Online we first need to register a Azure AD Application. This application is used for authentication only. To do this you will need to have write access in Azure AD.
Note
If you run Register-PnPManagementShellAccess and you get the error comand was not found in the module, if though you just installed it, then you are probably using PowerShell 5.x. Check your PowerShell version and make sure that you use 7.2 or higher.
Register-PnPManagementShellAccess
You will need to log in and give consent to the requested permissions for the PnP Management Shell. It is quite a lot, but that is expected because you can manage so much with the PnP PowerShell cmdlets.

Connect PnPOnline
With PnP PowerShell installed and registered, we can now connect to PnPOnline. The easiest way to do this is to use the -Interactive parameter. This will open a web dialog where you can enter or select your account and go through the MFA flow.
Connect-PnPOnline lazydev.sharepoint.com -Interactive
In the example above we connect to the main SharePoint site, at tenant level. But to change permissions of a specific SharePoint site, or when you want to create new document libraries in a SharePoint site, you will need to connect directly to that SharePoint site.
To do this we can simply specify the complete URL to the site:
$url = "https://lazydev.sharepoint.com/sites/Lab22"

Connect-PnPOnline $url -Interactive
If you were already connected to PnPOnline, then you don’t need to enter your credentials again. This means that you can simply connect (select) another SharePoint site using the connect-pnponline cmdlet.
Using PnPOnline in Azure Runbook
Azure Runbooks are a great place to run PowerShell scripts automatically. When you want to use PnPOnline inside a runbook it’s best to use the managed identity for the authentication. This way you don’t need to store any credentials or certificates for the authentication.
Follow this guide for the initial setup of managed identities in Azure. Once you have done that, we can add the required permissions for PnP PowerShell with the command below. Also, make sure that you add the PnP.PowerShell module in your Azure Automation account.
$managedIdentityObjectId = "1a2b1234-1234-123a-9b3f-1234f1234ab"

$spoScopes = @(
  'Sites.FullControl.All',
  'TermStore.ReadWrite.All',
  'User.ReadWrite.All'
)

ForEach($scope in $spoScopes){
  Add-PnPAzureADServicePrincipalAppRole -Principal $managedIdentityObjectId -AppRole $scope -BuiltInType SharePointOnline
}
After you have added permissions you should be able to connect to PnPOnline in your runbook with the following command:
Connect-PnPOnline -ManagedIdentity
Using PnP PowerShell
Now you are connected to SharePoint Online with PnpOnline, let’s take a look at some basic examples. I won’t show all possible cmdlets, because, at the moment of writing, there are more than 675 cmdlets in PnP Powershell, so we will focus on creating a new SharePoint site, adding some document libraries, and adding folders.
Creating a new SharePoint Site
To create a new SharePoint site we are going to use the New-PnPSite cmdlet. We will need to supply some basic information like title and alias, but other important fields to note are:
- Type – This can be a TeamSite, CommunicationSite or TeamSiteWithoutMicrosoft365Group
- IsPublic – Default is $false, which will create a private group. Set to $true for public site
- Owner – When not supplied, then you are the owner. You can supply one owner or use -Owners to supply multiple owners. Use the email address of the owner(s).
- TimeZone – This allows you to set the timezone for the site.
With the details supplied, we can simply create a SharePoint site using the following PowerShell code. Note that I use a splatted hashtable to store the properties (this makes it easier to read the code):
$siteDetails = @{
    Type = 'TeamSite'
    Title = "Lazy Lab 024"
    Alias = "Lab024"
    IsPublic = $true
    owner = "adelev@lazydev.onmicrosoft.com"
}

New-PnPSite @siteDetails
Now before creating a new SharePoint site, it’s a good idea to check if it doesn’t already exist. To do this we can use the Get-PnPTenantSite and use the filter to check if the site exists:
if ($null -eq (Get-PnPTenantSite -Filter "Url -like 'Lab024'")) {
  # Create new site
}
Adding Document Libraries
With the SharePoint site created, we can now add some document libraries. We will be using the New-PnPList cmdlet for this. Make sure that you are connected to the new site before running the cmdlet:
Connect-PnPOnline -url https://lazydev.sharepoint.com/sites/Lab024 -Interactive
The parameter -OnQuikLaunch will make sure that the new document library is also added to the site navigation. The -Template parameter allows you to select the type of list you want to create. The most common are DocumentLibary or GenericList, but other options can be found here.
 $docLibs = @(
    "Finance"
    "Marketing"
    "Contracts"
    "Drawings"
    "Legal"
)

$docLibs | ForEach {
    New-PnPList -Title $_ -Template DocumentLibrary -OnQuikLaunch
}
Creating Folders
We can also use PnP PowerShell to create folders in a SharePoint document library. This is great when you always use the same folder structure in your projects.
# Folders to create
$folders = @(
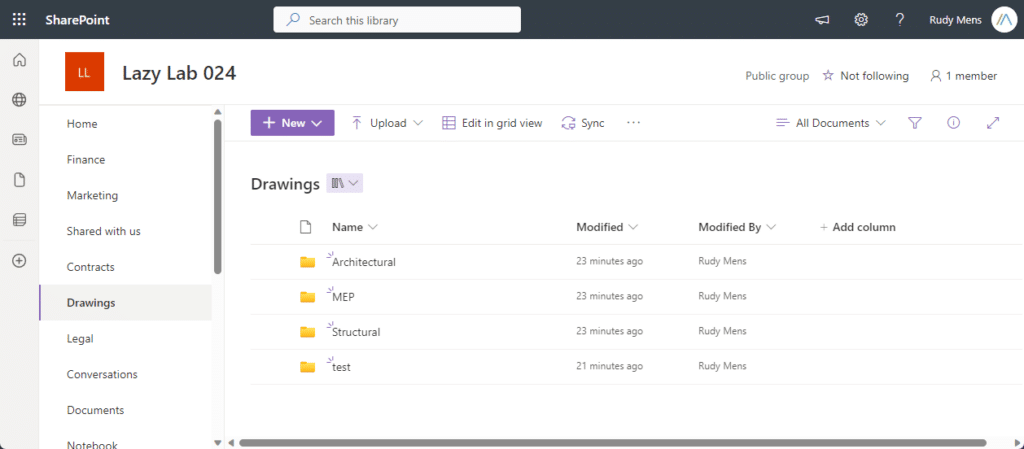
    "Architectural"
    "Structural"
    "MEP"
)

# Document Library
$docLibrary = "/Drawings"

#Create the Folder structure
$folders | Foreach-Object {
    Add-PnPFolder -Name $_ -Folder $docLibrary
}
You can also create subfolders with the Add-PnPFolder cmdlet. To do this you will need to add the parent folder to the document library path. So for example, if we want to create a subfolder in the folder Architectural, then you will need to specify the path as follows:
$folders = @(
    "Floor Plans"
    "Elevations"
    "Sections"
)

$docLibrary = "Drawings/Architectural"

$folders | Foreach-Object {
    Add-PnPFolder -Name $_ -Folder $docLibrary
}

Uploading Files with PnP PowerShell
The last step in our example is to upload files with PnP PowerShell. To do this we are going to use the Add-PnPFile cmdlet. We will need to use a local path to the file and specify the full path to which we want to upload the file.
So for example, to upload the file to the Architectural/Elevations folder in the Drawing library, we can do the following:
Add-PnPFile -Path "C:\temp\example.csv" -Folder "Drawings/Architectural/Elevations"
Wrapping Up
PnP PowerShell is a great way to create and manage SharePoint sites. You can easily connect directly to SharePoint sites with the connect pnponline cmdlet and manage every aspect of the site. In this article, we only looked at creating a site, libraries, and folders, but keep in mind that PnP PowerShell can do much more.
I hope this article helped you to get started with PnP PowerShell. If you have any questions, just drop a comment below.


Thanks for this great post. I’ve a question on executing cmdlets on a SP-site. We are working towards standardization of some aspects of SharePoint sites (for examples use of content types, default folder structure for project sites, etc). What we would like to do is to script the creation of sites using PnP PowerShell.
The issue I run into is that I (as SharePoint admin) first have to add myself to the owner group of a site before I can run cmdlets (like adding a content type from the content type hub). Is there a way to avoid this?
No, I haven’t found away atleast.