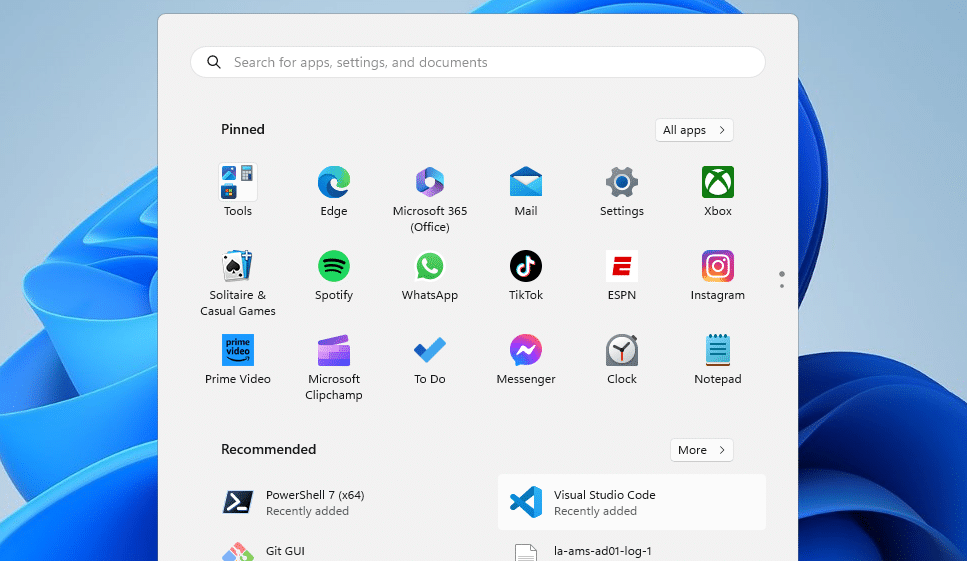
When you open the Windows 11 start menu for the first time, you probably have noticed that apps like TikeTok, Instagram, etc, are added to the menu by default. This is maybe fine in home environments, but when using Win 11 in a corporate environment you don’t want these apps. So how can we customize the Windows 11 Start Menu?
Most will say that you will need Windows 11 Enterprise for this. But that isn’t entirely true. We can create a default, custom, Windows 11 Start Menu for both Win 11 Home and Pro. The layout can be applied to existing users and set as a default for new users.
In this article, we are going to customize the Windows 11 Start Menu and set a new layout for all users.
Customize the Windows 11 Start Menu
The Windows 11 start menu layout is stored in a .bin file that is located in the local appdata. We can copy this file to other user profiles and the default user profile, to make sure that everybody has the same layout to start with. Users can still change the start menu later, but this way you can make sure that your business applications are listed in the menu, instead of TikTok, etc.
Good to know is that there are two versions of the .bin file:
- Win 11 22H2 and older uses start2.bin
- Older Win 11 version uses start.bin
If you have a mixture of 21H2 and 22H2 devices in your network, then you will need to create both files. You can’t use the start2.bin on an older machine or vice versa.
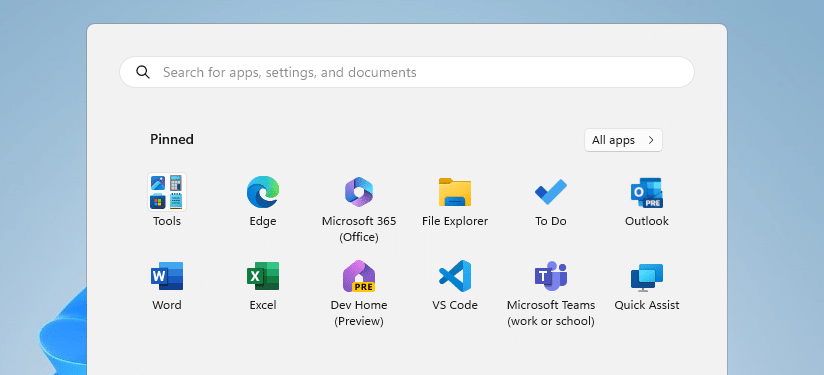
Make sure that you have customized your Win 11 Start Menu layout. Remove all the tiles/shortcuts that you don’t want and add your business applications. Note that you can also create folders (nested groups) in the start menu by dragging and dropping shortcuts over each other.
Export the Start Menu Layout
With the start layout created, we can export the .bin file from the user profile folder. Navigate to the path below to find the start2.bin file:
%localappdata%\Packages\Microsoft.Windows.StartMenuExperienceHost_cw5n1h2txyewy\LocalState
Copy the start2.bin file to a central location from where you can distribute it to the other computers/profiles.
Copy the Start Menu to All Users
When deploying the Windows 11 start menu layout on new computers, you can do with copying the layout file to the default user profile folder. But if you also want to replace the layout for existing users, then you will need to copy the file to each user profile folder.
We can both with the help of a small PowerShell script. Make sure that you change the startmenuTemplate path in the script below to your .bin file. The scripts will then copy the .bin file to each profile folder on the computer:
# Source start menu template
$startmenuTemplate = "\\server\repository\Windows\Startmenu win11\start2.bin"

# Get all user profile folders
$usersStartMenu = get-childitem -path "C:\Users\*\AppData\Local\Packages\Microsoft.Windows.StartMenuExperienceHost_cw5n1h2txyewy\LocalState"

# Copy Start menu to all users folders
ForEach ($startmenu in $usersStartMenu) {
  Copy-Item -Path $startmenuTemplate -Destination $startmenu -Force
}
For new users, we will need to copy the file to the default user profile folder. The problem is that the packages folder doesn’t exist by default. But we can just create it can copy the file to it. This way the start menu layout will be loaded once a new user signs in:
# Create default user profile folders and copy start menu layout

# Default profile path
$defaultProfile = "C:\Users\default\AppData\Local\Packages\Microsoft.Windows.StartMenuExperienceHost_cw5n1h2txyewy\LocalState"

# Create folder if it doesn't exist
if(-not(Test-Path $defaultProfile)) {
   new-item $defaultProfile -ItemType Directory -Force
}

# Copy file
Copy-Item -Path $startmenuTemplate -Destination $defaultProfile -Force
Wrapping Up
The .bin files allows us to easily create a template for the start menu. Keep in mind that users still can personalize the start menu after you have applied the template. The current Windows 11 build, 22H2, uses the file start2.bin. The older versions where using start.bin, so it could be that new version migh be using start3.bin for example. So keep an eye on that.
I hope you found this article helpful, if you have any questions, then just drop a comment below.


I could not get this to work with secondarytiles….thinking that perhaps icons need to be copied somewhere…tried copying to msedge localstate directory, but didn’t work…anyone have luck with this approach where the tiles are all seondarytiles?
If the user has already logged in and you deploy an updated one, does it change?
Yes, if you overwrite the existing one in the user profile
It Works great thank you for such a wonderful information
Hi Rudy. Thank you for the article. I was not able to package it properly, I guess. Could you help me package this for Intune deployment?
thanks man. it works like a charm.
i dont usually leave comments but i googled for how to remove adv apps, but its full of stupid sites. yours is the only one that actually held very useful info.
thanks again
It works when i distribute it manually or with a powershell script.
However the nesting doenst work when i distribute it with intune. It will send the .bin and the startlayout is customized just not with nested apps.
Hi Ruud, thanks for this.
I have grouped/nested my apps for office, unfortunately when i distribute the .bin file the startmenu’s dont appear with grouped apps.
I use intune and distribute the bin file as a package.
I have also tryed exporting the json file als a configuration profile but this also doenst give me the nested apps.
Can you help me get nested apps in the startmenu for w11?
Dank je wel
That is strange. Just did a quick test on a newly installed Win11 machine, it nested folders seem to work perfectly here. What happens if you distribute the .bin manually? And check if nested folders is working with other apps perhaps (new machine here doesn’t have Office installed.. )