Dynamic Groups in Entra (formally known as Azure) allow you to dynamically add users to groups based on the users attributes or group membership. This way you can, for example, create nested groups, or automatically group users based on their work location or job title.
Dynamic Membership rules are really powerful and can save you a lot of time when it comes to managing group membership.
In this article
In this article, we will take a look at how to create a Dynamic Group in Microsoft Entra (Azure), and how to use the dynamic membership rules.
Requirements for Dynamic Groups
Dynamic Membership Rules can only be used in combination with Dynamic Groups in Microsoft Entra ID. To use dynamic groups, you will need to have at least Microsoft Entra ID P1 licenses for the users who are part of the groups.
This means that if you have 1000 users in Microsoft 365, and want to dynamically assign 500 users to groups, then you will need 500 Entra ID P1 licenses.
What You Need to Know
Dynamic Groups in Microsoft Entra ID can be used for both Users and Devices, but you can’t create one group that contains both users and devices. It also isn’t possible to create a dynamic group for devices, based on user attributes.
Also good to know is that you can’t manually add or remove users from a dynamic group. Users, or devices, are added automatically based on the membership rule conditions. If the user doesn’t match with a rule anymore, then they are automatically removed from the group.
Devices can only be part of a dynamic security group, whereas users can be part of either a dynamic Microsoft 365 group or a security group.
Creating a Dynamic Group
The first step is to create a dynamic group in Microsoft Entra ID. Dynamic Groups can either by a security group or a Microsoft 365 Group. The difference between the two is:
- Security Group – Used to give group members access to applications, and resources or to assign licenses. We can also use a security group as a nested group.
- Microsoft 365 Group – Gives members access to a shared mailbox, SharePoint site, Teams group, etc
To create a dynamic group, you will need to open Microsoft Entra ID:
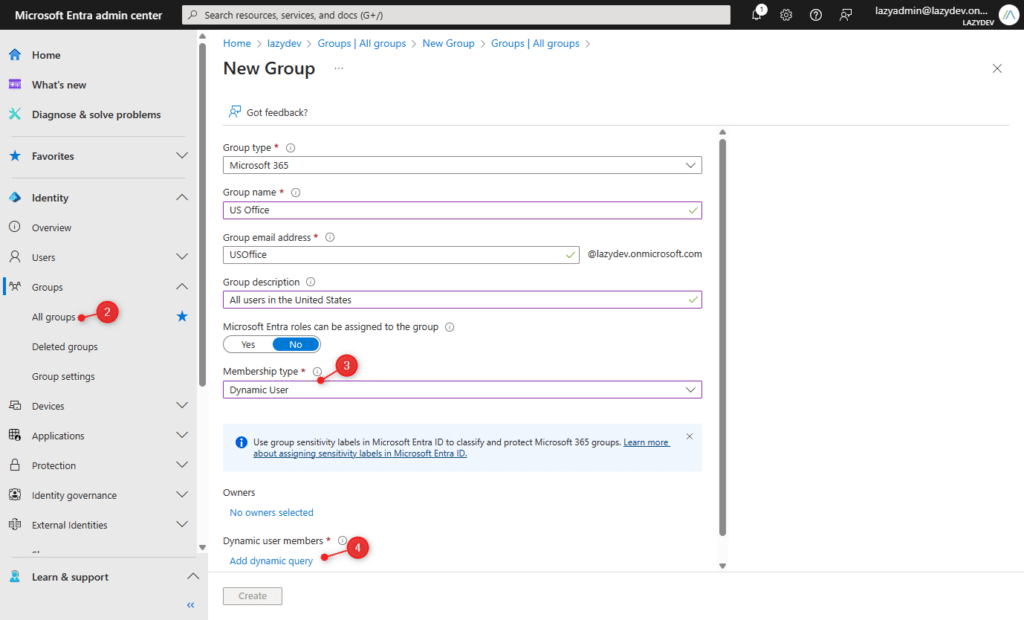
- Open Microsoft Entra ID
- Click on Groups > All Groups
- Fill out the details, and make sure you set Membership type to Dynamic Users (or Dynamic Devices)
- Click on Add dynamic query
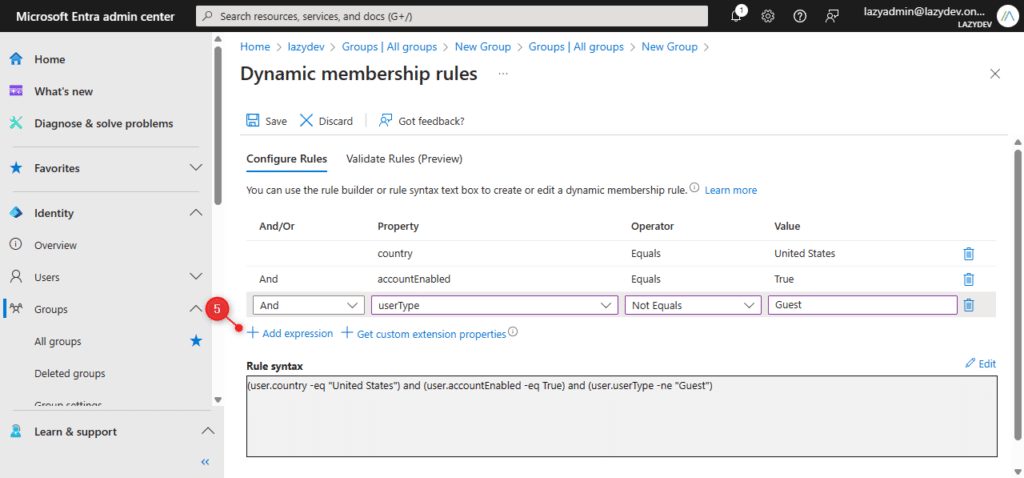
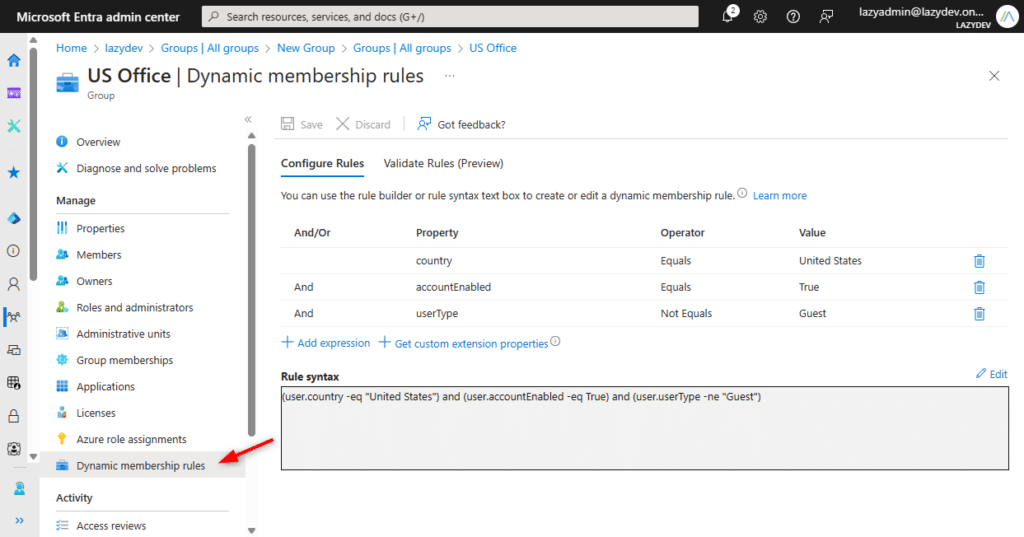
The Dynamic Membership Rules define which users should be added to the group automatically. You can define up to 5 conditions using the Rule Builder, if you need more than the 5 conditions, then you will need to manually write the condition in the Rule Syntax.
So for example, we want to automatically assign all users from our office in the United States to a group. In this case, we can add them based on the country property, which should match the United States.
Also, we only want enabled accounts in the group and don’t want any Guest users to become members of the group.
To add an extra condition, simply click on + Add Expression. Make sure that you set the And/Or condition correctly for your rule.
Validating the Rule
When you have created your dynamic membership rule, you want to validate it. Validating the rule allows you to test the rule against selected users. This way you can verify if your rule works as you expected, before actually applying it.
Rule validation doesn’t work when you are using the MemberOf condition.
- Click on Validate Rule
- Click on Add Users
- Select a couple of users to test the rule one
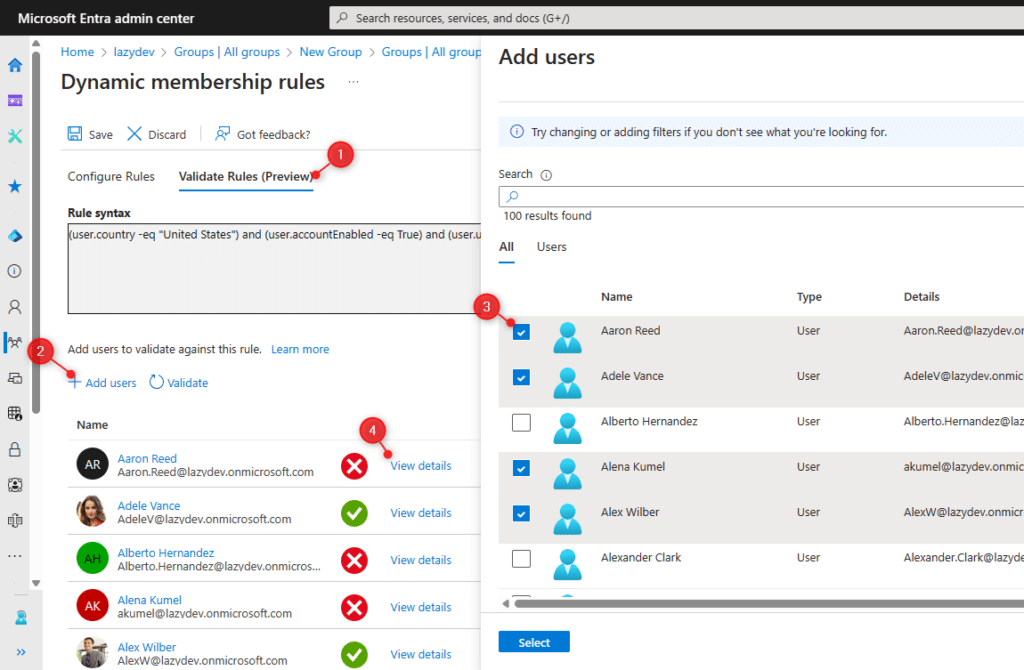
In the results, you will quickly see which users will be added to the group and which users won’t be added. What I really like is that you can see why a user is added or not by clicking on View Details (4).
This will show the verification details which explain which conditions are passed or not allowing you to quickly find any problems in your rule conditions.


Enabling and Processing
When you have configured your rules and they work as expected, then you can Save your Dynamic Membership Rules. This will take you back to the New Group screen. Make sure that all the details are filled in and click on Create to create your new dynamic group.
Depending on the number of users in your tenant, it can take a couple of minutes until the rule processing is completed. You can view the status of the rule processing by opening the newly created group.
The following status messages are possible:
- Evaluating: Changes are saved and being evaluated.
- Processing: Updates are being processed.
- Succeeded: Processing has been completed.
- Processing error: Unable to update due to an error in the membership rule.
- Update paused: Dynamic membership rule updates have been paused.

The Last membership change attribute is also an important one to take note of. This will show the last time when the dynamic rules were processed.
You also have the option to pause the processing (1). This allows you to temporarily stop the rule processing so that users (or devices) won’t be added or removed from the group.
Editing Existing Rules
When you have deployed your Dynamic Group then there comes a time that need to change the dynamic rule. To do this, simply open the group and click on Dynamic Membership Rules. This will open the rule builder as we have seen before.
You can add, edit, or remove expressions in the rule builder or use the rule syntax to edit the rules. When done, make sure that you validate your rules so you are sure that they work as expected.
When done, click on save. It can take a couple of minutes for the memberships to be updated.
Creating Nested Groups
Dynamic Groups also allow us to create nested groups with the help of the MemberOf attribute. When using the MemberOf attribute, members of the selected group will become members of the dynamic group.
These child groups can be either a security group, Microsoft 365 Group, or an on-premise group that is synced to Entra ID.
The example below show how you can create a dynamic group from the members of Group A and B. As you can see in the example, members of Group C, which is a nested group in Group B, won’t become members of the dynamic group.
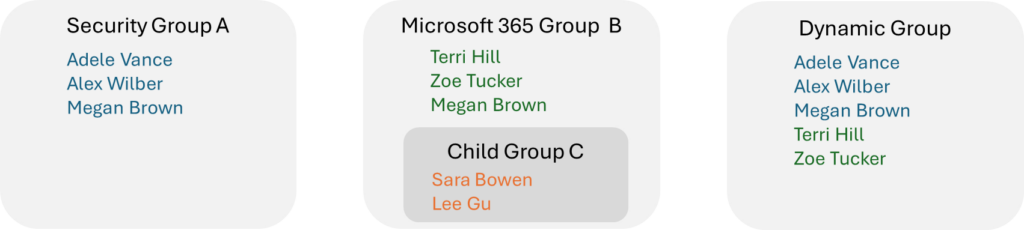
Only direct members of a group will be added as members in the dynamic group when using the MemberOf attribute.
There are also some other limitations that you need to know:
- You can’t use the validate rule feature when using the MemberOf attribute
- You can only add 50 nested groups
- Only 500 dynamic groups can use the MemberOf attribute
- MemberOf can’t be used on a dynamic group is also using MemberOf
- The MemberOf attribute can’t be combined with other rules
To create a nested group, we are going to start with a new Dynamic Group:
- Create a new group and make sure that you set the membership type to Dynamic User
- Click on Add Dynamic Query to open the Rule Builder
- Edit the Rule Syntax (you can’t use the rule builder for this)
- Add the following rule in the Rule Syntax:
# For users
user.memberof -any (group.objectId -in ['groupId', 'groupId'])

# For devices
device.memberof -any (group.objectId -in ['groupId', 'groupId'])
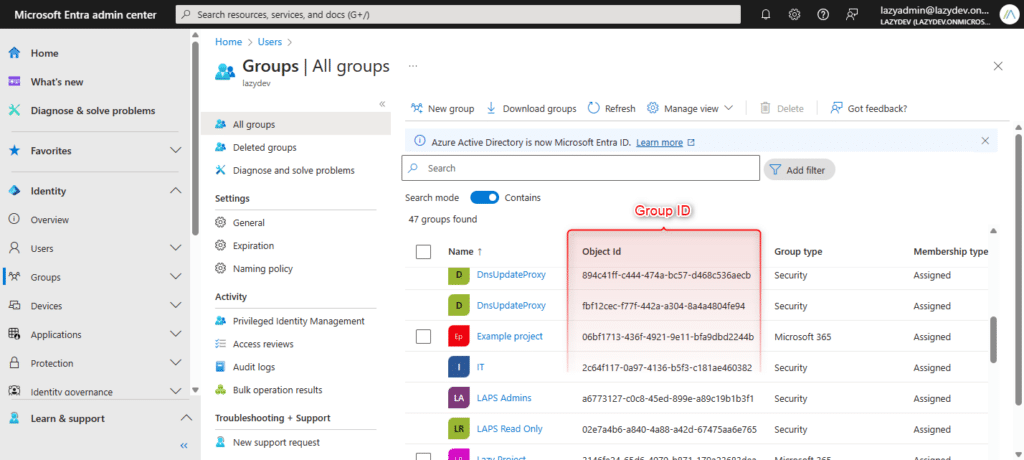
As you can see, we will need to use the Group ID to get all users that are members of the group. You can find the Group ID of a group on the All Groups page (the column Object ID) or by opening the specific group and copying the object ID from the group overview page.
Dynamic Groups with that use the MemberOf rule take longer to process, especially in larger environments. So don’t worry if you don’t see any members in the group after 5 minutes, just give it some time.
Writing More Efficient Rules
Complex dynamic rules can take up a lot of processing time. When you have a large tenant or a lot of dynamic groups, then it’s important to create your rules as efficiently as possible.
Creating simple and straightforward rule expressions really helps with reducing the processing time. This means minimizing the use of wildcards and operators such as-match and -contains. Instead, try to use Equals (-eq) as much as possible. If that is not possible, then it’s more efficient to use Starts With instead of Match or Contains.
# Avoid these
user.jobTitle -match "sen"
user.jobTitle -match ".*?sen.*"
user.jobTitle -contains "senior"

# Better option
user.jobTitle -startswith "Senior"

# Most efficient option:
user.jobTitle -eq "Senior Programmer"
If you need to match an attribute on multiple options, it’s better to use the -in operator, instead of creating using multiple -Or conditions. So for example, when you want to get all users that have one of the following job titles, it’s better to use an -In condition:
# Don't do this:
(user.jobTitle -eq "Senior Programmer")
or (user.jobTitle -eq "Programmer")
or (user.jobTitle -eq "Product Owner")

# Instead:
user.jobTitle -in ["Senior Programmer", "Programmer" , "Product Owner"]
Tips
When you add members to a Microsoft 365 Dynamic Group, they will automatically get a welcome email. This is not something that you always want. We can disable this welcome email with the help of PowerShell.
You will need to connect to Exchange Online first, if you are unfamiliar with this, make sure you read this article.
To disable the welcome message set the UnifiedGroupWelcomeMessageEnable to false for the group. You will need the group ID which you can find in Microsoft Entra ID:
# Connect to Exchange Online
Connect-ExchangeOnline

# Set the welcome message to false
Set-UnifiedGroup -Identity <GroupID> -UnifiedGroupWelcomeMessageEnable:$false
There are a couple of common rules for Dynamic Groups that are quite handy to know
Direct Report Group
This rule allows you to quickly create a dynamic group with all direct reports of a manager. You only need to look up the manager’s object ID. Simply create a new dynamic group and use the syntax below in the Rule Syntax Editor:
# Replace the ID with the user ID of the manager
Direct Reports for "{27e74ef7-f754-46aa-89dc-5aa75422593f}"
All Users
By default, your tenant already has an All Users security group. But if you want to assign all user to a specific group (for licensing) or add all users to a Microsoft 365 group, then use the syntax rule below.
This will add all users to the group, except guest users.
(user.objectId -ne null) -and (user.userType -eq "Member")
All Devices
You can do something similar to get all devices in your tenant:
device.objectId -ne null
Wrapping Up
Dynamic Groups in Microsoft Entra ID can really save you a lot of time when set up correctly. It allows you to automatically add users to the correct groups, based on their attributes.
Make sure that you optimize your rules as much as possible, so the processing time is kept to a minimum.
I hope you liked this article, if you have any questions, just drop a comment below.