Building a Smart Bathroom Mirror was on my to-do list for a long time. I started with this project 3 years ago, but when I was almost finished, we decided to buy another house. Now 3 years later I found the time to pick the project up again.
For the project, I am going to use the MagicMirror2 open-source platform, a Raspberry Pi 3, and a 19-inch screen from a notebook. Initially, the plan was to use an LCD panel from a 24-inch monitor, but the LCD panel from a notebook is much thinner.
In this article
In this article, I am going to explain how to install the smart mirror software and all the used modules, and how to build the mirror.
Requirements
- Raspberry Pi 4 (or a model 3B will also work)
- SDCard
- LCD Display from a notebook
- Display controller
- HDMI cable
- Brass Standoff spacers M2.5 or M3
- Super Glue
- One-way mirror glass or one-way mirror film
- Angle brackets (10mm)
Installing and Configuring the Raspberry Pi
Before we can configure the Smart Mirror we first need to install and configure the Raspberry Pi. This involves a couple of steps to install the necessary software on the microSD card, configure the Pi with SSH, and, of course, install the MagicMirror2 software.
Step 1 – Install Raspberry Pi OS
The first step is to install Raspbian on the microSD card. To use the MaigcMirror we will need the desktop version of Raspberry Pi OS. To install it on the microSD card we will use the Raspberry Pi Imager tool.
With this tool, we can’t only install Raspberry Pi OS but also enable SSH, configure the Wireless network, and set the username and password.
- Click Choose OS
- Select Raspberry PI OS (32-bit)

- Click on Choose Storage
- Select your microSD card, (check the drive letter!)
- Click on the Gear icon in the lower right corner.
- Enable SSH with password authentication
- Set username and password
- Configure wireless LAN

Step 2 – Start up and connect to the Raspberry Pi
Plug the SDcard in the Raspberry Pi, USB-C power cable, and connect an ethernet cable if you haven’t configured the WiFi The Raspberry Pi will now automatically start. It can take a couple of minutes the first time, optionally connect a monitor if you want to follow the boot process.
To find the IP Address of your Pi you can use Advanced IP Scanner or look if you have an UniFi network, just look in the client devices list.
We can now connect to the Raspberry Pi over SSH. For this, you can use any CLI, like Windows Terminal, PowerShell, or Putty.
# Login to your Pi with SSH
ssh pi@192.168.1.x
Step 3 – Configure Raspberry PI
So we are now connected to our newly installed Raspberry Pi. Before we install the MagicMirror software, we are first going to configure and update the Pi. The first thing we are going to do is set a fixed IP Address. This way we can always easily connect to the Pi and don’t have to look up the IP Address.
- Open the network config file by typing the following cmd
sudo nano /etc/dhcpcd.<strong>conf</strong>
- Scroll a bit down and enable the following lines by removing the # from it:
# Example static IP configuration:
interface eth0
static ip_address=192.168.1.213/24    # < change this to IP Address that want to use
#static ip6_address=fd51:42f8:caae:d92e::ff/64
static routers=192.168.1.1   # < change this to your routers IP Address
static domain_name_servers=192.168.1.1 1.1.1.1  # < change this to your routers IP Address and DNS
- Give your Pi a static IP Address in the .200 range. Also, make sure you configure the router’s IP Address correctly.
When done save and close the file by pressing ctrl + x and pressing Y to save it.
The next step is to make sure that the Pi is fully up to date. Run the following command to install the latest packages:
sudo apt-get update && sudo apt-get upgrade -y && sudo apt-get autoremove && sudo apt-get autoclean
Install and Configure MagicMirror
We are now ready to install the MagicMirror software. I am going to do the manual installation method because I like to know what is being installed and where. But I have to mention that there is also an installation script that you can use. This script can also be used to automatically update the MagicMirror software.
First, we are going to install Node.js:
# Install Node.js
curl -sL https://deb.nodesource.com/setup_16.x | sudo -E bash -
sudo apt install -y nodejs
The next step is to clone and install the MagicMirror software. Running npm install can take up to 10 min on a Raspberry Pi 3, with no to minimal console output. Just give it some time!
# Clone the MagicMirror Repository
git clone https://github.com/MichMich/MagicMirror

# Navigate to the MagicMirror folder
cd MagicMirror

# Run the install
npm install
The last step, for now, is to copy the configuration file and start the MagicMirror software
# Copy the config file
cp config/config.js.sample config/config.js

# Run the MagicMirror
npm run start
The MagicMirror should now start with the default configuration.
Configuring Raspberry Pi OS
We have the Pi and MagicMirror software running, now it’s time to configure the Pi and MagicMirror. If you have connected a monitor or other display to your Pi, you might have noticed that the screen orientation is incorrect for our smart mirror. Also, the screen goes to sleep mode after a few seconds, and the MagicMirror doesn’t start on its own.
So the first step is to make some additional changes to our Pi:
- Rotate the screen
- Disable screensaver
- Hide mouse pointer
- Autostart MagicMirror
Rotate the screen
To rotate the screen we will need to change the config file /boot/config.txt. We will be using the nano to make the file changes:
sudo nano /etc/xdg/lxsession/LXDE-pi/autostart
Add the following lines to the end of the file. Leave the file open for the next step.
@xrandr --output HDMI-1 --rotate right # or left
Disable screensaver
The next step is to make sure that the screen stays on. By default, the screen will turn off after a few minutes. Add the following lines to the end of the file, and save and close the file with Ctrl + X , and press Y
# Add the lines below in the autostart file (sudo nano /etc/xdg/lxsession/LXDE-pi/autostart)
@xset s noblank
@xset s off
@xset -dpms
We also need to edit the lightdm.conf file
sudo nano /etc/lightdm/lightdm.conf
Add the following lines to the end of the file. Press Ctrl + X and type Y to save and close the file.
[SeatDefaults]
xserver-command=X -s 0 -dpms
Hide the mouse pointer
Because we are using the full desktop version of Raspberry Pi OS, it’s possible that the mouse pointer is displayed. To remove it we are going to install the package unclutter
sudo apt-get install unclutter
We can add unclutter to the autostart file with the option to remove the mouse pointer after 5 seconds when it’s not used
sudo nano /etc/xdg/lxsession/LXDE-pi/autostart

# Add the following line to the end of the file
@unclutter -display :0 -idle 5 -root -noevents
Autostart MagicMirror
In case of a power loss or if the MagicMirror software crashes we want the smart mirror to restart automatically. For this, we are going to use the package PM2. This is a process manager for Node.js applications.
# Install PM2
sudo npm install -g pm2

# Configure PM2 to start on boot
pm2 startup
PM2 will examine your system and show you which command you need to run to start PM2 automatically on boot. Simply copy and paste the suggested command, in my case it was:
sudo env PATH=$PATH:/usr/bin /usr/lib/node_modules/pm2/bin/pm2 startup systemd -u pi --hp /home/pi
Next, we are going to create a start script for our smart mirror. Just follow the steps below to create the script:
cd ~  # navigate to your home directory
nano magicmirror.sh # Create a new shell file

# Add the following lines in the files
cd ./MagicMirror
DISPLAY=:0 npm start

# Press Ctrl+X and type Y to save and close the file
# Make the file executable
chmod +x magicmirror.sh

# Start the MagicMirror with
pm2 start magicmirror.sh
pm2 save  # Saves the current sessions and makes sure that the software is started after reboot
We can now also start, stop and restart the MagicMirror with the following commands:
sudo rebo
pm2 stop magicmirror
pm2 show magicmirror
Turning the display off and on
The smart mirror doesn’t have to be on 24/7. I have placed it the bathroom, so I only want the screen to be turned on in the morning and evening. To accomplish this we can use a cronjob. Cronjob’s allows you to run commands on a schedule time, or every hour for example.
I am not going to explain cronjobs completely, but you can find a good generator here online. To turn the monitor off we can use the following command:
xrandr --output HDMI-1 --Off
And to turn it on again :
xrandr --output HDMI-1 --auto --rotate left
I need to rotate the screen to the left, you can leave that part out if needed in your case. We can use these commands in our cronjob. Type crontab -e and create the following schedule for example:
# Turn the display on at 6.30AM at weekdays
30 6 * * 1-5 xrandr --output HDMI-1 --auto --rotate left >/dev/null 2>&1
# Turn the display off at 8.30AM at weekdays
30 8 * * 1-5 xrandr --output HDMI-1 --Off >/dev/null 2>&1

# Turn the display on at 10.00PM  every day
00 22 * * * xrandr --output HDMI-1 --auto --rotate left >/dev/null 2>&1
# Turn the display off at 10.45PM
45 22 * * 1-5 xrandr --output HDMI-1 --Off >/dev/null 2>&1
We have now made all the necessary configuration changes to use the MagicMirror for our smart mirror. In the next step, we are going to configure the magic mirror with the modules that we want to use.
Customizing the MagicMirror
With the Raspberry Pi configured we can start customizing our Magic Mirror installation. There are many modules created for MagicMirror, but a lot of them are not supported anymore. So I first created a plan of what I wanted to display on the smart mirror in the bathroom.

When you are going to look at which modules you can use, it’s important to check if they are maintained. Each module that is listed links to a GitHub repository of the module. Here you can clearly see when the last updates were made on the module. If the last update was more than a year ago, then there is a chance that the module won’t work anymore.
I have picked the following modules that I am going to use for my Smart Mirror:
- Weather: MMM-OpenWeatherMapForecast
- Time: built-in module
- Travel time: MMM-Google-Route
- Calendar: MMM-GoogleCalendar
- Stock market: MMM-Jast
- Scheduler: MMM-ModuleScheduler
Each module needs to be installed on the Raspberry Pi and configured. The configuration is done in the config file that we copied earlier and is located in /home/pi/MagicMirror/config. Now we can modify the config file through the console, using nano. But I find it easier to open the config file through the FTP client tool.
Install WinSCP and create a new session for your Raspberry Pi. You can use the same SSH credentials as you use to connect to Pi. You can now browse to your config folder and open config.js.
I will describe below how I installed and configured each module, but you can find the full documentation of the modules on their GitHub pages. You can also find all the configs and custom stylesheet that is used here in my GitHub repository.
Weather Module
We are first going to install the Weather module. To install the module you will need to navigate to the MagicMirror/modules folder in your console.
# Open the modules folder
# ~ is the home directory of the user Pi.
cd ~/MagicMirror/modules

# Clone (copy) the module
git clone https://github.com/MarcLandis/MMM-OpenWeatherMapForecast.git

# Open the module folder
cd MMM-OpenWeatherMapForecast

# Run the install
npm install
This module gets the weather information from OpenWeatherMap.org. To do this you will need to create a free account and request an API key. Go to https://openweathermap.org and create a free account. Once complete you can navigate to your profile to create an API Key.
Now will need to add the module to our config.js file. Open the file through your FPT client (WinSCP for example) and replace the calendar module with:
{
  module: "MMM-OpenWeatherMapForecast",
  header: false,
  position: "top_left",
  classes: "default everyone",
  disabled: false,
  config: {
    apikey: "<api-key>",
    latitude: "52.291610",
    longitude: "4.578690",
    updateInterval: "10",
    units: "metric",
    showSummary: true,
    showForecastTableColumnHeaderIcons: false,
    showHourlyForecast: true,
    showDailyForecast: false,
    forecastLayout: "tiled",
    mainIconset: "6oa",
    iconset: "1c",
    animateMainIconOnly: true,
    concise: true,
    label_high: "",
    label_low: "",
 }
},
To view the results, save the file and go back to your console. Enter the following command to restart the smart mirror and show the results:
pm2 restart ~/magicmirror.sh
I have also done some custom styling for the modules, but we will get to that later.
Date – Time Module
For the clock, we can keep the built-in module. There are some configuration options that we can change. We are going to remove the second and use custom formatting for the date and time. Later we will use CSS to place the date below the time.
{
 module: "clock",
 position: "top_right",
 config: {
  displaySeconds: false,
  dateFormat: "dddd, MMMM Do",
 }
},
Travel Time
When you are standing for the mirror in the morning it’s always good to know if you need to rush due to traffic jams, take a detour, or just can relax. We will be using the Google Directions API to calculate the two best routes to take.
First, we are going to install the module:
# Open the modules folder
cd ~/MagicMirror/modules

# Clone (copy) the module
git clone https://github.com/mrdis/MMM-google-route.git
We will need a Google API key to get the route data:
- Create an account at the Google Cloud Console
- Once you have created a project, click on Enabled APIs and Services
- Click + Enable API and Services in the top center
- Search for Maps and choose Maps JavaScript API
- Click Enable and wait for it to finish
- Do the same for Directions API
- Go to Credentials in the left menu
- Click + Create Credentials in the top center and choose API key
- Copy your key and add it to your config file (see below)
To use the API you will also need to link your Google Cloud Console project to a billing account. We can use the API for free up to $200 per month. With normal configuration, you won’t reach that with the smart mirror.
Go back to your configuration file and add the following block to your modules list:
{
 module: 'MMM-google-route',
 position: 'bottom_left',
 config: {
   key: '<YOUR_KEY>',
   directionsRequest:{
     origin: '<ROUTE START>',
     destination: '<ROUTE FINISH>'
   },
   refreshPeriod: 10,
   showMap: false,
   showAge: false,
   width: "500px",
 }
}
Google Calendar
The Magic Mirror comes with a built-in calendar, but that one is based on iCal or you will need extra modules to sync the calendar. The module that we are going to use uses Google API to get your calendar information.
First, install the module:
# Open the modules folder
cd ~/MagicMirror/modules

# Clone (copy) the module
git clone https://github.com/randomBrainstormer/MMM-GoogleCalendar.git

# Install the Google API module
npm install googleapis
With the module installed, we are going to add the configuration. Authentication can be done after the config file is applied. You will need your Google calendar ID for the config. You can find it by opening your Google Calendar, hovering over the calendar name on the left side (for example, hover over family), selecting Settings, and scrolling a bit down for the id:
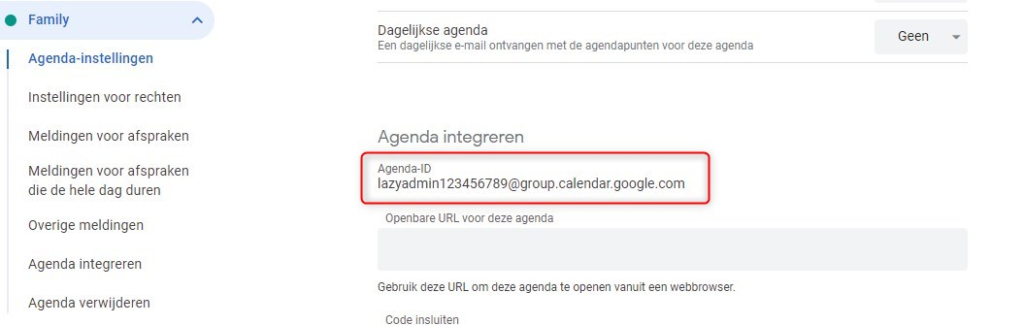
Add the following config, with your calendar id to the config.js file:
{
 module: 'MMM-GoogleCalendar',
 header: "Upcoming appointments",
 position: "bottom_right",
 config: {
  calendars: [
     {
      symbol: "calendar-day",
      calendarID: "lazyadmin123456789@group.calendar.google.com"
     },
   ],
   maximumEntries: 5,
   maximumNumberOfDays: 3,
   displaySymbol: false,
   fetchInterval: 3600000, // once per hour
   hideOngoing: true
 }
},
Just like with the travel time module, we will need to authenticate the module. Instead of an API key, we are going to use the oAuth method. For this method, you will need to sign-in in the same browser as where the Magic Mirror software is running. To do this you can connect a keyboard ad mouse or use VNC.
VNC can simply be enabled in the Raspberry Pi config:
- Type
sudo raspi-configto open the configuration - Select 3 Interface options
- Choose VNC
- Select Yes and exit the config with Esc
You can now use the tool RealVNC to connect to the Pi, using the IP address and same login as you are using for SSH. Follow the instructions here to authenticate the module.
Stock Market
If you are interested in the stock markets, then the Just another Stock Ticker is a great minimalistic option. It fits nice into the layout we are creating and follows multiple stock values. The data is retrieved from Yahoo’s finance API.
# Open the modules folder
cd ~/MagicMirror/modules

# Clone the repository
git clone https://github.com/jalibu/MMM-Jast.git

# Open the module folder and install
cd MMM-Jast
npm install --only=production
Add the following config to your config.js:
{
  module: "MMM-Jast",
  header:  "Stocks",
  position: "bottom_left",
  classes: 'restoftheday_scheduler',
  config: {
    currencyStyle: "code", // One of ["code", "symbol", "name"]
    fadeSpeedInSeconds: 3.5,
    lastUpdateFormat: "HH:mm",
    maxChangeAge: 1 * 24 * 60 * 60 * 1000,
    numberDecimalsPercentages: 1,
    numberDecimalsValues: 2,
    scroll: "none", // One of ["none", "vertical", "horizontal"]
    showColors: false,
    showCurrency: false,
    showChangePercent: true,
    showChangeValue: false,
    showChangeValueCurrency: false,
    showHiddenStocks: false,
    showLastUpdate: false,
    showPortfolioValue: false,
    showPortfolioGrowthPercent: false,
    showPortfolioGrowth: false,
    updateIntervalInSeconds: 300,
    useGrouping: false,
    virtualHorizontalMultiplier: 2,
    stocks: [
      { name: "S&P 500 InfoTech", symbol: "QDVE.de"},
      { name: "Vanguard All-World", symbol: "VWCE.de"}
    ]
  }
},
Scheduler
We are going to use the scheduler module for two things, to show the travel time only in the morning (and the rest of the time the stock market) and to only refresh the travel time in the morning to limit the API calls.
# Install the Scheduler module
# Open the modules folder
cd ~/MagicMirror/modules

# Clone the repository
git clone https://github.com/ianperrin/MMM-ModuleScheduler.git

# Run npm install inside the module folder
cd MMM-ModuleScheduler
npm install --production
Next, we will need to add the module to the config.js file. Just add it below the Stock market module.
{
  module: 'MMM-ModuleScheduler',
  config: {
    notification_schedule: [
        // Refresh the route every minute from 6 AM to 9:00 AM, monday to friday
        { notification: 'MMM-google-route/refresh', schedule: '* 6,9 * * 1-5' }
    ],

    global_schedule: [
      // SHOW MODULES WITH THE CLASS 'morning_scheduler' AT 06:00 AND HIDE AT 09:00 EVERY DAY
      {from: '0 6 * * *', to: '0 9 * * *', groupClass: 'morning_scheduler'},
      // SHOW MODULES WITH THE CLASS 'morning_scheduler' AT 09:00 AND HIDE AT 06:00 EVERY DAY
      {from: '0 9 * * *', to: '0 6 * * *', groupClass: 'restoftheday_scheduler'}
    ]
  }
},
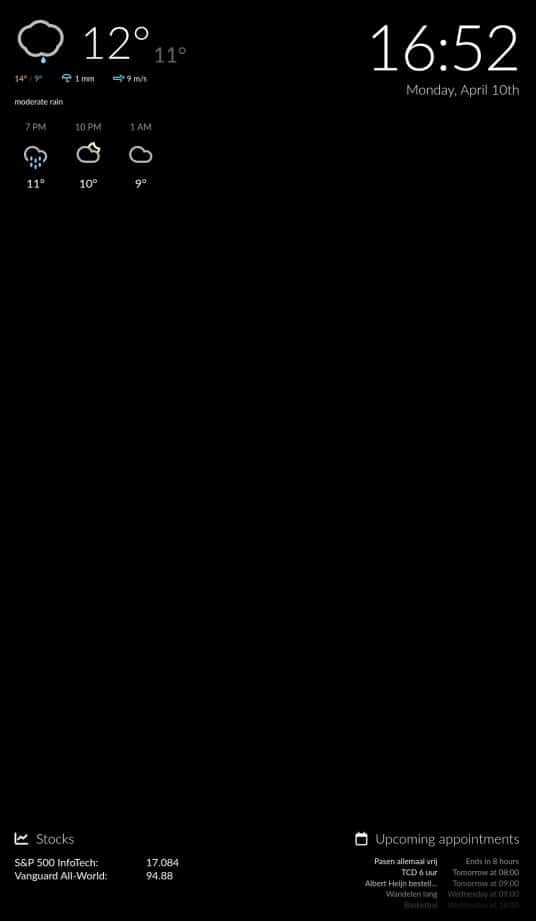
Styling the Smart Mirror
We now have all the modules running that we want to use, but if you restart the Magic Mirror you will see that the layout isn’t quite what we want. So we will need to do some additional styling to get the looks that we want.
The styling can be changed in the custom.css file which is located in the CSS folder. I am using a custom font, Lato, which I have placed in the folder Fonts. We are going to start with some general styling and then I have created the styling for each module.
@import url('/fonts/latofonts.css');

:root {
  --color-text: #999;
  --color-text-dimmed: #666;
  --color-text-bright: #fff;
  --color-background: black;

  --font-primary: "LatoWeb";
  --font-secondary: "LatoWeb";

  --font-size: 20px;
  --font-size-small: 0.75rem;

  --gap-body-top: 60px;
  --gap-body-right: 60px;
  --gap-body-bottom: 60px;
  --gap-body-left: 60px;

  --gap-modules: 30px;
}
body, html {
  font-family: "LatoWeb", sans-serif;
}
.large{
  font-size: 4.25em;
  font-family: 'LatoWebLight';
}
header{
  border-bottom: none;
  color: #fff;
  font-family: 'LatoWebLight';
  font-size: 1.3em;
  text-transform: none;
  margin-bottom: 20px;
}
/*
  Weather
*/
.MMM-OpenWeatherMapForecast{
  width: 500px;
}
.MMM-OpenWeatherMapForecast .current-conditions-wrapper .current.feelslike{
  font-size:2em;
  line-height:60px;
}
.MMM-OpenWeatherMapForecast .summary{
  color: #fff;
}
.MMM-OpenWeatherMapForecast .module-content{
  width: 500px;
}
.MMM-OpenWeatherMapForecast .wrapper.tiled .forecast-container{
  margin-left:-10px;
  border:none;
  width:300px;
}
.MMM-OpenWeatherMapForecast .wrapper.tiled .forecast-container .forecast-item .time, .MMM-OpenWeatherMapForecast .wrapper.tiled .forecast-container .forecast-item .day-name{
  font-size:17px;
}
.MMM-OpenWeatherMapForecast .wrapper.tiled .forecast-container .forecast-item .precipitation-container, .MMM-OpenWeatherMapForecast .wrapper.tiled .forecast-container .forecast-item .wind-container{
  display:none;
}
.MMM-OpenWeatherMapForecast .wrapper.tiled .forecast-container .forecast-item{
  border-bottom:none;
}
/*
  CLOCK
*/
#module_2_clock .digital {
  display: flex;
  flex-direction: column;
}
#module_2_clock div.date {
  order: 2;
  color: #fff;
  font-size: 1.3em;
  font-family: 'LatoWebLight';
}
#module_2_clock div.time {
  order: 1;
  font-weight: 300;
  font-size: 6em;
  letter-spacing: -3px;
  color: #fff;
}

/*
  Travel Time
*/
.region.bottom.left, .region.bottom.right{
  height: 250px;
}
.MMM-google-route header::before{
  display: inline-block;
  font-style: normal;
  font-variant: normal;
  text-rendering: auto;
  -webkit-font-smoothing: antialiased;
  font-family: FontAwesome;
  font-weight: 400;
  content: "\f017";
  margin-right: 15px;
}
.MMM-google-route tr td:first-child{
  width: 100px;
}
.MMM-google-route tr td:last-child{
  width: 300px;
}
/*
  Calendar
*/
.MMM-GoogleCalendar header::before{
  display: inline-block;
  font-style: normal;
  font-variant: normal;
  text-rendering: auto;
  -webkit-font-smoothing: antialiased;
  font-family: FontAwesome;
  font-weight: 400;
  content: "\f133";
  margin-right: 15px;
}
/*
  Stock
*/
.MMM-Jast header::before{
  display: inline-block;
  font-style: normal;
  font-variant: normal;
  text-rendering: auto;
  -webkit-font-smoothing: antialiased;
  font-family: FontAwesome;
  font-weight: 400;
  content: "\f201";
  margin-right: 15px;
}
.MMM-Jast .jast-stock{
  font-size: 1rem;
  line-height: 1.25;
  color: #fff;
  width:400px;
}
.MMM-Jast .jast-stock span{
  width:150px;
}
After you have added the custom stylesheet you only need to refresh the browser to see the results.
Building the Smart Bathroom Mirror
In our bathroom, we have a mirror cabinet with 3 doors. I am going to replace the center door with a custom door with a smart mirror in it. To make the door I used water-resistant plywood and cut out the center of the panel to fit the LCD display in. I have painted the plywood with matt black paint, this way you will get the best reflection from the mirror, and sealed the edges of the plywood with a wood veneer edge banding.
For the mirror itself, you have two options:
The film can be applied to a sheet of acrylic or even to glass. The mirror film is cheaper and when used with acrylic a lighter and safer option. Acrylic can be bent to a certain extent and it doesn’t break.
But the advantage of two-way mirror glass is that the reflection of it is much better, and also the visibility of the screen is better when used in a well-lit environment. You can check out the video below for a good compression between the two:
If you go for the glass option, then try to get the Pilkington MirroView glass. This glass is specially designed for Smart Mirrors.
You can glue the glass onto the wood, but make sure that you use transparent glue.
Wiring up the display
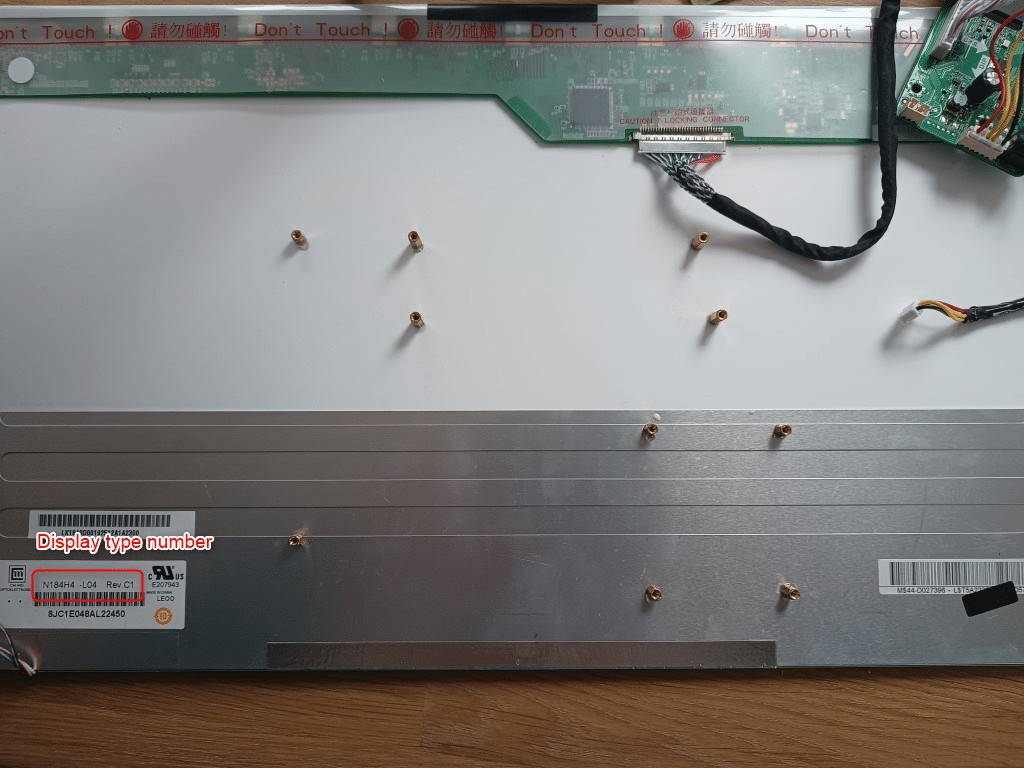
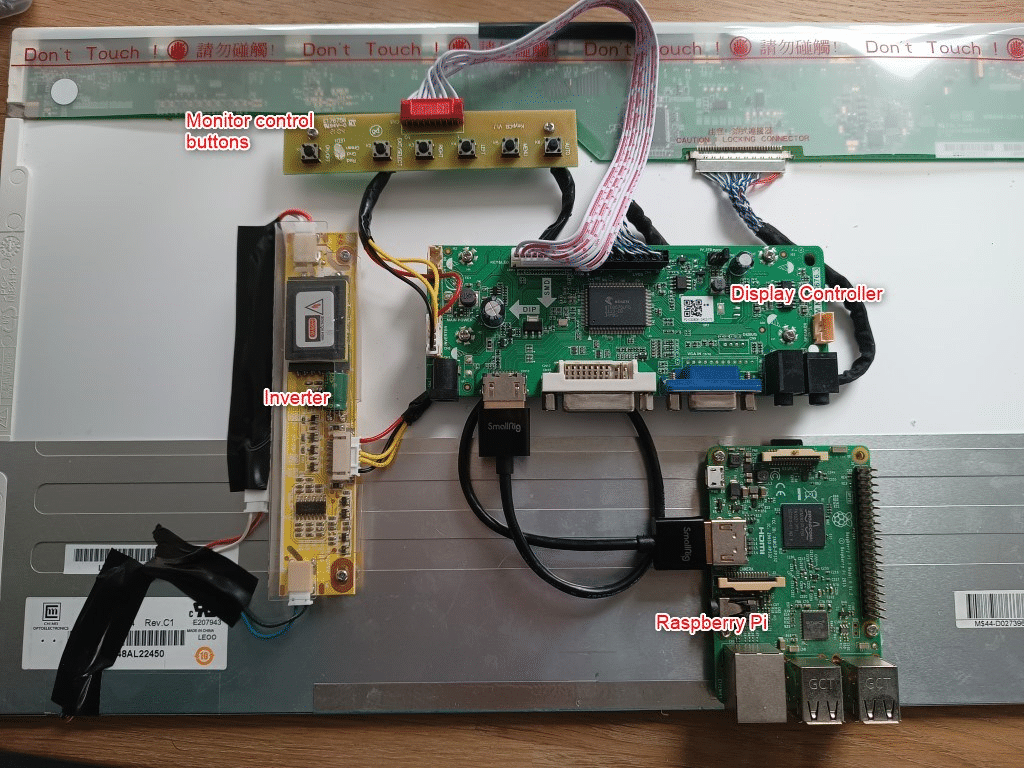
As mentioned in the beginning, I have chosen to use a display from a notebook. The advantage of notebook displays is that they are very thin, don’t require a lot of power, and are very light. There is however a downside, you will need a custom controller for the display. The controller is used to power the backlight of the display and connect the HDMI cable to the Raspberry Pi.
You can find these controller kits on Amazon and AliExpress. To find the correct kit you will need to look up the display number, which you will find on the back of the display after removing it from the notebook.
You can also buy the displays (LCD screen) online, for example here you can find the 18,4″ display that I used.
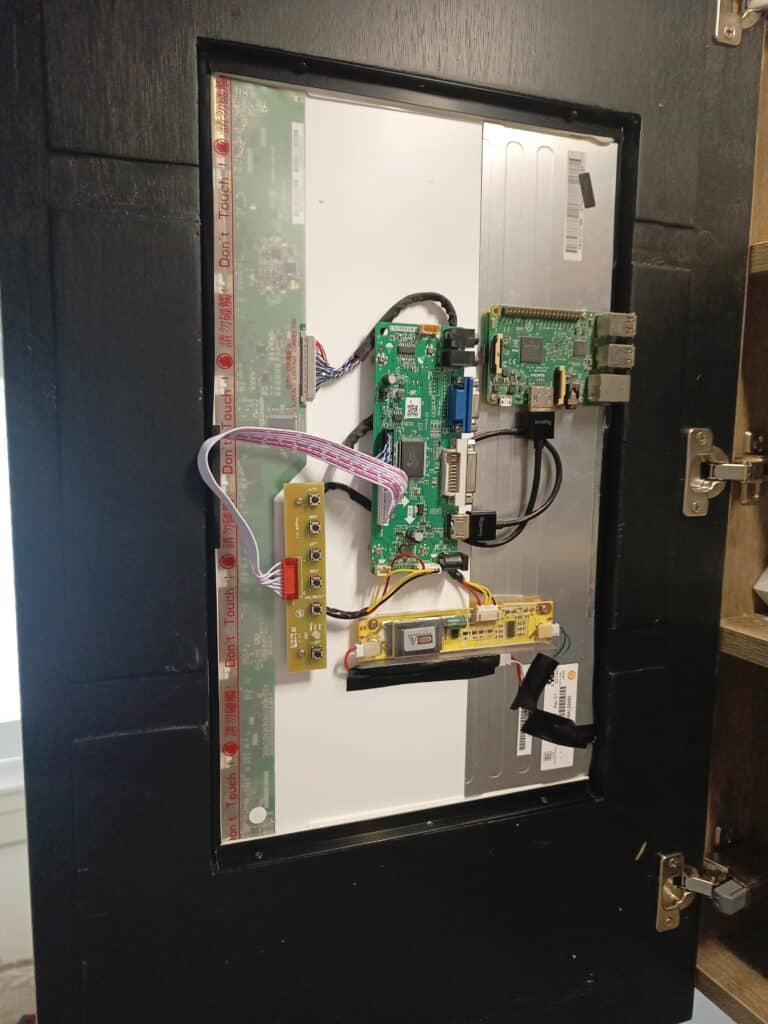
We need a place to mount the controller, inverter, and Raspberry Pi. I have used brass standoffs that I clued on the back of the LCD panel with super glue. The standoffs allow you to easily mount the different boards and also to hide some of the wires underneath them.
Mounting the Display
I have taped the edges of the display with black electrical tape. This way they won’t be visible through the mirror. To keep the display in place I have used small 10mm angle irons. All the components are still exposed at the moment, but I will probably cover it with a 3d printed plate.
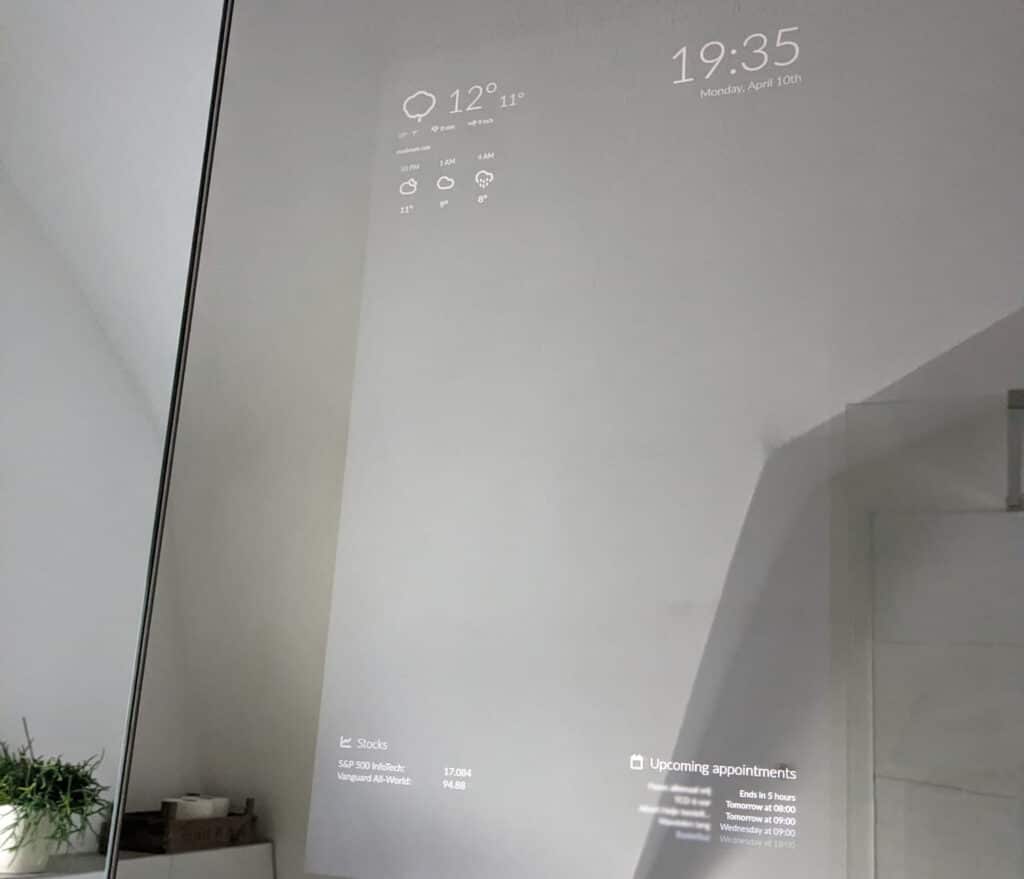
The Smart Mirror Result
I have used normal one-way mirror glass, and one of the downsides of it is that the glass is a bit darker (a bit more greyish instead of blueish like a normal mirror). So with 3 mirrors side-by-side you clearly see a difference. Another issue with it is that due to the tint of the glass, you get a less brighter view of the display behind it.
If you stand in front of the mirror, the text on the display is perfectly visible, but from an angle, you will barely see it. So I am probably going to replace the one-way mirror with the Pilkington MirroView glass, even though it’s almost twice as expensive.
The display panel self is barely visible. In the picture above you can clearly see the backlight of the panel, but in person, you only notice it from an angle if the lights are off in the bathroom. When you stand in front of it, or when the bathroom lights are on, you won’t see the backlight from the LCD display, but you can still clearly see the information on the screen.
The mirroring function is still perfect, there is no difference between the Smart mirror and the normal mirrors next to it (besides the color).
Wrapping Up
Smart Mirrors are not new, they were very popular around 2017. Personally, I find the bathroom the perfect place for a smart mirror. The information like upcoming appointments and travel time are really helpful in the morning.
The MagicMirror software makes it really easy to get the software up and running. There are a lot of modules available at the moment, but make sure that they are still maintained.
If you have any questions about this project, then just drop a comment below.


Are you at all concerned about steam/moisture damaging the electronics? Is just having it tucked into the wall sufficient?
I have it running now for 6 months, and it’s still running fine. The heat generated by the backlight, Pi and adapter will keep most moisture away. Bonus point of the smart mirror in the bathroom is that the mirror no longer fogs up.
don’t work for me too.
I have replaced the links.
Aliexpress links don’t work for me?