My original post about how to repair your Lumea when the batteries are dead is becoming quite popular. As a result an electronics designer from the UK, Shamus Husheer, reached out with another, cheaper solution.
He was handed a dead Lumea and just like you did, searched for a solution online. He found my original post and noticed that the Lumea is using a LiIon battery. As an electronics designer he knew a better, cheaper way to fix the battery that he would love to share:
Warning
The method below works, but can be dangerous. In theory it’s possible to cause fire when reviving an Li-Ion battery with the method below. The safest method is to replace the batteries.
Use the method below at your own risk!
The background (you can skip this if you like):
The underlying problem with the Lumea is that it uses a LiIon battery, yet the charger circuit in the device breaks some fundamental rules for designing such things. When fully discharged, a LiIon battery needs to be gently charged at a small constant current (e.g. 0.02A) until it reaches approximately 3V, after which point it can be safely charged at the full current (e.g. 1.0A).
The Lumea detects that the battery is discharged to below 3V, and so for safety reasons won’t apply the full 1.0A charge unless the battery voltage is over 3V. But for reasons either of design incompetence or commercial cunning, it does not apply a low-current charge to fully discharged batteries, hence the problem when you leave one discharged for months.
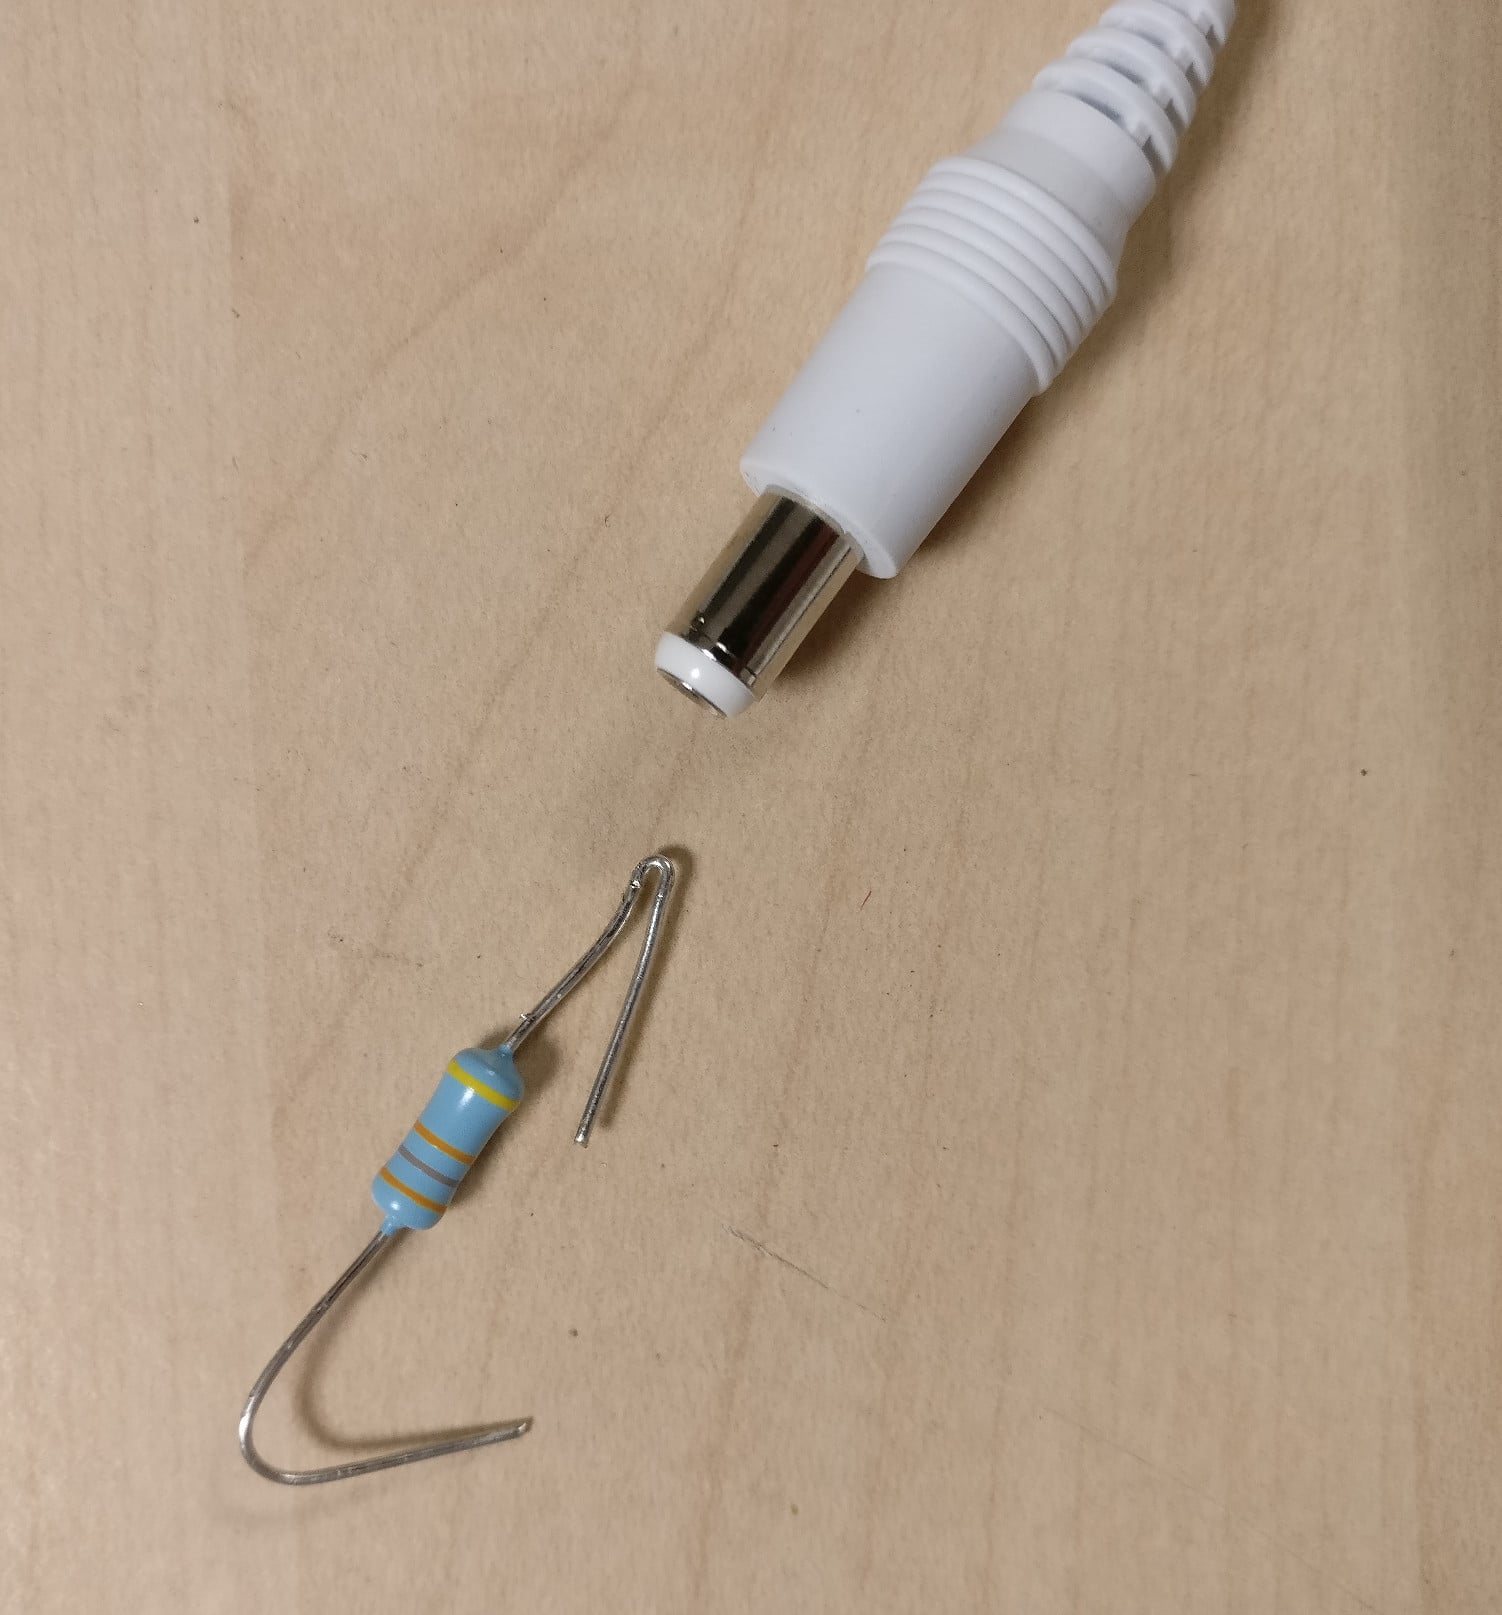
We will make an incredibly simple current-limited charger from the Lumea’s own power supply and a single component – a resistor. The Lumea power supply is 8.5VDC, which is about what two fully charged LiIon batteries can deliver in series (which is how they’re wired). Worst case, if you get the power supply around the wrong way, we want to limit the current to a safe level (less than 0.1A). That means we need a resistor of about (8.5+8.5)/0.1 = 170ohm, and in this worst-case scenario would be dissipating 1.7W of heat (enough to feel, but entirely safe). A convenient, easily available value is 180ohm, which has the color code brown-grey-brown, and is easily available in a 2W power rating for a few cents.
When fully discharged, this resistor will allow us to charge the batteries with (8.5-0)/180 = 0.047A, and when at 3V per battery (with two in series) we will charge at (8.5-6)/180 = 0.014A. Because only a small amount of charge is necessary, on my Lumea this took only about 15 minutes from the dead to alive enough to charge normally.
The total charge delivered over 1 hour, after the batteries reach 3V each, will be less than 0.014AHr. The batteries are rated for >1Ahr each, so it’s entirely safe to leave them charging through this resistor for an hour (but don’t leave them overnight).
The solution:
There is nothing wrong with your battery – you just need to give it a tiny bit of juice, at a safe level of current, then the Lumea’s own internal charging system can take over. The easiest way to do this is to use the Lumea’s own charger, and a 180 ohm, 2W resistor (available from any electronic shop for a few cents, e.g. £0.76 for a pack of 10 here: http://uk.rs-online.com/
Open your Lumea as per the photo [in the original blog post], but don’t even bother taking the battery holder fully out. All we need to do is locate the red and black terminals at the bottom of the battery pack (not the terminals of the charger inlet).
Hold the outer ring of the charger barrel against the black (negative) terminal – this can be held in place using e.g. a clothes peg.
Push one end of the resistor into the inside of the barrel (it’s easier to do if you bend the resistor lead back onto itself to make a snug fit).
Connect the other end of the resistor to the red (positive) terminal, and hold it there with e.g. a clothes peg.
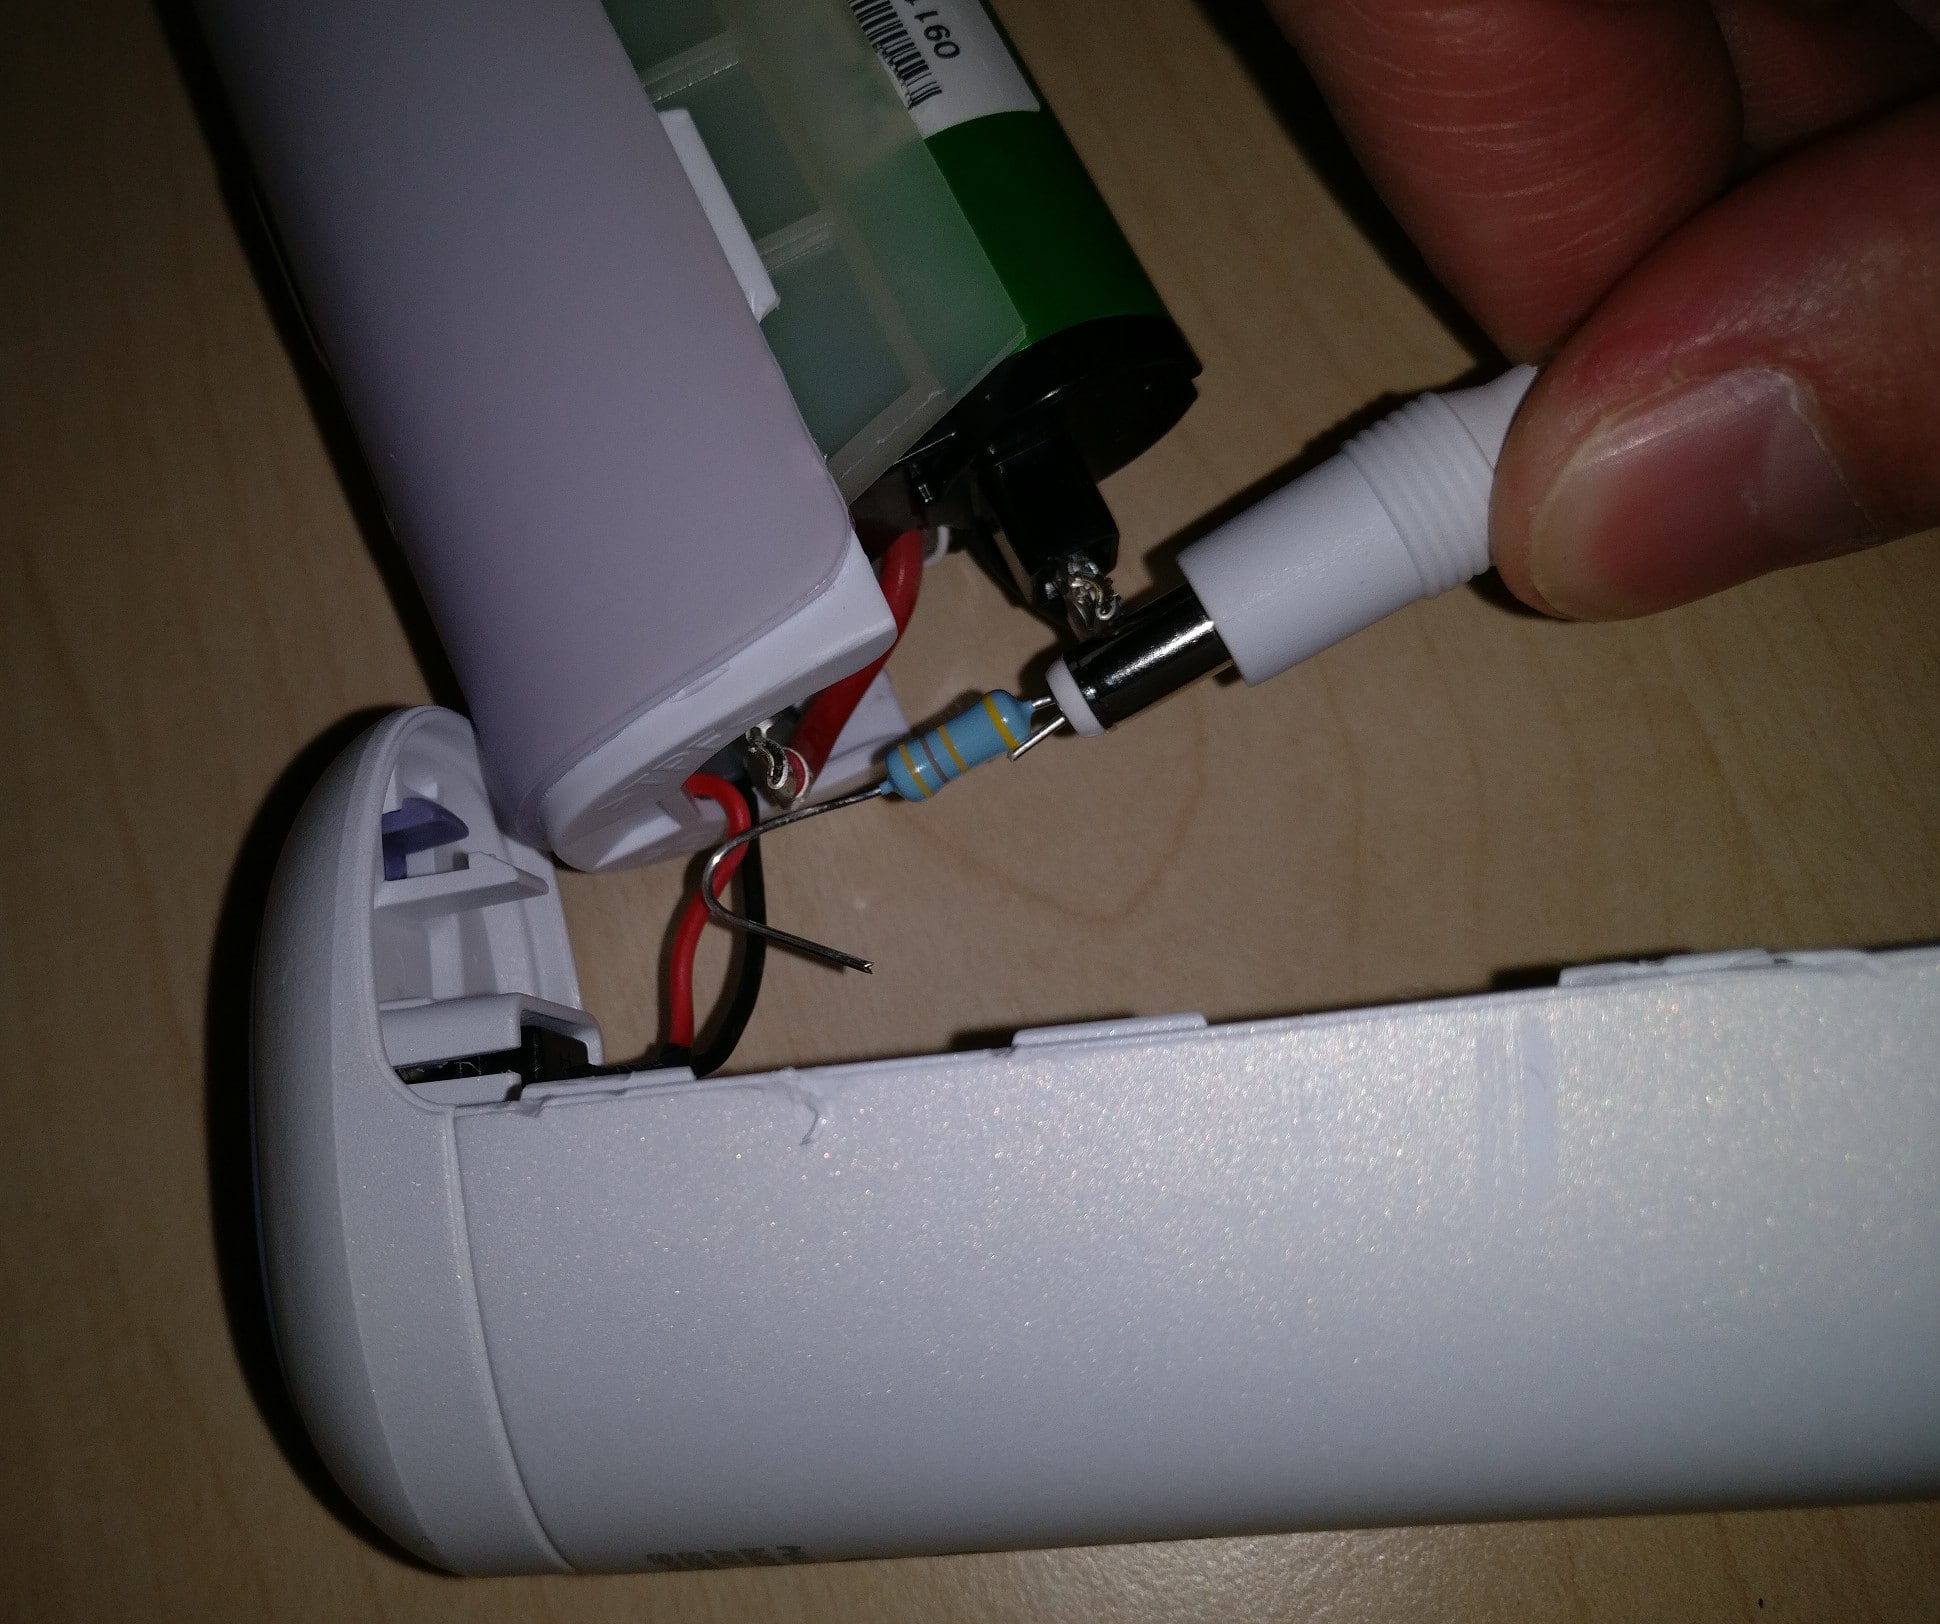
Plug in and turn on the plug for the Lumea charger.
Leave charging like this for about half an hour.
Disconnect your resistor from the battery pack, and try plugging the barrel into the usual socket on the Lumea. It should light up and charge normally – if not, try repeating the connection between the barrel, resistor, and terminals in case you didn’t get a good connection the first time.
Once charging normally, let the Lumea charge up fully. And you won’t forget to keep it charged every couple of months again, will you?
If this article helped you to fix your Lumea, please donate a small fee to keep this site running so I can write and help others too. Thnxs!


If I bought a 3V charger with the same plug that the original, can it be plugged in the Lumea conector instead of opening it and connecting the resistor?
Hi Guys, I have replaced original Lumea battery pack ( giving only 0,2V, one cell was leaked so i decided to buy two 18650 cells and create new battery). I have bought 2x ICR18650-26F M SDIEM TJV5 battery from Aliexpress (taged as LiitoKala but its Samsung battery without protection and flat heads + nickel sheets) link: https://www.aliexpress.com/item/32363331437.html?spm=a2g0o.store_pc_groupList.8148356.52.7d002336U1Dk03&pdp_npi=3%40dis%21EUR%21€%205%2C22%21€%202%2C72%21%21%21%21%21%4021038edc16912506167596222e07c3%2165174071439%21sh%21SK%211667945922
Batteries are charged, pluged in. Lumea is working, but i have a charging issue.. Original charger puts out 12,6V instead of 8,5V and not 1,2AMP but almost 2AMP. So i tried different charger. With low Voltage – under 8,5V – led is shining green.. over 8,5V led is flashing – so it look like it is charging.. but the battery pack is not receiving Volts.. still on 7V .. Device is not charging. Volts are not growing… At 7V lumea is flashing with orange led – please charge…. NTC resistor is original, everything is soldered like on original battery set.. NTC installed on the battery set ( connected – white cable on negative pole, black on negative on other battery as original) But the 10K NTC is showing like 9,80 Ohm but in NEGATIVE number… Is this OK? When is NTC resistor heating, because battery pack is heating, Ohms are falling down. More heat, less Ohms am I right? On cold battery there is “negative minus 9,80 Ohms) so it looks like the battery is totall overheated am I right? Probably thats the reason why is my Lumea not charging. Or is the roblem in batteries i took? Any advice for me? many thanks guys!
You don’t need to change battery or open Lumea.
It happens to my Lumea as I did not touch it fir years.
When I will connect it to its charger, it will show as if its fully charged but this charging will not last more than a minute.
I kept using and charging it every time, perhaps 20 times and slowly the battery now revive and is taking full charge, this charge is lasting quite long even better than new latestmodel lumea I bought which even doesn’t work on light brown skin but the old model does work on Asian skin colour on bikini area.
Hi
Thank you so much. It worked first time!
I tried to send you some money but your link doesn’t seem to work.
Kind regards,
Duncan
Is it possible to make the device work with cord as it only work cordless?
Not that I know
In addition to my last warning from June 12, 2022, here is an excellent article from an experienced battery designer which has good background information about deep-discharge:
https://accundu.de/brandgefaehrlich-akkus-wiederbeleben
It’s in German, but you can translate it e.g. with DeepL or Google Translate.
The final warning from there in red color, translated:
“So I’ll say it again, in case this hasn’t come across clearly so far: resurrecting lithium-ion batteries is a very bad idea, putting your life and the lives of your family at risk. Please do not do this at home!”
doesnt work for me. totally dead battery seems to be almost refreshed with resistor (as described above), because after that green LED flashes when charging but after a couple of days still not charged. no flash from lumea 🙁
skusal som tento postup…nabijal som to cez ten odpor a dokonca bateria i obzivla a zacala signalizovat nabijanie blikanim zelenej LEDky ( co predtm nebolo ) ale po napojeni nabijacky normalne (teda vyradenim odpora) ani po dvoch dnoch nie je nabita natolko aby z tej lampy vysiel aspon jeden vyboj.
Then replacing the batteries is the only option.
Hi Ruud,
what you describe here as a nice solution from an “electronics designer” source is not as good as it sounds. This Lumea battery revival may lead to a dangerous situation, fire hazard etc.
And Philips did not construct it this way because of “reasons either of design incompetence or commercial cunning” as you put it, but for customer safety.
Once a Li-Ion battery is below 3.0V or 2.5V, you are not supposed to revive it!
There are lots of sources for it, here is just one:
https://de.wikipedia.org/wiki/Tiefentladung
“Lithium battery
In lithium-ion batteries, a deep discharge to below 2.4 V leads to irreversible damage and loss of capacity. If the voltage of a cell drops below 1.5 V, it should no longer be used. It is very likely that copper bridges have formed, which then lead to a short circuit. In this state, the cell becomes unstable and heats up very strongly, creating a fire hazard. Deeply discharged lithium-ion batteries should not be reused for safety reasons.[14]”
I had the same problem with our Lumea and I just replaced the batteries with 2 new 18650 cells. This is the safest and recommend way for a Deep-discharged Li-Ion battery.
Hi Tom,
Thanks for sharing your information. I will add a warning to the article.
Hi , tom
Can you kindly send me the link where i can buy these 18650 cells?
Thank u r
Thanks OP, Worked like a charm for me.
I had to buy 20 x resistors.
Anyone needs one, pay £1 inc postage and ill send one out.
Cheers
Brendan
Hi Brendan I have my Lumea which does not work, Isit easy to fix? If so could I have one please.
Hi Punita
Yes I found it quite easy and found on my third attempt it fixed the issue and the Lumea is working as normal.
I found using a paper clip and some tape helped me keep a good connection between the outside of the charger and the resister.
If you pay £1 to paypal1@webandnet.co.uk and add your name and address I will send you out a couple in an envelope. (UK only)
I will donate the £1 to charity.
Best wishes
Brendan
Do you still have a spare one to sell?
hi can someone help me i really need this and can someone please leave step by step instructions on what to do
Hi Rudy,
Thanks for this solution. My local electronics store doesn’t sell 180ohm 2W resistors but has 1W or 5W. Which would be the most appropriate to use to fix my lumea
Hi,
We have a Lumea which wasn’t used for 3-4 years. When I plugged the charger, the charging LED was on but, it wasn’t charging the unit.
I changed the 2 batteries. Unit started working with new set of batteries but, charging LED does not turn on.
Changing the resistor connected between the batteries didn’t help.
Any suggestions to fix the problem?
Hi, the resistor method did not work for me. I have already got the two batteries out of the device; they are disconnected to the device. Is there a way to revive the two disconnected batteries? then I would return the two batteries back in the device and solder them. Thanks
Hi Rudd, I can’t seem to source a 180 ohm 2 w resistor locally. A previous comment said that the 180 ohm 5 w resistor didn’t work. However, my local shop has 180 ohm 1 w. Do you think this should work? Thanks!
Yes, that might work. You can also use two 1w resistors and connect them in series together.
Wow, can’t believe this worked. Wife hadn’t used the lumea for well over a year and it was just dead. As described I, prised off the bottom cover around the charging hole and remove two screws and then remove the bottom section to reveal the end of the batteries, attach resistor/charger to the battery terminals, Left for 15 mins then plugged in as normal and it’s charged and working. Glad i googled “lumea not charging”. A little fiddly to get the resistor/charger to stay attached. Total cost £6. £2 for resistor and crocodile clips and £4 postage and saved me hundreds
Hello Stephen, just wondering if you could mention the Lumea model and input & output VDC on your Lumea charger, so that I can figure out if this method works for my Lumea. Thanks
Hi
Can I ask, when using the resistor method to “boost” charge a depleted battery, what is the maximum amount of time you can leave it charging like this? I see in the instructions it says not to leave overnight. Also does the green light come on when it is full enough to charge with the regular plug lead? The reason for the question is that I have tried the “boost” charge in stages of 30 mins, hour, etc. When I plug the mains lead in the bottom of the unit after a “boost” charge the green light starts to flash a few times (good news!) as though it is going to charge then it just stops and there is no indication it is charging. So I have then attempted to “boost” charge with the resistor for longer. I just wonder how many times I can try this and how long for? Or whether my battery is too far gone? I have always regularly charged it but I think perhaps the last couple of times have gone longer than they should hence the depleted battery. However the unit is also 7 years old so perhaps it just needs a new battery?
Hi Ruud, just wondering if you could mention the information (input and output V, A, W) on your Lumea’s charger so that we can see if this method works for our Lumea model. I have already tried the resistor method four times but to no avail. My charger says: 16W, output 8.5V and 1.2A. Just wondering if I can leave Lumea charging through the resistor for three or four hours. Thanks
That’s amazing. I opened up the battery from the bottom oval plastic part as the Lumea manual instructed, held the resistor for 5 mins and it’s charging as normal again. You just saved me £300 here. Thank you so much.
Hi guys. I followed the original post 3 years ago and replace my batteries from 2 from a local electrical shop. They had the 3.7V 2600mA. So got 2 of those after hey told me they are fine and would just take longer to charge but will also last longer before needing to recharge. Anyway, worked for a while, then I think we let the batteries go flat…back to the original problem.
Have followed the resister method here but with a 180 ohm 5W resister as they dio nto have a 2W one. have let the rsister on for 3 minutes, then removed and plugged in charger. No joy. Refitted resister and left on for 1 hour. Measure voltage before removing resister is 0.6v. Does not look like i can get it much higher in this time frame. Removed the resister and plugged in charger…No joy.
Should i be leaving the resister for longer given the batteries are 2600mAH?
Any thoughts??
John
Hi John, your amazing, thank you so much for sharing this, you’re a life saver, my Lumea stopped working, I ordered the resister and followed your instructions and it’s now working, mind you, trying to take the cover off was difficult but got there in the end. Thanks again.
Thanks so much. This is helpful! If I see tiny sparks bursting out when connecting the 3 points, is it safe to continue???
Yes, that is normal
I bought the resistor you mentioned but I’m a complete novice! Can you upload a clearer photo of where I’m meant to peg the resistor to?! I know one end goes inside the charger pin but the other bit?
Hello Ruud!!
Thank you for sharing your knowledge!!
Is it possible to run the Lumea without batteries?- just with the cable!?
I replaced the Batteries, but when I reassambled the case something burned down…
… so, operating the device with batteries is no longer an option.
I connected the wires (which were on the batteries) to the socket. The Lumea starts, the light is flashing (but don’t stop flashing) and i can adjust the power levels, but the Impulse doesn’t work….could it be cause of the missing PCM?
(The lens cover is attached)
Is there a workaround?
Best regards,
Philipp
Not that I am aware of.
I would appreciate it if somebody mentions what stuff they used to wedge the cover and open the case.
I just used a screwdriver
my batteries are labelled 7.4V 1500mAh 11Wh 2UR18650W2 but I can’t find a source to replace them. Can I replace with the 3.7V one that you have linked? I’ve tried the resistor trick but to no avail. One of my batteries looks rusty so I think I need to replace them.
Do you really have two 7.4V batteries? Because that you can’t replace them with the 3.7, that won’t be enough.
Hi
I have new batteries and when I insert the charging pin in it the led flashes green but no charging. As the return output for charging on the wire should be above 8v but I am getting 1.6v any idea why I am having this problem.
Regards
It worked 100%. i followed the instructions and my Lumea is working again! many thanks!!!
the resistor i have purchased on Amazon as i couldn’t find them in local stores.
Hiya, how easy Isit to tism pretty annoyed that mine has is not working. Had it since 2014 and hardly used it.. I want to have a go at changing the battery.
Can anyone upload clearer photos of where I connect the resistor from and to?!
Thanks, in your 4th stage, where is the “hole in the cylinder”? My batteries are taped together there is a gap between the batteries where the tape is and some wires – is that the hole in the cylinder? I have everything else but that …..
I think he means the hole inside the power adapter plug
I am nearly there … but would be great if you could clarify what you mean by “Push one end of the resistor into the inside of the barrel (it’s easier to do if you bend the resistor lead back onto itself to make a snug fit).” Is it just the case that I push it between the 2 battery barrel and that is it or does the resistor have to touch something inside the battery barrel? I tried it but didn’t work this time and want to be sure that I am doing it correctly.
He’s talking about pushing one of the resistor wires up inside the charger bit (pin) that you would normally poke into the bottom of the device. Look at the end and you will see a hole up through the middle of it. Look again at his photo. You can see the wire bent in half so it’s easier to poke it inside and keep it there.
Great advise, we left Lumea for 5 years without charging and it of course id not work. I found your instructions and I followed them and… it worked!!!
Thanks a lot!
I don´t have any experience in handling electronics, do you think I need some background to fix my lumea? How did you open the casa in the first place?
No experience required, only some common sense ;). Check this article for opening the case: https://lazyadmin.nl/diy/replacing-battery-in-a-philips-lumea/
Thank you for this cheap and easy fix (had more trouble getting the resistor than anything else!)
Now fully charged and working.
First of all, thanks for all the good advice. I’d like to offer another solution.
You can connect 4 A rechargeable batteries to the Lumia one’s. In this way, you are increasing total voltage (0+6) allowing current to flow into your exhausted batteries. I’ve test this method and after 10’ my Lumea is charging as should.
Thanks a lot again
Thanks for sharing!
Hi Tommaso,
Thanks for the suggestion. Do you mean AA batteries? And how would you connect the 4 to the lumea batteries?
Dear Helen, I connected 4 AA batteries with some tin wire. Connect them in parallel, so their voltage will increase. After that, you can plug the positive/negative side with the positive/negative connector of Lumea. In order to make this connection you have to open the Lumea, so you can find them. Let me know if you need more info.
Tommy
Hi Tommy, thanks for sharing this with us. Just wondering if you plugged the negative terminal of batteries with the positive (red) connector of Lumea and the positive one to the negative (black) connector of Lumea.
Hello- how would you do this? I have followed the above method which worked for one full charge and use but now nothing happens when I plug in the charger and I’m not sure what’s wrong. I repeated the process above and it will turn on for a second and then dies and won’t charge. Please, if anyone can help I’d be really grateful.
Hello Ruud! Thank you so so much for this article. Thanks to you I saved £350 and fixed my Philips Lumea charging problem
However, due to my impatience and carelessness while trying to open the casing, I have dented and scratched it so much that it hasn’t reattached into the grooves as tightly as it was before on one side. Therefore, on one side there is a slight gap and when I hit the laser button I can see a white spark through the gap. Is that dangerous? Would you suggest any further work on it?
Thank you so much again
I don’t think a spark is safe, to be honest. Can you maybe try to clue the case with some superglue? (to keep it simple)
Hi,
My charger is stamped 8.5 V but delivers 12 V. PHILIPS white charger, model: A00440.
I am using a 180 ohm resistor.
After a while (30-60 min) am only getting a couple a flashes when charging straight from the charger.
When removing the 180 ohm/charger, the voltage in the batteries drops very quickly to 0V (most likely before the charger is able to kick in).
Do I need to use a different value for the resistor? Someone in the comment was saying he used a 350 ohm resistor to match the 12 VDC of his charger.
Thanks for sharing this fix. I found a comment from another user who recommended opening the bottom cover (which houses the charging connecter) by removing the two tiny screws underneath the cover. This has given me access to the battery connectors. Can I not simply apply this fix without having to open the unit?
Hi Nat,
I have the same issue and experienced the same outcome as you. it seems the suggested way does not work for our case. Have you found meanwhile any other solution?
I forgot to mention on my previous comment that one of the batteries has some bubbling.
Yes, if the batteries look like that you will need to replace them.
Hi
my batteries are both rusted from both ends where can I get the replacement batteries
Hi everyone
The issue I have is that once I charge the unit for a while and the use it the unit will die within 5 seconds.
What do you think is my issue.
I have tried using the idea with the resistor. Would it be better to replace the battery
I had the same problem, tryied as suggested to give the boost with resistor, and it did not work.
So I’ve repliced the batteries in mine and it works perfectly fine now. The new batteries I’ve put are 3400 mAh instead the original 1500 mAh. Now it even works much longer on the single charge than before. It is pretty easy to repace them too, just need to have bit of soldering skills and a good powerfull solderer.
The link with instruction how to replace them:
https://lazyadmin.nl/diy/replacing-battery-in-a-philips-lumea/
The batteries I’ve used:
https://www.ebay.co.uk/itm/202252669231
Also advice for those who go for battery boost with the resistor to use the Alligator Croc Clips which can be also found on ebay. Much easier to keep all connected together than to hold the wires just with your hands.
Hi, thanks for sharing. Can I ask what resistor you used and could you share a link from where to purchase please?
https://uk.rs-online.com/mobile/p/through-hole-fixed-resistors/7078833/
These work fine.
ROSTAR2000 if u r located in the UK would you be willing to take a look at mine.. im no expert.. i tried the resistir method and i see no change.
Id be happy to post out and cover all costs…
Im at my wits end. Such expensive machines and very little use..
Sam
Hi Saima, I tried the resister method and got the machine alive but not working. It turned out one of the cells was damaged and it leaked. I managed to change the batteries and it now works. I can help you by sending you a step by step guide of how I did this, was a little fiddly but I followed Ruud’s instructions and youtube. You will need a few DIY things which my dad had in his tool shed but it cost less than £30 in new parts to fix.
This isn’t working for me 🙁 Do you think I need to change the batteries?
Hi,
Thanks for sharing.
My original Philips charger is stamped 8.5V but delivers 12V for some reason.
I was not able to fix my lumea with a 180 ohm resistor.
After the 30 minutes, the LED light did light up for a fraction of a second when I plugged it straight to the power supply. But nothing after that.
Hello. I had that problem too! the LED light did light up for a fraction of a second when power on. I discovered that the two tini black and red wires that goes from the plug in charger (that in my case were twisted) got broken the insulation. Both where broken, so the copper cores where touching. I put new insulation and now i got a permanent green light when I plug the charger
Hi Ruud,
Thanks for spreading the word and start repairing stuff instead of throwing things away too easily.
I’m an electrical engineer like Shamus working on a daily basis with Li-Ion batteries and I’d like to clarify some things here as they are crucial for a save home.
Shamus’s method is called “awaking” of an Li-Ion cell. I’m glad the method works that well for all the people. Many people, even professional battery charger building companies use it to get deeply discharged batteries again to work.
However, please please please observe the “open” circuitry very closely during the time of awaking. If it heats up noticebly, immediatly stop the procedure. In that case the cell has an internal short-cut(s), superfine coppertracks, which may lead to burning (in the worst case). The professional battery charger that enable that feature observe the cells via voltage, current and temperature and in case of any abnormal behaviour (heating up) the stop charge immediately.
If you’d like to get more knowledge about this short-cuts, please go to the website of an renowned battery charger equipment manufacturer (https://batteryuniversity.com/learn/article/low_voltage_cut_off).
My intention in this post is, that everybody performing this procedure knows about the consequences and procedes with full awareness.
Fantastic, fixed and saved us a lot of money to replace it! Made a small donation, have a couple of coffees on us.
Thanks for the donation, really appreciate it!
I bought my Lumea in 2013 but ended up going travelling so had never actually used it. Following the birth of my son I decided to use it so was devastated to switch it on and realise it would not charge and that I had wasted hundreds of pounds!
I bought the resistors on Tuesday, they arrived yesterday, and last night I successfully managed to charge my Lumea following your instructions! The case now feels/looks rougher around the edges from where I had to pry it open but that is purely superficial.
I’m still shocked I have managed to recharge it since it’s probably been “dead” for roughly 6 years. Thank you so much for sharing this fix with us.
Guys.. do you think it’s a problem with my charger. I can’t actually see if it’s working! I’ve tried the resistor method atleast 10 times now no sign of life 🙁
Thanks
Thank you – your fix works. Took a while to gently pry the case open with some plastic phone pry tools – but no damage done. My wife is a happy bunny 🙂
Thank you so much for this! Just did it today and it worked after a couple of trys.
Hey guys. I have a lumea sc2003. Iv tried the resistor method and have no luck. No change. Does the charger end side need to be touching the black wire. Or does the end of the resistor need to be touching the black wire.
If anyone lives in England, I’d be happy to post then my machine and a resistor if they wanted to help me.
Many thanks
The outside of the charger barrel needs to be touching the black wire.
Spot on. Simple fix for me. Pry the base off by inserting a small screwdriver in the power socket in the base of the unit and lever gently and it should pop off. Remove the two screws and again pry off the base this time with the power socket and move aside. You will see the battery terminals. I soldered a 180 resister to a piece of wire and then clipped the wire to the positive side of the battery, inserted the other end into the middle of the power supply plug and them clipped the outer of the plug to the negative side of the battery. Make sure there is no danger of a short and turn the power supply on for about 30 mins. After that turn the charger off, remove the wiring and plug the charger into the normal socket, turn on and hopefully the charge light will flash and the battery will charge. After a couple of hours recheck and if all good pop it back together. No damage done to the casing other than perhaps when prying the purple base cover off. Well done OP.
Hi Just An update
Ibhave alsof fixed the probleem with the resistor.
Check with a voltage meter of een you do the resistor trick, the voltage is going up.
Around 6 v is enough tot switch tot the normal lading procedure.
Hello!! Thanks for giving a bit of hope. I’ve got a newer version of Lumea, it’s Prestige IPL – BRI956. I was wondering if the above mentioned technique will work on this model or not? Mine’s battery just died today and I desperately want to fix it. But it seems like it won’t be easy to open and it seems closed from all directions from the handle. Not sure if I can get hold of battery by opening it or not. I would appreciate thoughts from you if you are able to suggest something or anyone else who has the experience of fixing the same model?
Thanks!
I don’t have any experience with this model. After a quick look on Google, I think you should be able to remove the top part of the white cover (where buttons are) and maybe you can work your way down.
Hello,
I tried the resistor method from a completely dead battery and it worked. However, the fan runs and the lights on the front come on but the machine never becomes “ready” to use. Has anyone else found this or have any ideas what I can do now? Thanks
Yes, mine does exactly this! Did you manage to fix yours?
Hello,
What fantastic solutions in both posts, Ruud and Shamus. Congratulations to both.
I would add a little add-on if I may. One doesn’t really need to open the full tool to get access to the batteries.
At the bottom of the Lumea there is a little bluish cover where one inserts the charger. This is easily pried out with a small screwdriver or tool alike.
Then, two screws are exposed and by removing those and prying out once more the bottom case from the front side of the tool, you immediately see the red and black cables.
Note: I can’t upload any picture but in the second picture of this post the two clips holding both covers are visible (the smaller blue one and a bigger white one) .
Finally, applying your findings leads to the same result without anybody, not yours, neither Lumea’s body 🙂 being damaged in the process.
Hope it helps.
Hi Angel,
Thanks for sharing. I will double check it with my wife’s Lumea and update the article with your comments.
Dank voor je snelle reactie, super fijn & tof
Batterijen zien er eigenlijk nog helemaal gaaf uit, ik heb 2 rode batterijen. Ik meen op de foto’s van jou te zien dat deze zwart zijn, correct?
Ik vermoed toch dat ik iets verkeerd doe met het connecteren van de metalen delen. Helaas kan ik geen foto sturen.
Dus toch nog 1x voor de zekerheid:
– uiteinde van de resistor dubbelvouwen en in de oplader steken (gele kant)
– de ‘mond’ van de oplader tegen het metalen klepje (goudkleurig) van de zwarte draad bevestigen
– ander uiteinde van de resistor tegen het metalen klepje (goudkleurig) van het rode draadje batterij bevestigen
Correct?
Groetjes!
Correct, meer kan ik er niet van maken. Bij mij waren het ook rode batterijen, maar die waren zwart uitgeslagen omdat ze stuk waren.
Als het opladen niet lukt is de goedkoopste “gok” toch de batterijen vervangen. Is wel iets lastiger, maar een andere optie weet ik zo ook niet.
Hallo Rudy,
Nogmaals 4x geprobeerd waarvan 3x zonder resultaat. Laatste poging niet 30-60minuten maar minimaal 2,5uur laten staan, stekker erin en het werkte. Is nu weer aan het opladen echt onvoorstelbaar. Nogmaals 100x dank!!!!
Super, fijn om te horen dat het toch nog gelukt is.
Thanks so much for this instruction! You have given new life to my seemingly dead lumea! Orked out fine as described. Only opening the body of the lumea was hard work, but totally worth it. Thanks again!
Dank voor je snelle reactie, super fijn & tof
Batterijen zien er eigenlijk nog helemaal gaaf uit, ik heb 2 rode. Ik meen op de foto’s van jou te zien dat deze zwart zijn, correct?
Ik vermoed toch dat ik iets verkeerd doe met het connecten van de metalen delen. Helaas kan ik geen foto sturen.
Dus toch nog 1x voor de zekerheid:
– uiteinde van de resistor dubbelvouwen en in de oplader steken (gele kant)
– de ‘mond’ van de oplader tegen het metalen klepje (goudkleurig) van de zwarte draad bevestigen
– ander uiteinde van de resistor tegen het metalen klepje (goudkleurig) van het rode draadje batterij bevestigen
Correct?
Groetjes!
Hallo Rudy,
Ik heb exact de beschrijving gevolgd en de RESISTOR 180 OHM 2W 5% gekocht maar het lukt helaas niet. Wat nu wel weer is na 4 pogingen is dat het ledje 1x knippert als ik op de aan en uit knop druk, dus dat is gewonnen! De uiteinde geel duw ik dubbel gevouwen in de oplader en met een wasknijper tegen het onderste mentale klepje van de zwarte batterij. De andere uiteinde met een wasknijper vast aan de rode batterij, metalen klepje onderaan. Dan half uur laden, eruit, oplader in de Lumea en er gebeurt niks. Doe ik iets verkeerd? Hopelijk kan je helpen en hoor ik snel iets. In elk geval alvast dank!!
Groet
Hoi Jacqueline,
Hoe zien de batterijen er zelf uit? Bij mij waren ze gevlekt aan de buitenkant, duidelijk teken dat ze stuk waren. Het kan zijn dat je batterijen zelf defect zijn, dan is de enige oplossing deze vervangen. Het rustig opladen zoals je beschreven hebt klinkt goed.
Denk dat je het probleem dus eerder in de batterijen moeten zoeken.
Gr, Ruud
I wasn’t sure if I’d connected it up properly with the resistor but after half an hour I tried charging it normally and it works!
It was very difficult to open the case though, and I caused a bit of damage but it was worth the effort.
Thanks 🙂
You are amazing and its charging.
I found out after struggling to get the case of that if you pop off the inner piece of the base you will find two screws underneath. Once the screws are undone, the base pops off and you have clear access to the battery points. My IPL is now working. Thanks
Hi Steven,
Could you make some pics, how to access or find these screws or lever the base? This base accessing method sounds easier.
BR,
Peter
Instead of opening the gun, is not easyer to cut the battery charger cord and put the 180ohm resistor on the red wire (for the half hour) and then reassemble the red wire without the resistor to complete che charging?
Sorry for my bad english.
Omg I have a green light and it’s charging! Took a couple of attempts but seems to be fixed. Thank you so much!!
Fantastic – mine was dead as a dodo as I hadn’t used it for about 9 months and missed the bit in the instructions about charging it every 2-3 months. Your trick worked on the third attempt – the first two times I mustn’t have had it connected in the charger barrel properly. I’ve not put it back together yet while it’s charging but have probably done some damage pulling the casing off – some little bits of plastic fell off and the edge is rough and scratchy and will need smoothing down. Fingers crossed it’s easier to put the casing back on than it is to get it off! Thank you so much!
Ruud! You are genius.
I found my Lumea ( SC2002)died one week ago so tried to repair it in computer shop ( where perhaps they could kick the power ) paid £ 25 ( waste money ) they back it to me in couple days and said that nothing they can do ( the batteries shown 0 ). So I searched all websites ( even Russian) to solve the problem. So found your explanation, but as a woman couldn’t manage to open my Lumea and waited when my husband will arrive. So we together managed to open it and followed your rules. It is working. I can’t find words for thanking to you. You are just smart genius guy.
We so grateful for you. Thanks a lot (Spasibo- in Russian language)
Good to hear that you where able to fix your Lumea!
Thanks! It is working again. Opening the device is pretty difficult so I was wondering if it is more easy putting the resistor outside of the device. For instance by cutting the powerline of the adapter and put it in between one of the two cables? Or using another universal adapter with lower current?
Would this method work with a 300ma 3v unregulated ac/dc charger.
I’m not great at taking things apart!
I have really no idea, but why are you not using the original charger and a resistor?
You *have* to take it apart, unfortunately.
Your 3V supply would *probably* be fine for recovering the batteries as long as you limit the current in some way, such as using a resistor as described in this post (300mA is far too much for recovering a deeply-discharged Li-Ion cell – you want the charge current to be less than a third of that, i.e. no more than 100mA).
But the whole problem here is that the device’s internal charging & battery protection circuitry has completely disconnected the battery from the charging port “for safety reasons” because it thinks that the battery is old/faulty, so no matter what power source you plug into the DC socket on the device, it’s not going to do anything at all (well, unless you connected something like a 1000V supply – something high enough to destroy the MOSFETs that are keeping the battery disconnected – but that’s a rather, uh, *permanent* solution! 😉 [hint: please don’t do this!]).
So you have no choice but to open it up and connect a power source directly to the battery pack, bypassing the mis-designed protection circuit. Annoying, but better than buying a replacement when these things are ~£300 =/
Thanks for the post, Rudy 🙂 I had already assumed that the problem was something like this, but when I tried to disassemble the thing, it wasn’t coming apart as easily as I would have liked, so I wanted to look up some instructions just in case there was something I was missing – a hidden screw, for example. But it looks like I just needed to apply more force … to something containing two Li-Ion cells and some high-voltage circuitry that may well contain some still-charged capacitors! Eek! o.o
Given that my unit is something like 5+ years old, and I already have a fair number of good-quality, high-capacity 18650 cells in my supplies, I may replace the cells in mine anyway – we’ll see 🙂
[P.S. I love the “Leave Empty” anti-spam field in this comment form – that’s genius! :D)
Great advice. Can anyone help with what screwdriver to use to open the screws? They look like torx slot screws or 6 lobe slotted ones.
After two years of having changed the batteries I couldn’t believe my lumea died for the second time . This time I tried this batteries charging trick and it’s charging again. I was very worried about having to tear it apart again, it was the most difficult part in the first fix, so I tried to do it only opening the purple plastic at the bottom, where the charger goes, and the two screws that hold that part. I didn’t have any resistors on hand so I cut an USB cable, connected the red to the red battery pole, the black to the black, and plugged it to a 0,5 A plug that I use to charge my smartwatch. I’m definitely setting a reminder for this to never happen again
Thanks again for all the work behind these fixes!!!
Thank you for writing these instructions.
I was hoping to use them with my wife’s lumea but unfortunately when I got into it one of the batteries had clearly failed: brown gunge round the top of one of the cells and it was discoloured. Clear liquid started bubbling from that area when I was taking it out. Think I’ll try replacing the battery as on https://lazyadmin.nl/diy/replacing-battery-in-a-philips-lumea/ instead.
Yes, you should definitely change the batteries if they start bubbling.
Hi Rudd
Your system worked perfectly, my daughter says thank you!
Best regards
Gary
Hi Rudd,
When dismounting the small black component on the black wire to PCM was broken. Can you tell me what it is. I am reading on the posts it is a thermistor
Is it a simple resistor 10kΩ or a mix resistor thermistor ?
Someone mentioned 10 K Ohm B = 3380 NTC , can you help ?
Many thanks
Kind regards
Claude
Hi Rudy, thank you for the information. My wife`s Lumea was death and I managed to charge the battery. when charging with Lumea´s charger it doest not blink the green light. when i turn it on, the fan works, but power selector does not work, it does not “shoot” either. Full charged I measure 8.11V, might this be the problem? thanks. Jorge.
It has happened to others also, Lumea keeps flashing, but won’t fully charge. I don’t know what is wrong then. You could try replacing the batteries as instructed here:
https://lazyadmin.nl/diy/replacing-battery-in-a-philips-lumea
It works great, very easy and very simple. Do it just you see on the pictures above and leave it for a 1/2 hour and you will see the result.
Hallo Rudy, Het werkt fantastische. Het apparaat werkt weer.
Waanzinnig dat je dit hebt kunnen ontdekken. Kan i nog doneren met bovenstaande link.
Super om te horen dat het gelukt is! Doneren kan inderdaad via de bovenstaande link.
Is this the right resistor ?
https://uploads.disquscdn.com/images/143ebaa4e95ede064f269de0ad7da06f2d92ba61aa2d425c2e83af2e60a7d510.png
This is the right one: goo.gl/8uAijR
Thank you 🙂
Hi Rudy. Can you share any video of how to use the resistor. Don’t want to make a mistake. I am zero at electronic stuff.
Hi Uzma,
Sorry I can’t really make a video. Even I havent used the resitor before, I replaced the batteries. Just scroll trough the comments for photo and tips and you will fine.
Big thanks for this tricks. 1 hour plus 180Ohm(2W) and I have 4V on my batteries. After that’s they charges from original power supply. Good work!!!!
ps: The most difficult thing was to disassemble the device.
pss: My original IMAX B6 mini refused to charge these batteries separately.
Hi Rudy and Shamus,
Thanks so much for posting this solution! I gave it a try and it revived my battery. However, my Lumea now shuts down every couple of seconds when I try to use it (I can get a couple of flashes out of the machine, but then it turns itself off). I am able to start it up again, but the same thing happens. Any ideas as to what is going on? Did I perhaps not charge it right with the resistor? Or is meu battery so “dead” that I should replace it (as per the original post)?
Thanks once again!
It’s hard to say from here, but I would try to change the batteries. If it first didn’t charge and now it does but not fully then my first guess would also be the batteries.
Hey Amaral!
I’ll share my experience that I believe might be similar to your situation.
One of the two batteries in our Lumea got drained. So I did similarly to Shamus/Ruud’s suggestion and used 350 ohms resistor connected for about 1 hr and then attempted to charge w/o resistor. Attempted to turn it on, fan would kick in for 1-2 sec and then lights would go off.
Checked batteries and each read about 3.5-3.7 Vdc. It got me puzzled for a while.
Then I thought that perhaps the two tiny wires (black connected to black negative terminal of battery and white one connected to the common plate “+” from one battery and “-” from another) is meant for monitoring charge of one battery, and if it drops below certain threshold value, then some circuitry shuts off fan and lights up red “charging needed” light. To see if this was the case I soldered off white tiny wire from the baterries common bridge and soldered it onto the red wire that is connected to “+” of battery. Whoohoo, this actually solved the problem. Now I get Lumea work like new.
My explanation to this is that the black and white tiny gauge wires are part of some protection circuit. When this circuit doesn’t read let’s say 3.5V from one battery, it automatically shuts off fan and the rest of equipment.
Also, after many years of cycling charge/discharge, Li ion battery doesn’t get to 100% of 4.25V and stays at around 3.5-3.7 instead. That in turn triggers the safety circuit. By wiring white wire as I described above, it sort of cheats the protection circuit because 3.5+3.5=7 Vdc, thus it will take a long time to drop both batteries to 3.5 V.
It would be great if Ruud and Shamus could comment on this and either confirm or disprove my suggestion.
P.S. I used 350 ohm resistor because ac to dc adapter’s voltage is 12 Vdc and 12/350=34 mA. S
Thanks and good luck!
Hi guys!! I fixed Lumea battery failure with your precious experience, but unfortunately the protection component ( NTC or PTC? ) was broken durin removal… Can you help me to identify this? Thank you and have a nice day!!
It is 10kΩ B = 3380 NTC thermistor.
So pleased this worked! It’s tricky to get it open but definitely worth the effort. Thank you so much for the instructions : )
Thank You for Your knowledge. 30 min with resistors (had to use 2, 100 ohm+80 ohm) and now it’s charging again normally, great. Keep up the good work 🙂 https://uploads.disquscdn.com/images/bf3f789a45768ee9330d61e673880be22c60165d3cfb0d4d8a16ab64f757db06.jpg
Glad we could help!
Hello
Would this work using 2× 1 amp resistors? That is all I could get my hands on sadly or a 5 amp resistor.
Hello ! after error in the Charger plug end, I followed your procedure, 30mn after my Lumea charge works again! Thank you very much !!
Your welcome 😉 Great to hear you got it working again!
Brilliant, thank you ever so much! Found my Lumea dead yesterday, heart sank. Googled for a way to resuscitate, found this page. Picked up a resistor for 20p today, followed your procedure, Lumea works again! Means I don’t have to bin a device I paid hundreds of pounds for and that I don’t have the means to replace at the moment. This is what the internet is for 🙂 Thanks again.
Happy I could help 😉
can you please share video of how to fix it.. its kind a hard to understand your technical terms as i have no electronic knowledge
Hi Hala, I’ve just managed to work it out, followed the procedure and my Wife’s Lumea is back up and running. Brilliant! So here’s what I did. I ordered the resistor fro RS components and for a total of 91p they arrived the next day (Smallest quantity pack of 10) but heyho)
1st Follow the instructions to open the Lumea. It is a bit tricky and I’m afraid I scratched the body of ours, but a small price to pay to get it back up and running.
2nd Take the end of the charger cable with the connector on it. The bit that looks like a small rod with a hole in the centre and obviously not the Charger plug end.
3rd At the very bottom of the battery pack you can see 2 terminals. One red and one black. Use a peg or similar to hold the cylinder to the BLACK connector.
4th Take one of your resistors and bend one end of the wire back on itself and push it into the hole of the cylinder. (If it feels loose, open the the wire bend you just made a little and try again. You want to make a good contact with the inside of the cylinder.)
5th Again using a peg or similar, hold the other end of the resistor to the RED terminal (I learned by the way that it doesn’t matter which way round your resistor is as they are apparently non polar)
6th Plug your charger in and turn on the power supply.
7th Let it charge for about 30 mins. (Apparently it shouldn’t be more than an hour. Mine worked with 30 mins)
8th Turn off the power and disconnect the resistor.
9th Put the charger connector into its correct socket on the Lumea and turn the power back on and you should now see the green charger light flashing.
I left the Lumea charging overnight and all that was left to do was close the body up again. Takes some doing and ours hasn’t closed as neat and tidy as new, but doesn’t appear to be much of a problem as it now works perfectly. Fantastic!
Hope this has helped and good luck with your repair 🙂
Thank you for the help, it’s working cant believe I managed to do it myself. Followed the instruction. Thank you made my day 🙂
Ich habe die Methode gerade gemacht. Habe das Gerät vorher zerlegt und dann erst diese Anleitung gefunden. Habe die Akkus wieder auf 2,5v gebracht und dann mit einem Ladegerät voll aufgeladen.
Die Widerstände habe ich aus einem alten Radio (2* 360 ohm parallel)
Gerät wieder zusammengestellt, funktioniert.
Das Gerät habe ich mit plektrons geöffnet, Handy repair
Kosten 0