To export your AD users to CSV we can use PowerShell and the Get-ADUser cmdlet. This allows us to quickly export all users from your active directory into a usable CSV file.
Exporting your users to check if they have the correct attributes set is a common task for system administrators. It allows you to verify if they still have the correct contact information listed and if there are any obsolete accounts that you might need to close.
In this article
In this article, we are going to take a look at how to export AD users to CSV and I have a complete script for you at the end.
Requirements
To export the Active Directory users, we are going to use PowerShell. You will need to make sure that you have the Active Directory Module installed. This is installed by default on the domain controller, but if you want to run the scripts or cmdlets from a different machine, then you will need to install it.
To install the module on a Windows 10/11 computers, you can run the following PowerShell command:
Add-WindowsCapability –online –Name “Rsat.ActiveDirectory.DS-LDS.Tools~~~~0.0.1.0”
Export Active Directory Users to CSV
To export the users from your Active Directory to a CSV file, we are going to use two cmdlets, Get-ADuser and Export-CSV. The first cmdlet will get all the users from your AD and allow you to select only the information that you need.
The second cmdlet exports the selected data to a CSV file. Exporting to CSV is pretty straightforward, you only need to specify the path and file name, as I will show you in the steps below.
As mentioned, I have a complete script at the end of the article, but it’s important that you understand how it works, so you can change it to your needs. That is why I will guide you through the steps required to export AD users to a CSV file.
Step 1 – Selecting the users with Get-ADUser
The first step to exporting users is to select the users that you want to export from the Active Directory. We do this with the Get-ADUser cmdlet. This cmdlet accepts different filters which allows us to select only the users that we need.
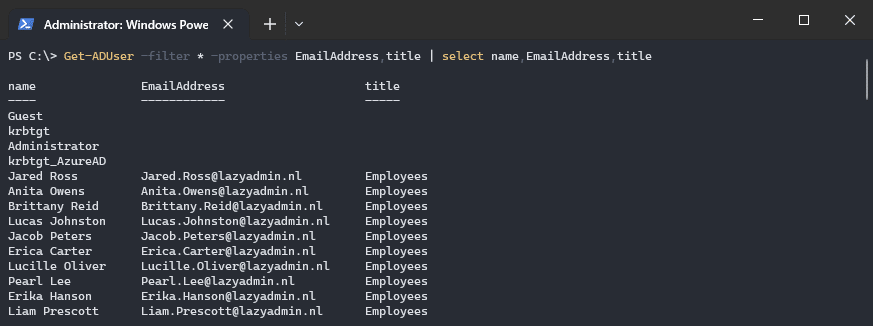
To get all users in your domain, with their name, email address, and title, you use the following command:
Get-ADUser -filter * -properties emailaddress,title | select name,emailaddress,title
Select and Filter Users
You don’t always want to export all the users from the Active Directory. Sometimes you only need users from a specific OU or want only the active or disabled users. To do this, we can use different filtering options:
- Filter – Allows you to filter the results for example on name, title, or email address
- SearchBase – You can specify which OU(s) you want to get the users from
- Identity – Allows you to specify a specific user
I will briefly explain the different options below, if you want to know more, then make sure you read this article about the Get-ADUser cmdlet. It goes more into detail on how the different options work.
The -filter parameter allows you to find all users with a particular attribute. For example, when you want to export all users with the job title “fixer”, then we can use the following command:
Get-ADUser -filter "title -eq 'fixer'" -properties * | select name, emailaddress, title | Export-CSV -path c:\temp\export.csv
We can also use the filter to export only the enabled user accounts, or only the disabled accounts:
# Export all disabled user accounts
# change false to true for enabled accounts

Get-ADUser -filter "enabled -eq 'false'" -properties * | select name, emailaddress, title | Export-CSV -path c:\temp\export.csv
The -SearchBase property is used to export only the user accounts from a particular OU in your Active Directory. You will need to use the distinguished name of the OU. You can combine the SearchBase property with the SearchScope property to determine how many levels deep you want to go.
Get-ADUser -Filter * -SearchBase "OU=IT,OU=Amsterdam,OU=Sites,DC=Lazyadmin,DC=NL" | Export-CSV -path c:\temp\export.csv
Step 2 – Selecting the Properties
Now we know how to select the users that we want to export, we can look at which attributes we want to include in our export. If you don’t specify any property, then only some basic information is exported, like the name, objectID, and userprincipal name.
To view all properties that are available from the Get-ADUser cmdlet, you can use the command below. This will return all properties of a single user:
Get-ADUser -filter * -properties * -ResultSetSize 1 | select *

# Or to view all properties from a specific user:
Get-ADUser -identity ztucker -properties * | select *
When you have your list of properties that you want in your export, you can specify them in the -properties parameter and select the result. I recommend testing/checking the output first in the console before you export it to a CSV file.
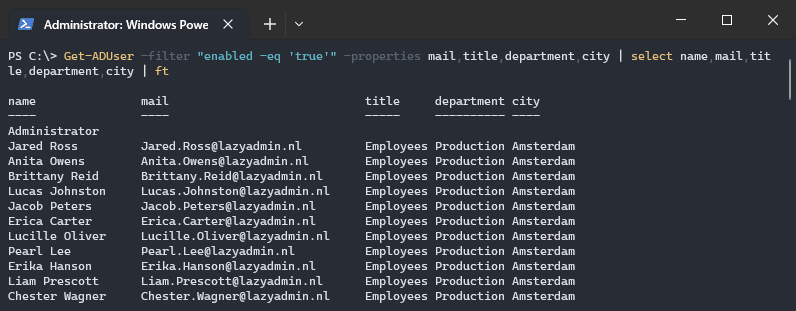
In the example below we select the mail, title, manager, and office attribute. Make sure that you also select those attributes with the select statement, otherwise, you will still get all the default fields as well:
Get-ADUser -filter "enabled -eq 'true'" -properties mail, title, department, city | select name,
 mail, title, department, city | ft
When you are creating a script, then I recommend putting your properties inside a hashtable. The advantage of hashtables is that you can easily change the attributes, and in this case, we can use the same list for both the properties parameter as the select statement.
$properties = @(
  'name',
  'userprincipalname',
  'mail',
  'title',
  'enabled',
  'department'
)

Get-ADUser -Filter * -Properties $properties | Select-Object $properties
Step 3 – Export to CSV
We now have selected the Active Directory users we want to export and selected the attributes that we want to include in our CSV export. The last step is to export the results to a CSV file. For this, we will be using the Export-CSV cmdlet.
The Export-CSV cmdlet only requires a path (with a filename) to export the result. I also recommend to add the following two parameters to the cmdlet: -NoTypeInformation -Encoding UTF8. These will remove the header with information in your CSV file and make sure that all characters are exported with UTF8.
# Export all enabled user accounts with to a CSV file
Get-ADUser -filter "enabled -eq 'true'" -properties mail, title, department, city | select name,
 mail, title, department, city | Export-CSV -path c:\temp\users.csv -NoTypeInformation -Encoding UTF8
Complete Export AD Users to CSV script
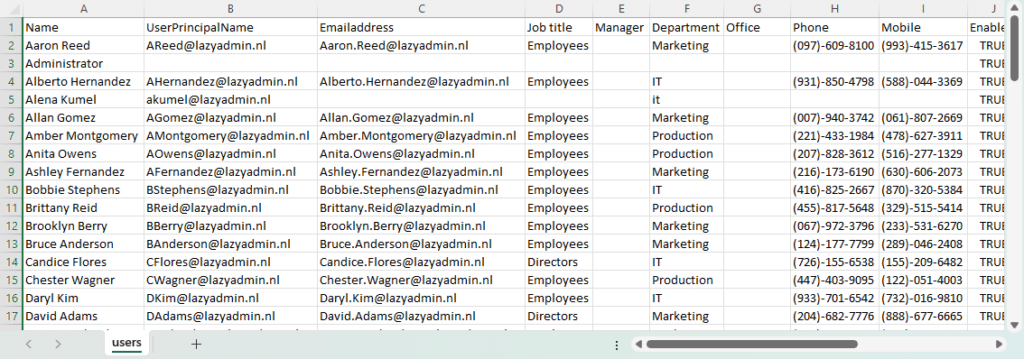
I have created a PowerShell script that will Export all AD Users to CSV for you with the most commonly needed properties. If you specify a path for the CSV file, the script will create the CSV file and open Excel once it’s finished.
When you run the script you specify a couple of options:
- Get the manager’s display name or not (default true)
- Specify the searchBase (OU), default whole Active Directory
- Get enabled or disabled accounts or both (default only enabled)
- Export path CSV file (default script location)
The script will get all the user accounts from the Active Directory if you don’t specify the searchBase (OU). It’s also possible to specify multiple OU’s:
.\Get-ADusers.ps1 -searchBase "OU=users,OU=Amsterdam,DC=LazyAdmin,DC=Local","OU=users,OU=Oslo,DC=LazyAdmin,DC=Local" -path c:\temp\users.csv
You can find the latest version of the script here in my GitHub repository.
param(
  [Parameter(
    Mandatory = $false,
    HelpMessage = "Get the users manager"
  )]
  [switch]$getManager = $true,

  [Parameter(
    Mandatory = $false,
    HelpMessage = "Enter the searchbase between quotes or multiple separated with a comma"
    )]
  [string[]]$searchBase,

  [Parameter(
    Mandatory = $false,
    HelpMessage = "Get accounts that are enabled, disabled or both"
  )]
    [ValidateSet("true", "false", "both")]
  [string]$enabled = "true",

  [Parameter(
    Mandatory = $false,
    HelpMessage = "Enter path to save the CSV file"
  )]
  [string]$CSVpath
)

Function Get-Users {
    <#
    .SYNOPSIS
      Get users from the requested DN
    #>
    param(
      [Parameter(Mandatory = $true)]
      $dn
    )
    process{
      # Set the properties to retrieve
      $properties = @(
        'name',
        'userprincipalname',
        'mail',
        'title',
        'enabled',
        'manager',
        'department',
        'telephoneNumber',
        'office',
        'mobile',
        'streetAddress',
        'city',
        'postalcode',
        'state',
        'country',
        'description',
        'lastlogondate',
        'passwordlastset'
      )

      # Get enabled, disabled or both users
      switch ($enabled)
      {
        "true" {$filter = "enabled -eq 'true'"}
        "false" {$filter = "enabled -eq 'false'"}
        "both" {$filter = "*"}
      }

      # Get the users
      Get-ADUser -Filter $filter -Properties $properties -SearchBase $dn | Select-Object $properties
    }
}


Function Get-AllADUsers {
  <#
    .SYNOPSIS
      Get all AD users
  #>
  process {
    Write-Host "Collecting users" -ForegroundColor Cyan
    $users = @()

    if ($searchBase) {
     # Get the requested mailboxes
      foreach ($dn in $searchBase) {
        Write-Host "- Get users in $dn" -ForegroundColor Cyan
        $users += Get-Users -dn $dn
      }
    }else{
      # Get distinguishedName of the domain
      $dn = Get-ADDomain | Select-Object -ExpandProperty DistinguishedName
      Write-Host "- Get users in $dn" -ForegroundColor Cyan
      $users += Get-Users -dn $dn
    }

    $users | ForEach-Object {

      $manager = ""

      If (($getManager.IsPresent) -and ($_.manager)) {
        # Get the users' manager
        $manager = Get-ADUser -Identity $_.manager | Select-Object -ExpandProperty Name
      }

      [pscustomobject]@{
        "Name" = $_.Name
        "UserPrincipalName" = $_.UserPrincipalName
        "Emailaddress" = $_.mail
        "Job title" = $_.Title
        "Manager" = $manager
        "Department" = $_.Department
        "Office" = $_.Office
        "Phone" = $_.telephoneNumber
        "Mobile" = $_.mobile
        "Enabled" = $_.enabled
        "Street" = $_.StreetAddress
        "City" = $_.City
        "Postal code" = $_.PostalCode
        "State" = $_.State
        "Country" = $_.Country
        "Description" = $_.Description
        "Last login" = $_.lastlogondate
        "Password last set" = $_.passwordlastset
      }
    }
  }
}

If ($CSVpath) {
  # Get mailbox status
  Get-AllADUsers | Sort-Object Name | Export-CSV -Path $CSVpath -NoTypeInformation -Encoding UTF8
  if ((Get-Item $CSVpath).Length -gt 0) {
      Write-Host "Report finished and saved in $CSVpath" -ForegroundColor Green

      # Open the CSV file
      Invoke-Item $CSVpath
  } else {
      Write-Host "Failed to create report" -ForegroundColor Red
  }
} Else {
  Get-AllADUsers | Sort-Object Name | ft
}
Wrapping Up
Exporting Active Directory Users to a CSV List can really help you with keeping track of all users and their properties. It’s good to understand how you can create your own scripts for these kinds of tasks.
I hope this article helped you to understand how to export users from your AD to a CSV file. If you have any questions, just drop a comment below.


