Azure Files is a great storage solution when you need flexibility or need to access your files from different locations around the world. But it will never be as fast and seamless as an on-premise file server. This is where Azure File Sync comes in.
It allows you to cache your frequently accessed Azure Files on your on-premise file server. This will greatly reduce the access time, giving your users a better experience. It can also be used to sync your files across multiple file servers, each in a different location.
In this article, we are going to take a look at how to install and configure Azure File Sync. Make sure that you already have set up an Azure File Share.
Advantages of Azure File Sync
Before we start with implementing Azure File Sync, let’s first take a look a brief look at the different use cases.
The most common use case is local caching. When you have stored all your files in an Azure File share, then you probably have noticed that there is a latency when you access a file. This isn’t a problem with files you don’t need often, but it can be really annoying with files that you need regularly.
This is where Cloud tiering comes in. It allows you to cache the most frequently accessed files in your on-premise file server. You can determine how much disk space you want to allocate for the caching. So you don’t need to match the same storage space locally as you have in Azure.
Multi-site Sync
When you have multiple offices around the world and need to share the same files, then Azure File Sync is a great solution to distribute the files. You can deploy a local file server in each Office, and make it part of the sync deployment group.
Any changes made locally in one of the offices will automatically be synced to the other offices, keeping everything in sync.
Quick Disaster Recovery
Azure File Sync is out of the box not a real backup solution, because it will sync all changes from your on-premise environment to the cloud. So any files that are deleted locally will also be deleted in the cloud.
However, we can use Azure Files to quickly restore a file server. Your on-premise server is nothing more than a local cache of the data. So in case something happens to your on-premise file server, you can simply install a new Windows Server, deploy the Azure File Sync agent on it, and add it to the deployment group.
Set up Azure File Sync
To set up the Azure File Sync, we are going to start in Azure with deploying the Storage Sync Services. Keep in mind that an on-premise server can only be registered to one Storage Sync Service.
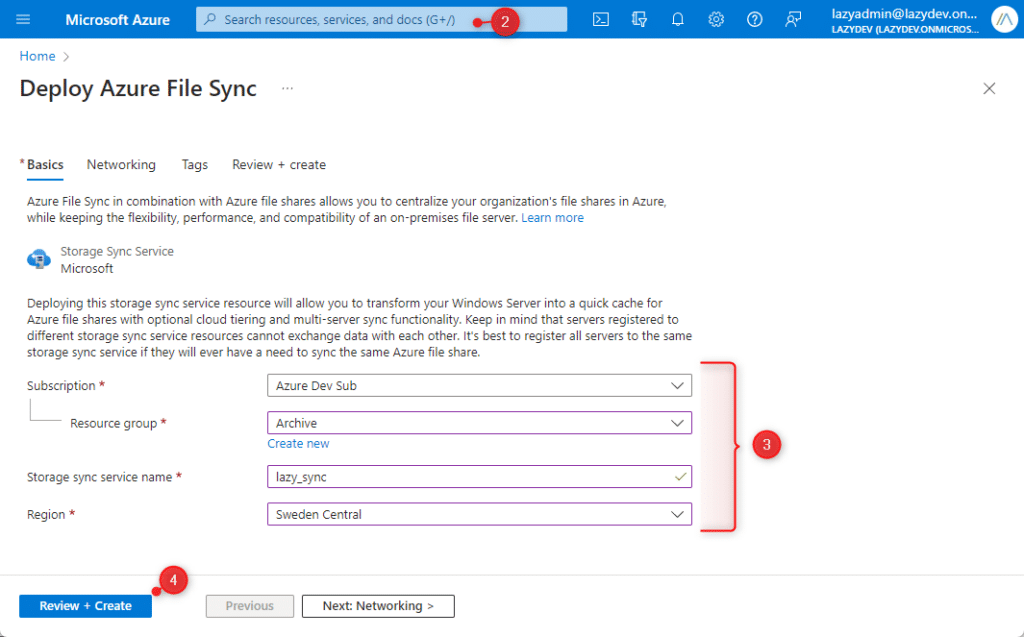
Deploy Storage Sync Service
When creating the Storage Sync Service, make sure that you select the same Azure subscription, resource group, and region as that used for Azure Files. Otherwise, it won’t work.
- Open portal.azure.com
- Search for Azure File Sync and select it from the Marketplace list. (or use this direct link: Deploy Azure File Sync – Microsoft Azure)
- Enter the basic details:
- Select the same subscription, resource group, and region as your Azure Files
- Storage sync service name must be unique
- Click on Review + Create
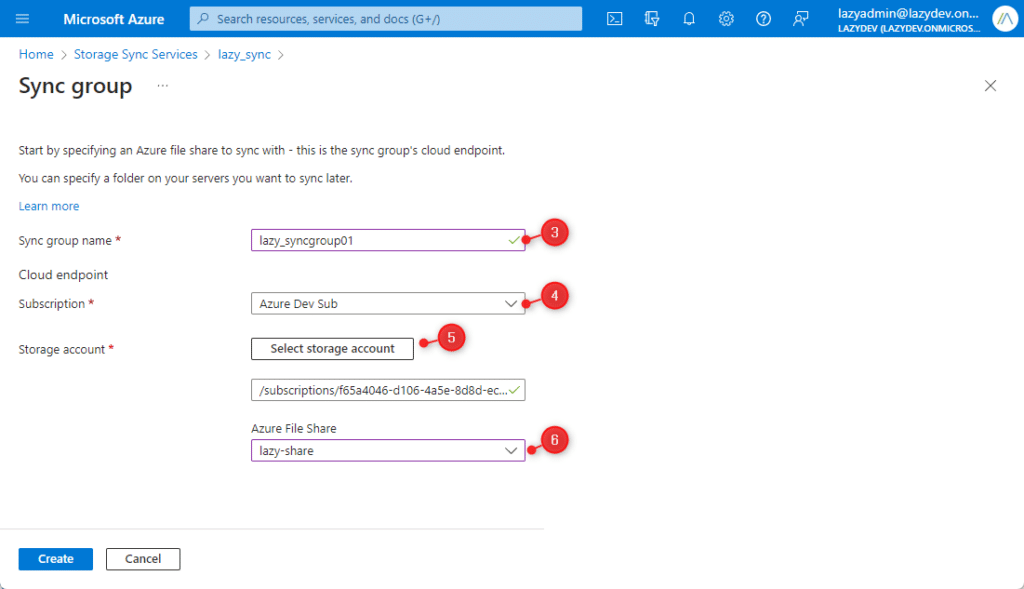
Create a Sync Group
With the sync service deployed, we will now need to create a sync group. The sync group contains all the endpoints that we want to keep in sync. It will need to have at least one cloud endpoint (Azure File Share) and one server endpoint.
- In Azure, go the Storage Sync Services and open your newly created sync service
- Click on + Sync group to create a new group
- Give your group a name
- Make sure that the correct subscription is selected (same as your Azure File Share)
- Click on Select storage account, and select your storage account
- Select the Azure File Share that you want to use
- Click on Create
Will we need the sync group later on, but first we need to install the Azure File Sync Agent on the server.
Deploy Azure File Sync Agent
On the local server, we will need to install the Azure File Sync Agent. This agent will connect to the Azure Storage Service and keep all the files in sync. First, we will need to make sure that Internet Explorer Enhanced Security Configuration is disabled on the server.
- Open the server manager and select Local Server
- Click on the link labeled On behind the IE Enhanced Security Configuration
- Select Off for both Administrators and Users
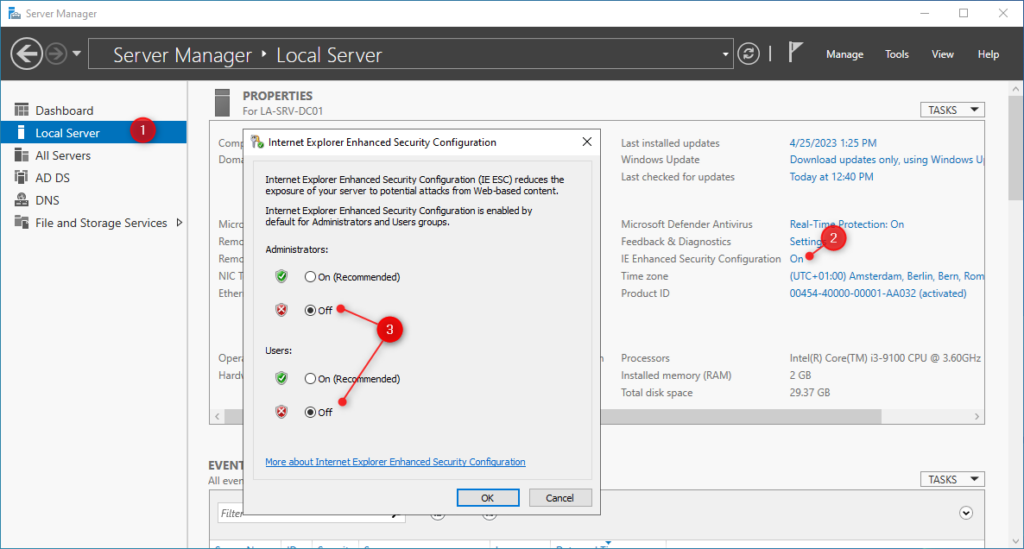
You can turn it back on if you want after we completed the registration of the agent. We can continue with installing the agent on the server
- Download the Agent from the Microsoft Download Center
- Install the agent, using the default settings
After the agent is installed, we can register the Windows server in the Storage Sync Service. This will create a trust relation between your server and the Azure Storage Service. The sync agent will automatically start after the installation.
- Select your Azure Environment (in most cases AzureCloud) and click on Sign In
- Sign in with your Azure Credentials
- Select the Azure Subscription, Resource Group and Storage Sync Service, just as we used/created earlier
- Click on Register
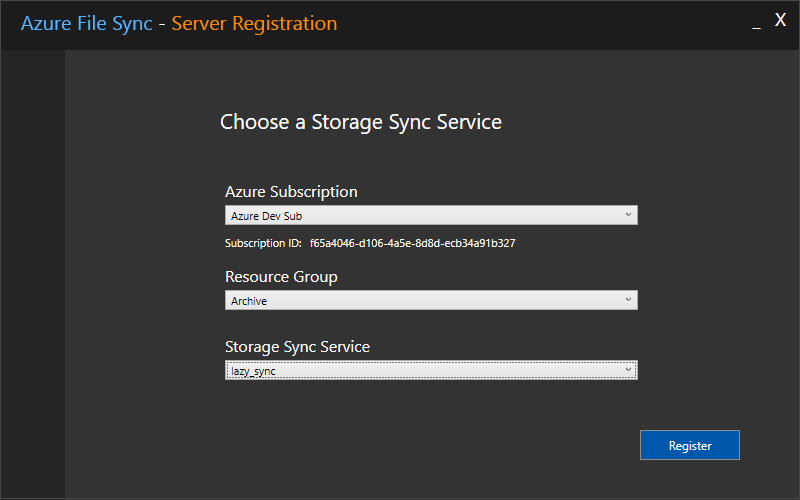
It can take a moment to register your server. Wait until you see that the registration was successful and the network connectivity test is passed.
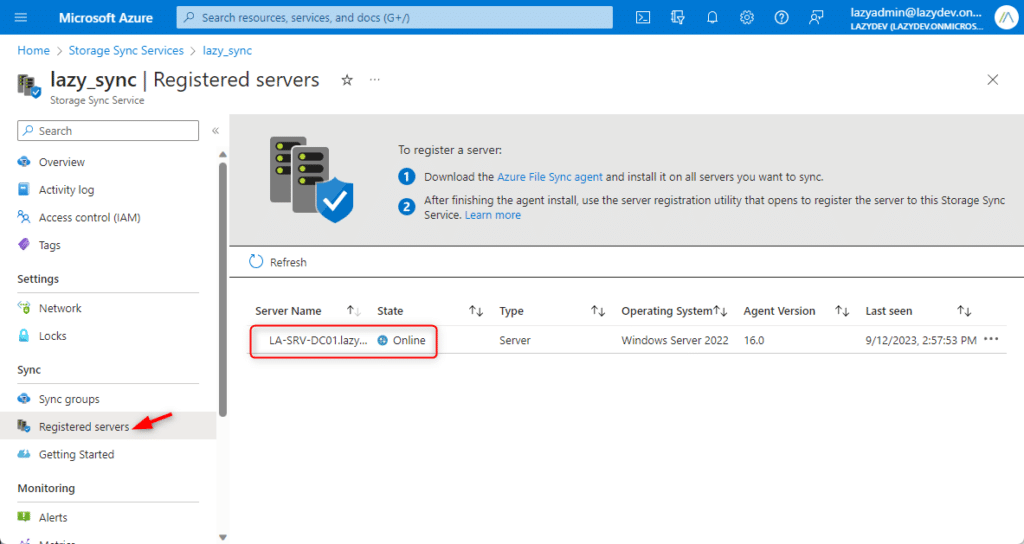
We can verify the registration in the Azure Storage Sync Service. Open your sync service and click on registered servers. The server should be listed and marked Online:
Configuring the Server Endpoint
We have now installed all the components, but still need to tie it all together. We do this by adding a server endpoint in the Storage Sync Group, that we created earlier.
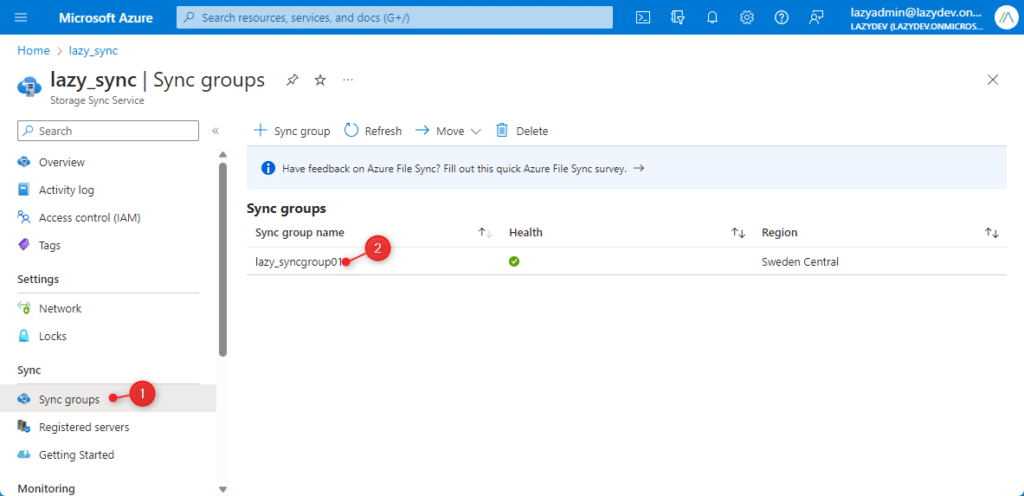
- In your Storage Sync Services, go to Sync Groups
- Open the sync group
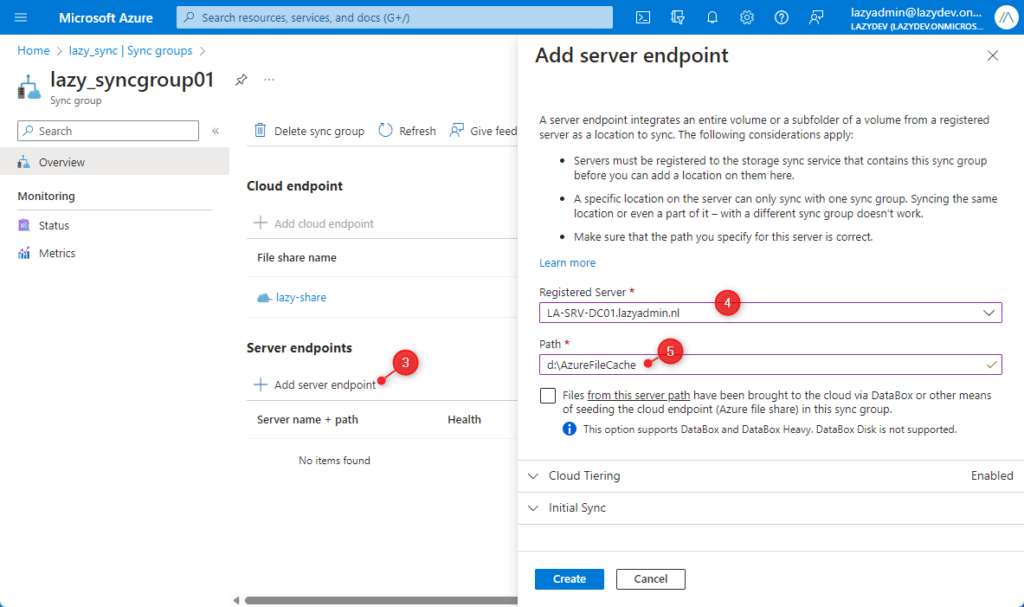
Here you will see the Azure File Share that we have linked earlier (under the Cloud endpoint). As you can see, the server endpoints are still empty. This is where will add the local server(s).
- Click on Add server endpoint
- Select your server under Registered Server
- Enter the path where you want to store the Azure File cache, for example
d:\ord:\azurefilecache
Next, we have a couple of choices to make. This will determine which, how many, and when the Azure files are synced.
Cloud Tiering
As explained in the beginning, with Cloud Tiering, you can turn your server into a local cache of your Azure File share. Cloud Tiering is only possible when using a separate volume, you can’t use it if you want to store the data on the same disk as where you have your OS installed on.
When enabled, you can set how much storage space you want to keep free. Another option is to enable Date Policy. This allows you to cache only the files that are accessed the last x days (for example, the last 15 days).
Initial Sync
The initial sync is an important want to take a look at. Which option you should choose really depends on where you have your files stored right now.
- Merge – This merges the contents of Azure Files with your local folder. If a file exists in both locations, then both versions will be kept.
- Authoritatively overwrite – When your Azure Files are empty (or outdated), and you have only files on your local server, then choose this option.
Initial Download
The last option that you will need to take a look at is the initial download option. You can choose to download only the namespace of the file or to download as many files as possible.
The first option is similar to how OneDrive works these days. You will see all the files, but they are only downloaded when you access them. This is the best option if you want to keep as much space-free as possible locally.
When performance is important, then you might want to download as many files as possible upfront. This will reduce the latency for your users.
Finish the Server endpoint configuration
After you have made your choices, click on Create. The server endpoint will be provisioned. It can take a couple of minutes until the initial up- and download will start. If you click on the server, you can view more details about the sync status and any errors that might have occurred.
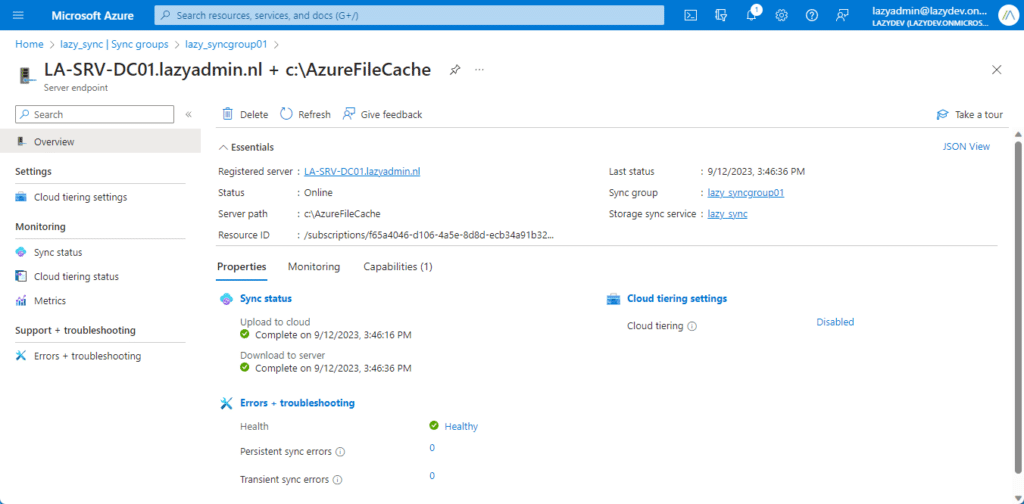
When Azure Files is the source of the files, then you will see that all the files and folders are quickly listed on the server. Depending on your configuration, it can then still take some time until they are actually downloaded to your server.
Wrapping Up
Azure File Sync in combination with Cloud Tiering is a great option when SharePoint isn’t an option for your business case, but you still want to store your data centrally in the cloud. The Cloud Tiering will make sure that your users can quickly access the file that they regularly need, making working with it as seamless as possible.
I hope you like this article, if you have any questions, just drop a comment below.