The Netsh WLAN command can be used to show and manage wireless network profiles. It even allows you to read the stored wireless network password and import or export all stored wireless networks.
Managing wireless networks can also be done through the settings menu in Windows. But the advantage of the netsh WLAN command is that you can use it in scripts or deployments as well.
In this article
In this article, we are going to take a look at how to use the netsh WLAN command in Windows.
Netsh WLAN Show Profiles
You can use the Netsh WLAN command in command prompt, Windows PowerShell and Windows Terminal. It’s however important that you run it with elevated permissions. To do this for Windows PowerShell for example:
- Right-click on Start (or press Windows key + X)
- Choose Windows PowerShell (admin)
- Click Yes on the UAC prompt
We are going to start with listing all stored WLAN profiles on our computer. WLAN profiles are wireless network that you have used on your computer. Windows will store the wireless network name (SSID) and password (keyphrase), so it can automatically reconnect.
netsh wlan show profiles

# Result
Profiles on interface Wi-Fi:

Group policy profiles (read only)
---------------------------------
    <None>

User profiles
-------------
    All User Profile     : Mohito
    All User Profile     : CABIN-17
    All User Profile     : LinkTest
    All User Profile     : Uplink
So in this example, we have stored 4 wireless networks on the computer. It will only show the name of the wireless networks.
To view more details of a wireless network, we can specify the name of the network in the netsh wlan show profile command. For example, to view the details of the wireless network LinkTest, we can do:
netsh wlan show profile name=LinkTest
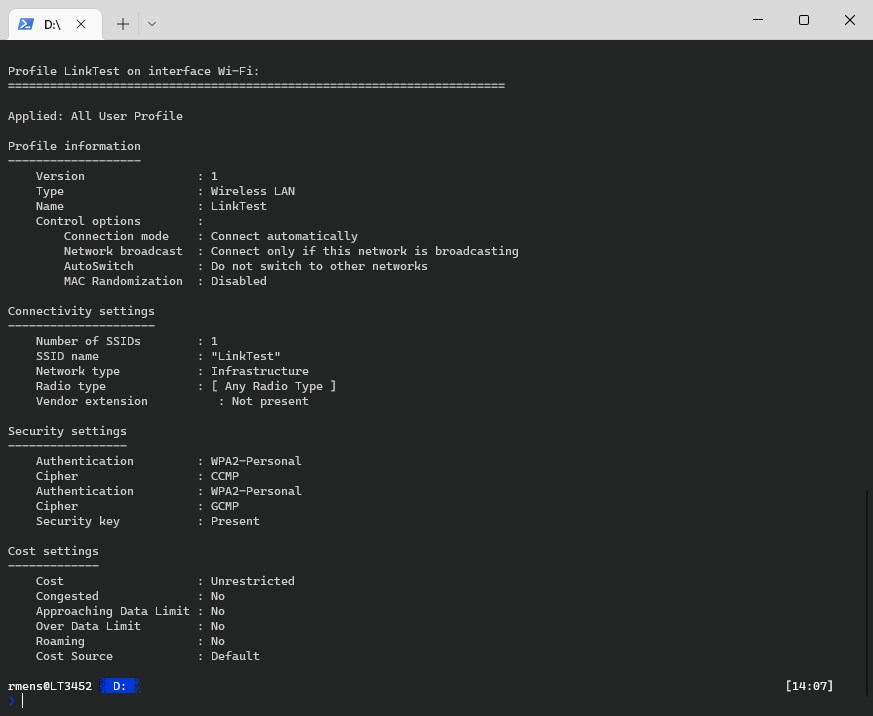
This command will give you a lot more valuable information about the stored wireless network. We can see for example that the connection mode is set to automatically.
View Wireless Network Password
The netsh WLAN show profiles command also allows us to view the stored password of a wireless network. This can be really convenient if you don’t know the wireless password anymore but have a connected Windows device.
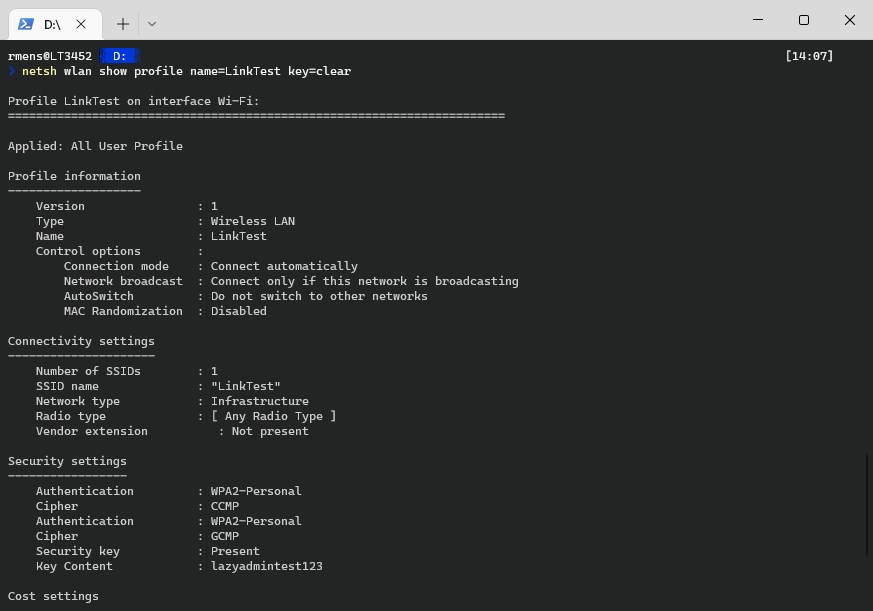
We can also use this command to export the wireless networks so we can automatically import them into another computer. To view the wlan password we only need to add the parameter key=clear to the command:
netsh wlan show profile name=LinkTest key=clear
If you look at the screenshot below, you will now see key content in the security settings block:
Changing Wireless Network Settings with Netsh WLAN
The Netsh WLAN command doesn’t only allow you to list wireless network information. You can also modify the settings of the wireless network. All these settings can also be done through the Windows settings screen, but the advantage of the command is you can easily update settings on multiple computers.
Change Connection Mode
By default, Windows will automatically connect to a wireless network. You can change this in the wireless network settings, or use the netsh wlan command for this with the parameter connectionmode.
Note that we are starting the command with netsh wlan set profileparameter, instead of show profile.
# Set the connection mode the manual
netsh wlan set profileparameter name=LinkTest connectionmode=manual

# Set the connection mode the automatic
netsh wlan set profileparameter name=LinkTest connectionmode=auto
Changing Connection Priority
Another common setting to change is the connection priority. Windows will by default connect to the best wireless network in reach. We can control this behavior by setting the wireless network priority.
Again, note that we will be using netsh wlan set profileorder this time. We also need to enter the interface name which you can look up with netsh wlan show interfaces.
netsh wlan set profileorder name=LinkTest priority=1 interface="Wi-Fi"
Delete Wireless Network Profile
We can also delete a wireless network profile with the netsh WLAN command tool. Deleting a profile we remote all information of the wireless network and make sure that users can’t connect to that network again, without re-entering the wireless network password.
netsh wlan delete profile name=LinkTest
Export and Import Wireless Network Profiles
I personally use the netsh command mostly to export and import wireless network profiles. When deploying new notebooks I want all the wireless networks to be preconfigured for our users. We can do this by first exporting the stored profiles from a notebook to an XML.
When exporting the profiles it’s important to export the wireless network keys as well. Keep in mind that the wireless network keys are stored in plain text in the XML file. You will need to export each wireless network profile separately.
# Export a single wireless network
netsh wlan export profile name=LinkTest key=clear folder=C:\temp\wlanprofiles

# Export all wireless networks
netsh wlan export profile key=clear folder=C:\temp\wlanprofiles
Each wireless network profile will have its own XML file
<?xml version="1.0"?>
<WLANProfile xmlns="http://www.microsoft.com/networking/WLAN/profile/v1">
	<name>LinkTest</name>
	<SSIDConfig>
		<SSID>
			<hex>4C696E6B54657374</hex>
			<name>LinkTest</name>
		</SSID>
	</SSIDConfig>
	<connectionType>ESS</connectionType>
	<connectionMode>manual</connectionMode>
	<MSM>
		<security>
			<authEncryption>
				<authentication>WPA2PSK</authentication>
				<encryption>AES</encryption>
				<useOneX>false</useOneX>
			</authEncryption>
			<sharedKey>
				<keyType>passPhrase</keyType>
				<protected>false</protected>
				<keyMaterial>lazyadmintest123</keyMaterial>
			</sharedKey>
		</security>
	</MSM>
	<MacRandomization xmlns="http://www.microsoft.com/networking/WLAN/profile/v3">
		<enableRandomization>false</enableRandomization>
		<randomizationSeed>1198958294</randomizationSeed>
	</MacRandomization>
</WLANProfile>
Import the wireless network profiles
For importing the profiles we have a couple of options. The most common way to import to profile is for all users and all wireless network interfaces. But it’s also possible to import the profile only for the current users or a specific network interface.
To simply import a single WLAN profile we can use the following command:
netsh wlan add profile filename="LinkTest.xml"
This will import the wireless network profile for all users and all wireless network interfaces. To import the profile only for the current user we can add the parameter user=current to the command:
netsh wlan add profile filename="LinkTest.xml" user=current
To import multiple wireless network profiles with netsh we can use the PowerShell script below. This script will import each XML file from the given directory:
#Import all WLAN Xml-files from specified directory
$XmlDirectory = "c:\temp\wlanprofiles"

# Loop through each XML file in the directory
Get-ChildItem $XmlDirectory | Where-Object {$_.extension -eq ".xml"} | ForEach-Object {
  netsh wlan add profile filename=($XmlDirectory+"\"+$_.name)
}
Netsh WLAN Show Interfaces
The netsh WLAN command can be used for more than managing wireless network profiles. We could use it for example also to read out the wireless network interfaces with the command netsh wlan show interfaces.
This command will give you information about the available wireless network interfaces and their status. This can be useful if you want to debug connection issues remotely through the command line.
netsh wlan show interfaces

A good use case for the Netsh WLAN Show Interfaces command is to find the access point to which a device is connected. Knowing the access point to which a device is connected can really help with debugging network issues.
In the output of the show interface command, you will find the BSSID, which will contain the MAC address of the access point the device is connected.
Netsh WLAN Show Networks
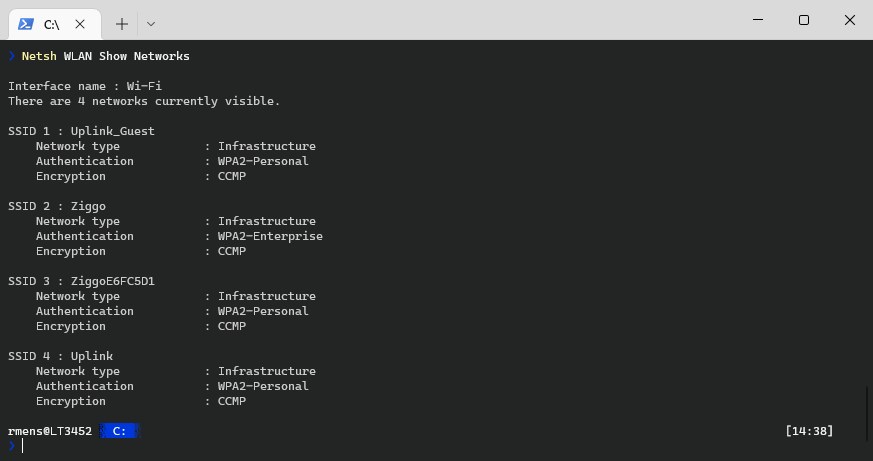
Another useful command for remote debugging is netsh wlan show networks. This command will list all wireless networks in range of the clients.
netsh wlan show networks
Netsh WLAN Connect / Disconnect
We could then use the command netsh wlan connect followed by the network name to connect to a wireless network from the command line:
netsh wlan connect name=Uplink
If you have multiple wireless network cards (interfaces), then you can also specify which interface you want to use by using the parameter interface="interfacename".
Disconnecting from a wireless network from the command line is done by simply using the command
netsh wlan disconnect
Wrapping Up
The netsh wlan command is a really useful command to manage wireless networks from the command line. I often use the command to update or add new wireless network profiles remotely to multiple devices.
I hope you found this article useful, if you have any questions, just drop a comment below.


A wonderful post. I used some of these scripts, in addition to a shell script with Autoran on a USB, and it was wonderful. I will share the code with you to try it if you want.
@ECHO OFF
FOR /F “tokens=2 delims=:” %%a IN (‘netsh wlan show profile ^| findstr “Profile”‘) DO (
set “name=%%a”
setlocal enabledelayedexpansion
netsh wlan show profile name=!name:~1! >> output.txt
netsh wlan show profile name=!name:~1! key=clear >> output.txt
endlocal
)
and>>
Use this code to hide the command window>>
Set WshShell = CreateObject(“WScript.Shell”)
WshShell.Run chr(34) & “yourFilleName” & Chr(34), 0
Set WshShell = Nothing
how do you connect to a wifi using its BSSID not the ESSID
You can use a tool, WifiInfoView.exe for that.
i want to known how i make my own command used like netsh wlan
This is a nice piece, the steps are well articulated. Thank you.
Can you use the command below on a remote PC that’s on the same domain network via CMD??? I know it can be used on the local PC but i’d like to know if it can be used on a remote PC, if so, how please? Thanks
netsh wlan connect ssid=SSID name=SSID interface=Wi-Fi
You can use PowerShell to run a command on a remote computer:
Invoke-Command -ComputerName comp01, comp02 -ScriptBlock {netsh wlan connect ssid=SSID name=SSID interface=Wi-Fi}You might also want to check out PDQ Deploy, a great tool for this kind of things and more 😉
How can we change the connection limit to a network through command?
That is not possible as far as I know