Storing your files in SharePoint Online has a lot of benefits, but opening the browser every time that you need a file is just not that convenient. Most users still prefer to use File Explorer to navigate through folders and open files. So how do you add SharePoint to File Explore?
There are a couple of options for adding SharePoint to File Explorer. We can for example open SharePoint directly, sync the files to your computer using the OneDrive client, or to create a shortcut to the folder in your OneDrive.
In this article
In this article, we will look at the different methods on how to Add SharePoint to File Explorer.
Sync SharePoint
We will start with the most commonly used option, syncing SharePoint with the OneDrive client. Syncing the SharePoint files to your computer allows you to quickly access the files from your File Explorer. And another big advantage is that you can even access the files while you are offline.
By default, the OneDrive client, which is used to sync SharePoint will only show the files and folders that are available. When you open a file, then it will be downloaded instantly to your computer and kept in sync with the version in SharePoint. This on-demand method allows you to quickly access the files in SharePoint but doesn’t cost you a lot of storage space on your computer.
It’s also possible to pre-download all the files to your computer. This way you will always have the latest version of the file on your computer in case you don’t have an internet connection. Any changes made to the files will be synced as soon as you are back online.
Sync SharePoint with OneDrive Client
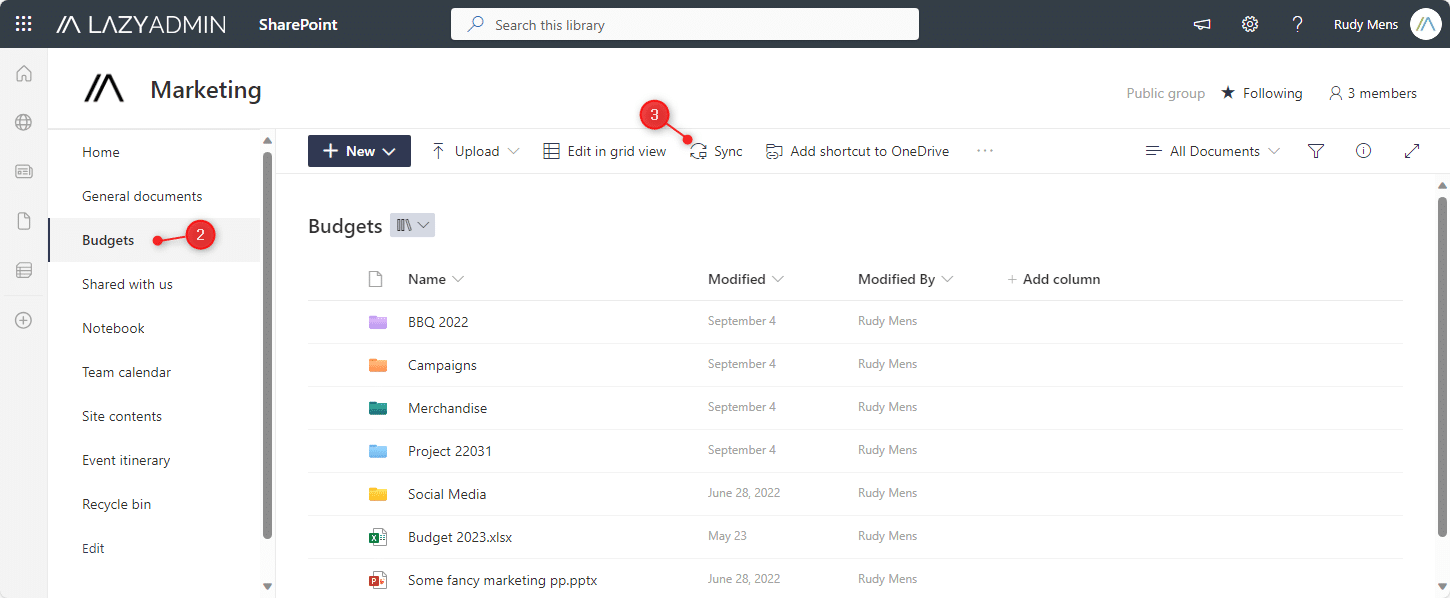
To sync SharePoint we are going to use the OneDrive client. The OneDrive client is pre-installed on all Windows 10 and 11 computers, so you don’t need to install anything. Each SharePoint site can have multiple document libraries (which are listed on the left side), you will need to sync each document library individually that you need:
- Open the SharePoint site that you want to sync
- Open the document library
- Click on Sync
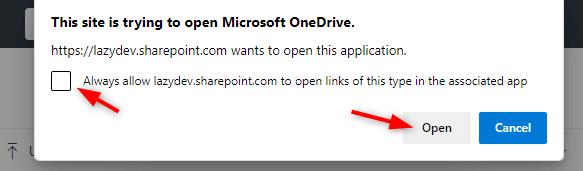
When you sync files for the first time, you will probably get a warning stating “This site is trying to open Microsoft OneDrive”. Make sure that you select Always allow… and click on Open
Note
If you haven’t used OneDrive before, then you will need to set up OneDrive. Use the email address that you also use to log in to Microsoft 365 and click on Sign In.
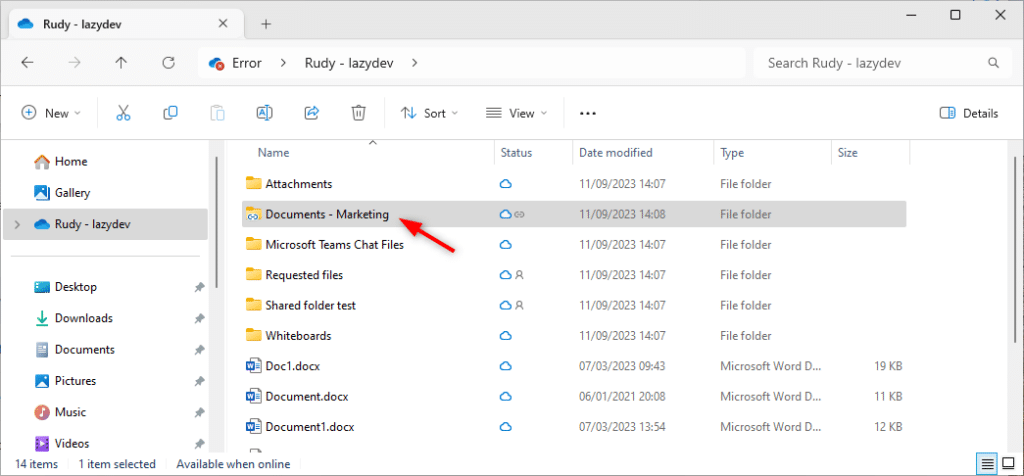
The SharePoint files are now available in your File Explorer. Open the Explorer, on the left side, you will see your company name with a blue Office building icon. Expand it, and you will see the SharePoint library that we have synced:
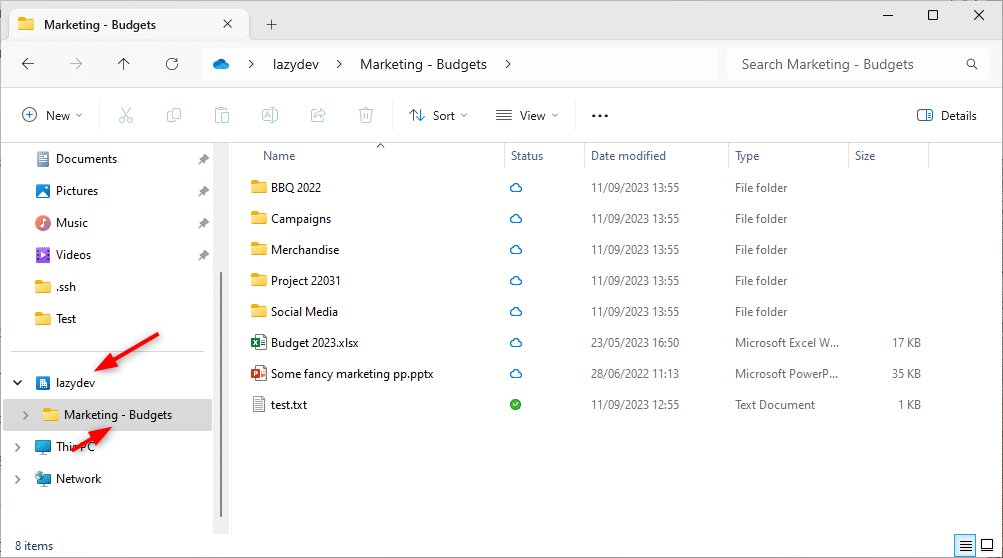
All the folders and files are listed now in your Explorer. The column Status indicates if the file is downloaded to your computer or not. A blue cloud icon indicates that the file is available online. Files or folders with a green checkmark are downloaded on your computer.
Adding Shortcut to SharePoint
Another option, which I actually recommend not to use, is to add a shortcut to SharePoint in your OneDrive. This feature is enabled by default, and allows you to create a link to a SharePoint library or folder directly into your OneDrive folder.
When you have your OneDrive synced to your computer, the behavior of the SharePoint shortcut is the same as the normal sync method. Only the folder is located in another place.
The only reason to use this method is if you are using OneDrive solely online, and want to create a quick access link (shortcut) to a SharePoint folder.
One of my readers pointed out a good use case for the shortcut method, which I hadn’t thought of. When your users move a lot between multiple computers, or when they are working on a remote desktop environment, then the shortcut method does make sense.
If you use the sync method, then you will need to re-sync your SharePoint sites on each new computer that you log in to. The shortcuts, however, easily “travel” with you in your OneDrive.
Follow the steps below to add a shortcut to SharePoint:
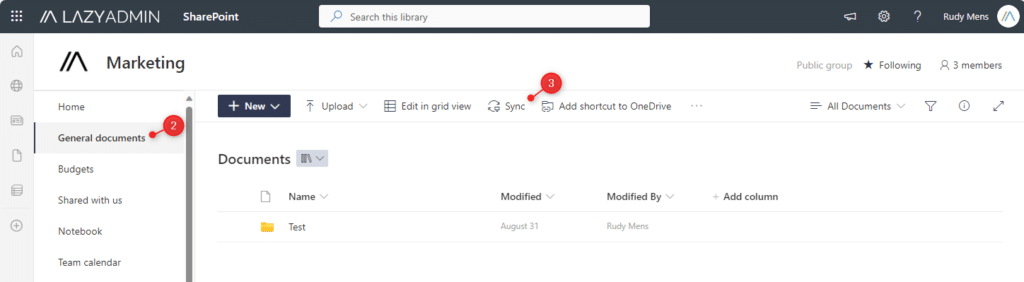
- Open the SharePoint site
- Navigate to the document library and/or subfolder
- Click on Add shortcut to OneDrive
If you now open your File Explorer, then you will find the shortcut to the SharePoint library in your OneDrive folder. You will also find the shortcut in your OneDrive folder when you open OneDrive online.
Disable Add shortcut to OneDrive in SharePoint
As mentioned, I don’t recommend to use this method. There is no real advantage over this method, compared to the normal sync method, and the problem is that you now have two locations in your Explorer where you can access your SharePoint files.
What I also often have seen happening, is that use create a shortcut to a single folder in a document library. Then they later decide they want to sync the whole library, but then they get the following error Sorry, we can’t sync this folder.
The reason for this error is that you created a shortcut to this or one of the subfolders. To solve this, you will need to remove the shortcut first in your OneDrive folder.
You can remove the feature Add shortcut to OneDrive in SharePoint with the help of PowerShell:
# Optional, install the SharePoint Online Module
install-module microsoft.online.sharepoint.powershell

# Connect to SharePoint Online
Connect-SPOService -Url https://lazydev-admin.sharepoint.com

# Disable Add shortcut to OneDrive
Set-SPOTenant -DisableAddShortcutsToOneDrive $true
SharePoint view in File Explorer
The last option that we are going to take a look at is adding SharePoint to File Explorer. This method will create a direct link to your SharePoint library or folder. This method won’t download files to your local computer, so it won’t take up any storage space on your device.
To use this method we first need to make a couple of changes in SharePoint, with PowerShell. Also on the clients, we will need to change a registry key, which we can do locally or with a GPO. In either case, you will need to have admin permissions in SharePoint and on your computer.
Enable View in File Explorer
The first step is to enable the option View in File Explorer in SharePoint Online. This option is turned off by default. Open PowerShell and connect to SharePoint Online:
Make sure that you have installed the PowerShell module:
Install-Module -Name Microsoft.Online.SharePoint.PowerShell

Connect to SharePoint Online:
Connect-SPOService -Url https://lazydev-admin.sharepoint.com
Run the following command to enable View in File Explorer for your tenant:
Set-SPOTenant -ViewInFileExplorerEnabled $True
Set the Registry Key on the Client
Next, we will need to set a registry key on the client. We have a couple of options to do this, we can use the registry editor, use PowerShell, or create a GPO for it. Using PowerShell is the easiest method, simply open PowerShell as Admin and run the following command:
reg add "HKEY_LOCAL_MACHINE\Software\Policies\Microsoft\Edge" /v ConfigureViewInFileExplorer /d "[{'cookies': ['rtFa', 'FedAuth'], 'domain': sharepoint.com'}]" /f
You can also use the registry editor to create the key:
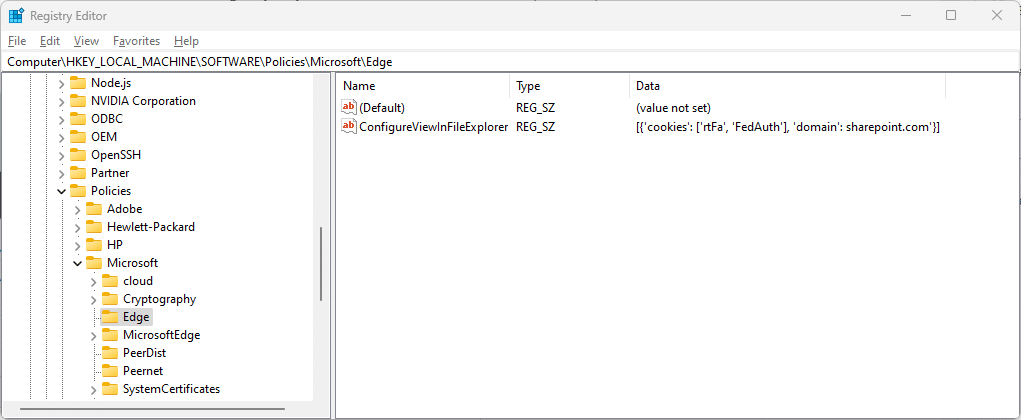
- Navigate to HKEY_LOCAL_MACHINE\Software\Policies\Microsoft
- Create the key Edge
- Create a new REG_SZ value named ConfigureViewInFileExplorer with the following data [{‘cookies’: [‘rtFa’, ‘FedAuth’], ‘domain’: sharepoint.com’}]
Tip
If you want to quickly test this feature, then create the key in the HKEY Current User instead of the HKEY Local Machine.
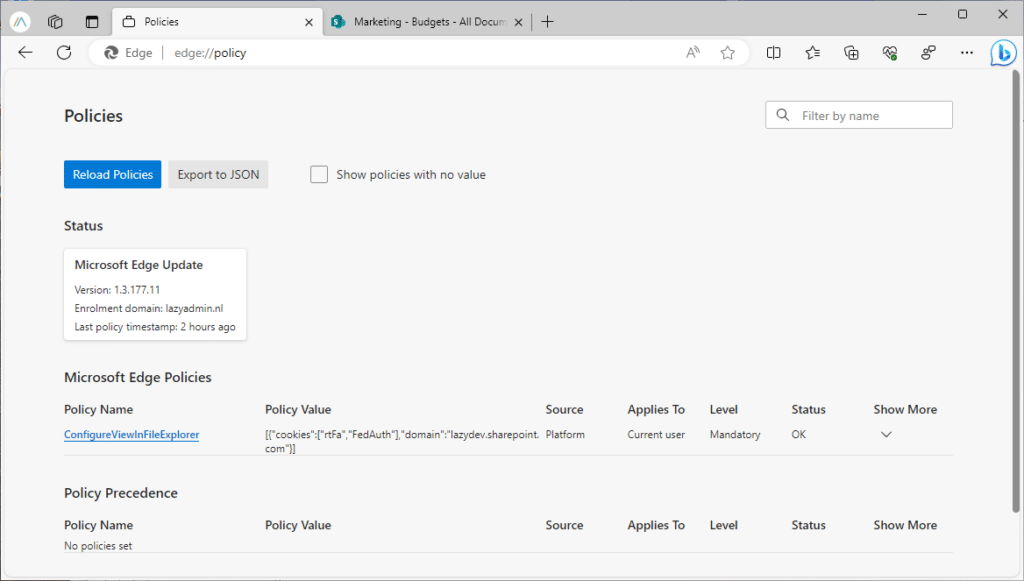
Reload Edge Policies
You will need to restart Edge to make sure that the new policies are loaded. We can verify the settings by going to the following URL in Edge: edge://policy/. Click on Reload Policies to view all the applied Edge Policies:
Add SharePoint to File Explorer
With everything configured, we can now add SharePoint to File Explorer.
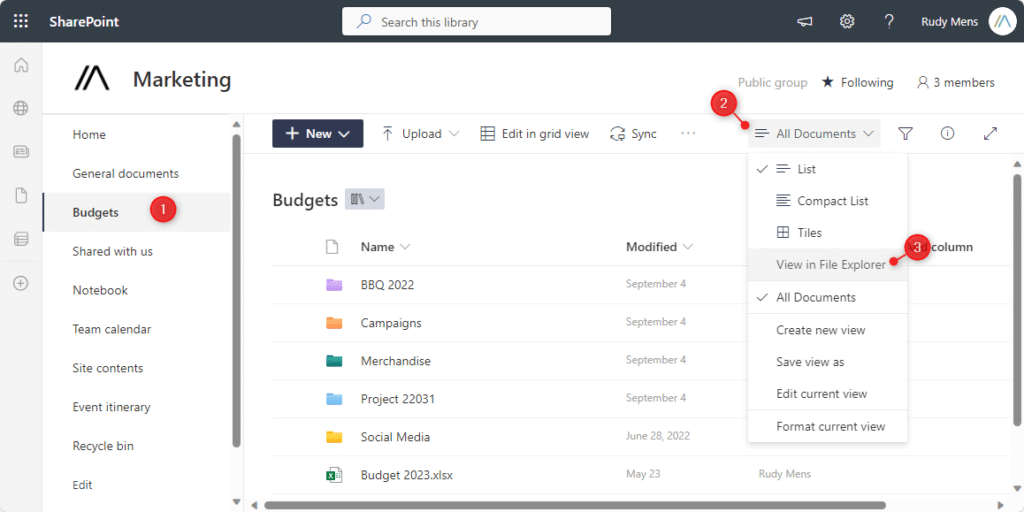
- Open the SharePoint site and document library that you want to open in Explorer.
- Click on All Documents
- Select View in File Explorer from the dropdown list
It can take a moment, but your File Explorer will now open with a direct link to your SharePoint files. We can now open, edit, or upload files to SharePoint without the need for the OneDrive client. You can pin the SharePoint folder to your quick access list in Explorer so you can easily access it:
- Click on the 3 dots
- Choose Pin to Quick Access
- You can now open it from the Quick Access List

Wrapping Up
As you have seen, there are multiple ways to add SharePoint to the File Explorer. The most common way is to use the OneDrive Client, but the View in File Explorer can also come in really handy in some situations.
Keep in mind that the View in File Explorer method only works in Edge. Other browsers are not supported.
I hope you found this article helpful, if you have any questions, just drop a comment below.


Is there any way to manually create the Sharepoint shortcuts as a user? Or copy existing ones for another user?
Our sysadmins also prefer the syncing method but the users much prefer the shortcuts for exactly the reason Tim pointed out in his comment. We are working on the same files and are also archiving files on the Sharepoint site, it already happened more than oce that someone deleted his “link” in explorer (which was actually a sync) and deleted the whole Sharepoint site.
The shortcut in OneDrive can be done by the user. The other option requires registry modification, for which you will need to have local admin permission.
We are switching from syn to add shotcut to onedrive, as pointed out for user who switch computers and for a better reason and that is that users can safely remove the shortcut from the explorer. If they delete a synced folder without disconnecting the folder first they will remove documents on sharepoint. If you use the shortcut to onedrive the user can remove the folder and not remove the actual folder/items. This is the main reason why we are going to use it