Microsoft Defender is in Windows 11 the default anti-virus/malware solution just like it was in Windows 10. It protects your computer against malware and virus threats. Even though it’s one of the best antivirus solutions on the market today, you still might want to turn off Windows Defender for testing purposes or on devices that are not connected to the internet.
Keep in mind that Windows Defender is turned off automatically when you install another antivirus application. So you don’t need to worry about that.
In this article, I will explain how you can fully turn off Windows Defender in Windows 11 and how to stop it temporarily.
Turn Off Windows Defender Temporarily
We are first going to take a look at how to stop Windows Defender temporarily. In Windows 11 we will need to open the Windows Security app for this.
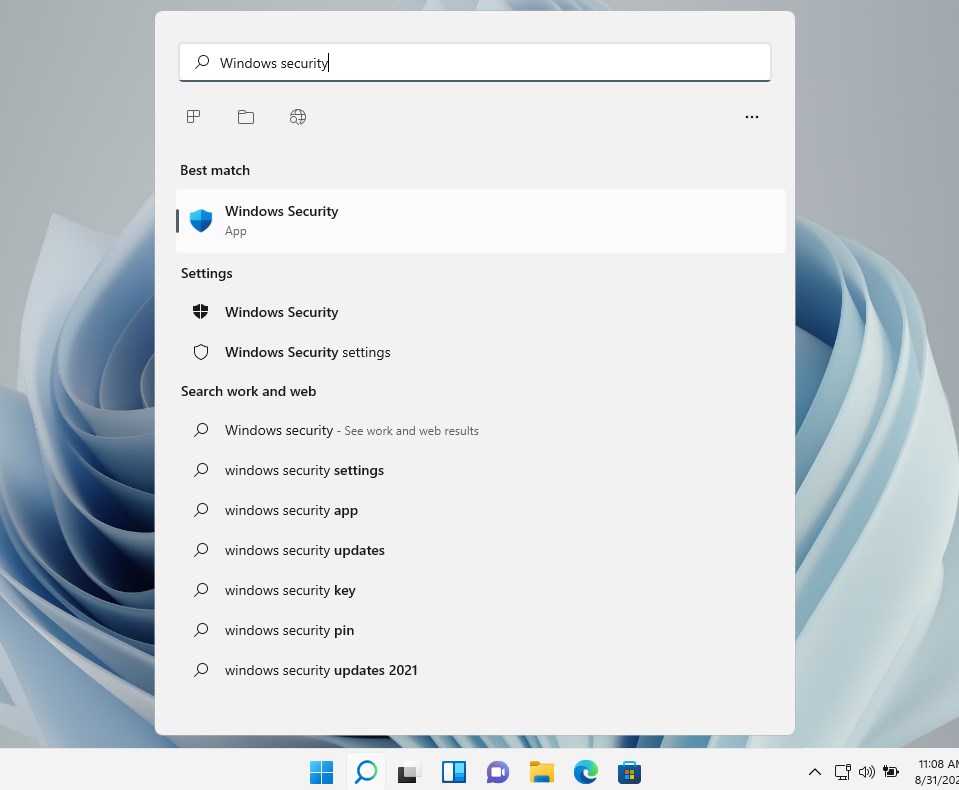
- Open the Start Menu
- Type Windows Security
- Open the Windows Security App
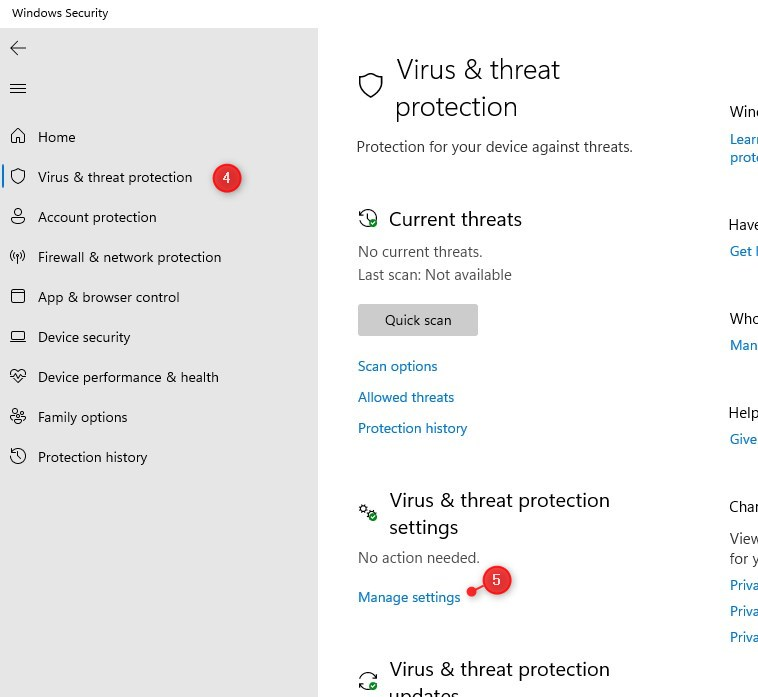
- In the Windows Security screen open the Virus & Threat protection.
- Click on Manage Settings under Virus & Threat protection settings
We can now disable the Real-time protection which should be enough for most testing purposes. When you turn it off you will get a warning, just click yes to disable the Windows Defender.
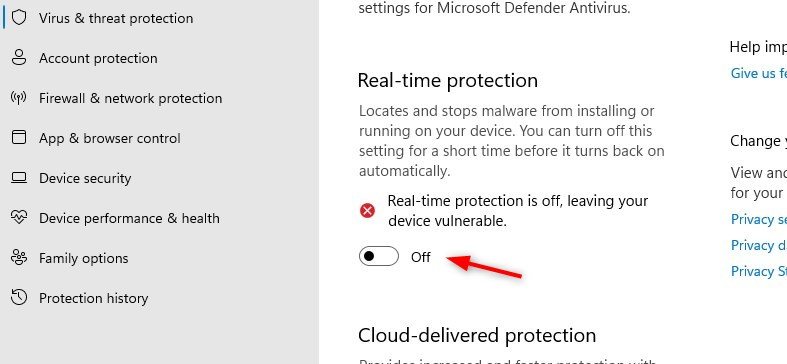
The Real-time protection will automatically turn back on after a short time. If you open the task manager you will see that the Microsoft Defender Antivirus service is still running. Also when you reboot your computer the process is automatically started again.
Disable Windows Defender in Windows 11 Permanently
Permanently disabling Windows Defender can be challenging. Methods that worked in Windows 10 don’t seem to work in Windows 11 anymore. I have tested pretty much every possible method that was described for Windows 10, but every time Windows Defender was able to automatically start up again.
I have tried disabling Windows Defender with:
- gpedit – The setting Turn off Microsoft Defender Antivirus is reset after reboot
- Disabeling the services from the startup – Settings are reverted within 2 minutes after reboot
- Removing the Wdboot driver – Setting is reverted as well
I have two options that seem to work and last. The first is through taking ownership of the Windows Defender executable and removing all permissions from it. This way the system principal can’t start the Microsoft Defender services.
The second option is by editing a couple of registry items, which disable the startup of services related to Windows Defender.
Step 1 – Boot into Safe Mode
The first step is to boot into Safe Mode. Without Safe Mode, we can’t take ownership of the MsMpEng.exe file.
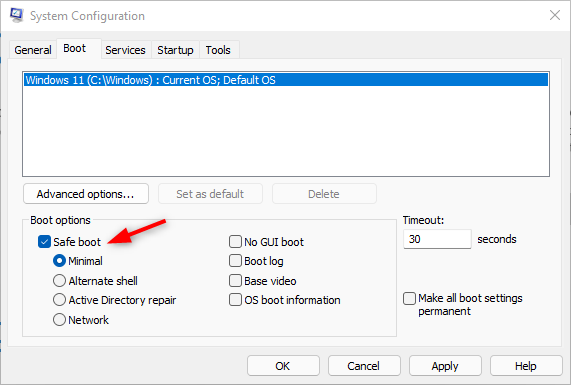
- Press Windows key + R to open the run dialog
- Type msconfig and press enter
- Select the boot tab
- Under Boot opties enable “Safe boot“
- Press Ok and restart your computer
Step 2 – Take Ownership of Defender
The next step is to take ownership of the Windows Defender application folder. This way we can hopefully also prevent any updates from Defender.
- Open Explorer
- Navigate to c:\programdata\Microsoft\Windows Defender\
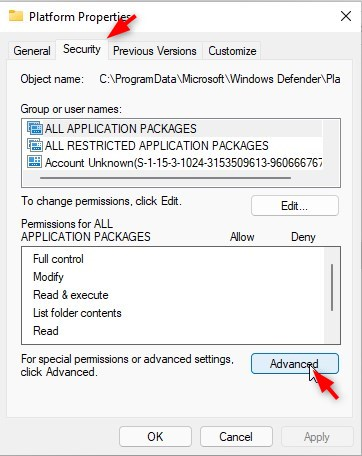
- Open the properties of the folder Platform (right-click > select properties)
- Select the Security tab
- Click on Advanced
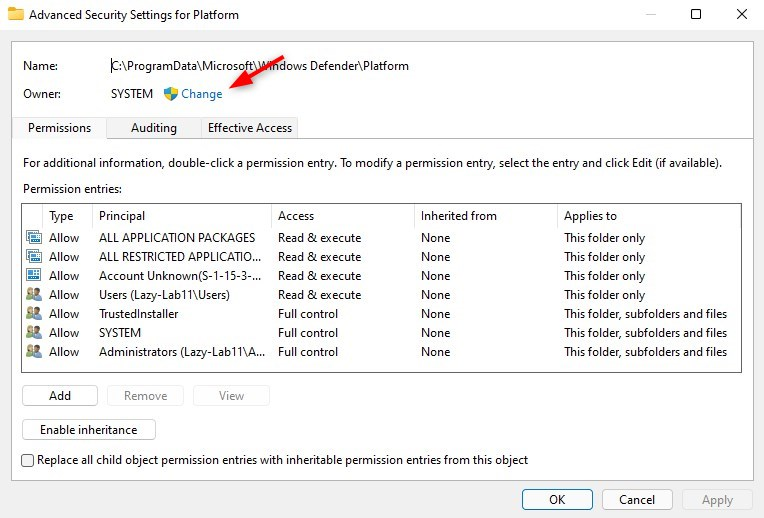
- Change the Owner
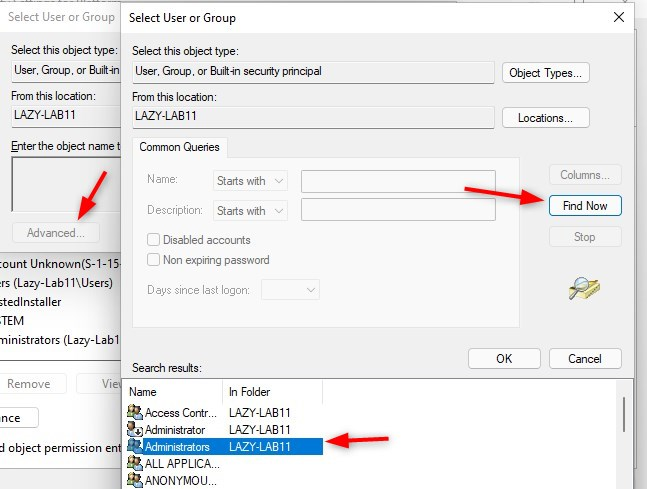
- Click on Advanced > Find Now and select Administrators
- Click Ok (twice) to take ownership
Step 3 – Remove All Permissions
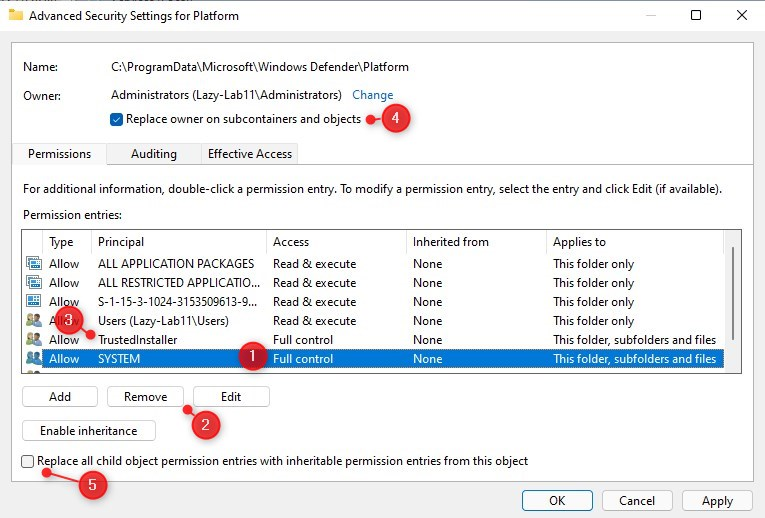
We now have ownership of the Windows Defender application. All we now need to do is remove all users/principals from the list.
- Select each Permission entry
- Click Remove
- Do that for all users/entries in the list
- Make sure you select Replace owner on subcontainers and objects
- Select Replace all child object permi…
- Click Apply
Step 4 – Disable Safe boot and reboot
To reboot back to the normal version of Windows 11 we need to disable the safe boot option. Open MSConfig again and remove the safe boot option:
- Windows key + R
- Type msconfig <enter>
- Open the tab Boot
- Unselect safe boot
- Restart your computer
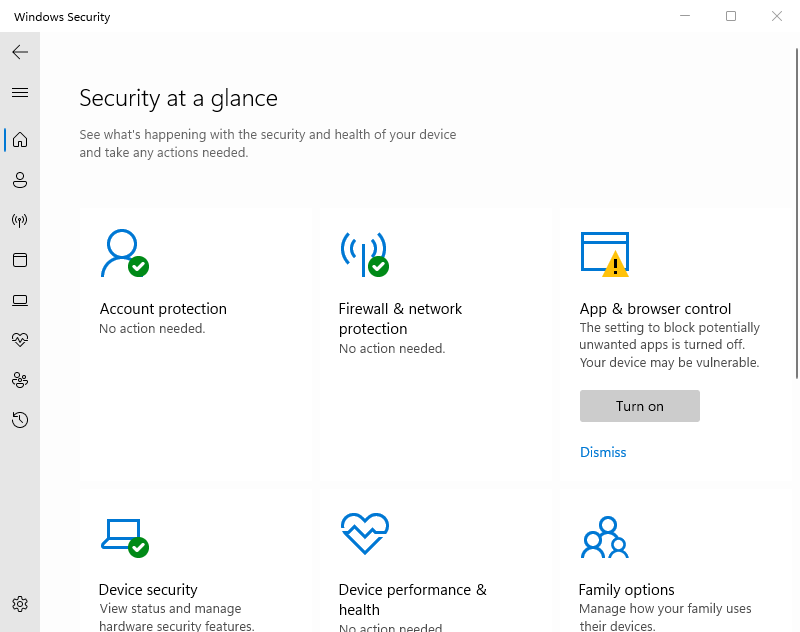
If you now open the Windows Security app in Windows 11 you will see that Virus & Threat Protection is completely gone.
Using RegEdit to disable Windows Defender in Windows 11
An alternative way to disable Windows Defender in Windows 10 or 11 is to use the registry. For this, you will also need to boot into safe mode. Follow step 1 from the previous chapter to boot into safe mode.
Once booted in safe mode:
- Press Windows key + R
- Type regedit <enter> to open the registry
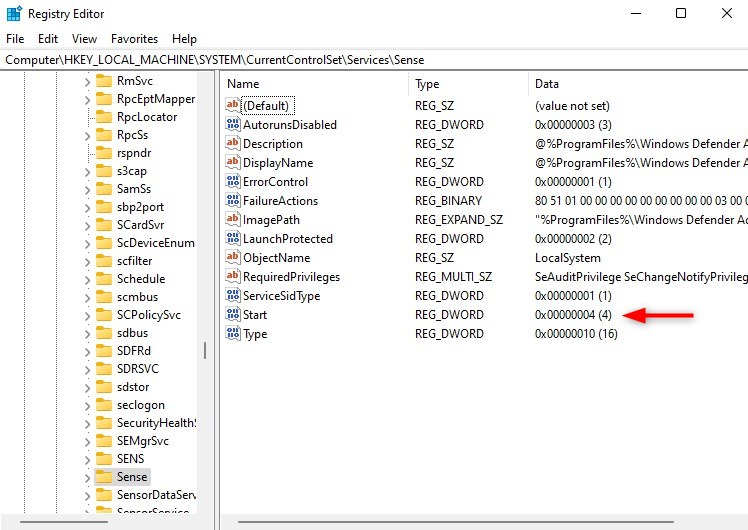
- Navigate to HKEY_LOCAL_MACHINE\SYSTEM\CurrentControlSet\Service
- Change the following folders the key Start to 4
- Sense
- WdBoot
- WdFilter
- WdNisDrv
- WdNisSvc
- WinDefend
Follow step 4 from the previous chapter to reboot Windows back to normal mode.
Revert the change
If you no longer want to disable Windows Defender you can easily revert the change. You will need to restart into safe mode again and give System and TrustedInstaller full access permission on the Platform folder.
When you used the registry method, then restore the values to:
| HKLM\SYSTEM\CurrentControlSet\Services\Sense\Start | 3 |
| HKLM\SYSTEM\CurrentControlSet\Services\WdBoot\Start | 0 |
| HKLM\SYSTEM\CurrentControlSet\Services\WdFilter\Start | 0 |
| HKLM\SYSTEM\CurrentControlSet\Services\WdNisDrv\Start | 3 |
| HKLM\SYSTEM\CurrentControlSet\Services\WdNisSvc\Start | 3 |
| HKLM\SYSTEM\CurrentControlSet\Services\WinDefend\Start | 2 |
Wrapping Up
Keep in mind that you are vulnerable to virus and malware infection without an antivirus application. I don’t recommend disabling defender purely because it takes too much CPU. If you find that Windows Defender is consuming too many resources then try another antivirus solution.


This really helped me, my PC was super slow and HD at 100% because of Defender, opening a simple jpg took 45 seconds, on my Win7 PC opening a simple images takes 1 sec.
I deleted the permissions and it’s running faster now.
Thanks very much!
I don’t think all of this is needed any more. Boot to Safe Mode then gpedit disable:
ComputerConfiguration>AdministrativeTemplates>Windows Components>MicrosoftDefenderAntivirus
and
ComputerConfiguration>AdministrativeTemplates>Windows Components>MicrosoftDefenderAntivirus>Real-timeProtection
Then edit the registry as above but you only need to set the WinDefend key to 4.
I believe there is a Smart Screen something or other that needs to be disabled too. Ugh, all this layers upon layers of garbage slows the computer SO MUCH. Smart Screen, Defender, Anti-tamper, real-time protection, blah, blah, blah. Adding MORE layers isn’t going to make Windows more secure. Fix the OS!
In my experience, the registry way doesn’t work. After rebooting the computer back in to normal mode the service(s) is still going.
Removing the permissions works but Windows update still wants to update “Defender” and it can’t as it has no permissions to that folder, so it shows pending updates. You can exclude those updates with wushowhide.diagcab but if you monitor remote computers like I do, then you will always have those missing Defender updates pending causing a yellow flag on the monitoring system.
In any case thanks for this idea. I will continue trying to work on this to try to disable these “Defender” services. I will post further if I find a way.
Thanks, Manny. Please keep us updated if you find a way. 🙂
[HKEY_LOCAL_MACHINE\SYSTEM\CurrentControlSet\Services\Sense]
The above key is no longer in Windows 11 22H2
This worked beautifully pre 22H2. In fact, it was the *only* thing, out of so many suggestions … fixes etc out there, that *did* work.
But it doesn’t work in 22H2 which is a bit of a tragedy. MS must have seen your evil work … I mean, how dare we think that *we* might own/control our computers, when MS knows that only *it* is capable of knowing what’s best for us, and must retain control to protect us from ourselves!
So … any thoughts on a 22H2 version? I’d be the first to try it.
Thanks for your great work.
Thank you so much for this. I used the registry example from above and it perfectly disabled Windows Defender under the latest build of Windows 11. I have been trying for hours to find a way to do this and your article did the trick. 🙂
Thanks for this! New Defender leak in Feb/mar 2022 took all 32gb of ram and had another 30bg+ cached by 15mins after boot. Couldnt do anything on my PC until doing the regedit. They shouldnt make it this tough for admins to turn this off.
Guys After taking owner authority as administrator, I just deleted every other entry except that administrator which is me and then I deleted the whole windows defender folder, and I can confirm that after deleting the whole folder everything seems to be fine…
My pc booted up faster and even i checked for windows update and nothing is broken…
Hi. Thanks Man you’re a champion.
Same experience as you: Windows Defender keeps turning itself back on, even after disabling via Group Policy. WTF Microsoft? Why do you do this?
This works still on the release version build 21H2 or 22000.318
I have a duel boot computer with Zorin
I started Zorin and deleted “windows defender folders in Program files, Program files x86 & Program data. (be sure to open Microsoft folders and delete defender folders there)
Works!!! Thank you….Now, anyone knows what are the default settings instead of 4’s in these keys?
[HKEY_LOCAL_MACHINE\SYSTEM\CurrentControlSet\Services\Sense]
“Start”=dword:00000004
[HKEY_LOCAL_MACHINE\SYSTEM\CurrentControlSet\Services\WdBoot]
“Start”=dword:00000004
[HKEY_LOCAL_MACHINE\SYSTEM\CurrentControlSet\Services\WdFilter]
“Start”=dword:00000004
[HKEY_LOCAL_MACHINE\SYSTEM\CurrentControlSet\Services\WdNisDrv]
“Start”=dword:00000004
[HKEY_LOCAL_MACHINE\SYSTEM\CurrentControlSet\Services\WdNisSvc]
“Start”=dword:00000004
[HKEY_LOCAL_MACHINE\SYSTEM\CurrentControlSet\Services\WinDefend]
“Start”=dword:00000004
(I just remember some are 0 ans some 2…) Thank you
I have updated the article with the original registry values.
nice, thank you, only problem is that you can’t download files from browser that conforms with windows’s scanning-each-downloaded-file policy , which means we’ll need a third-party like browser
Works beautifully, thanks. I appreciate you giving actual useful information instead of all the junk and useless advice that other sites do.
How do I undo this?
Just go back into safe mode, and reset the permissions. (Edit permissions of the folder, and give system and trusted installer full control)
Could you tell me the value on the SENS start hex…I changed that because I don’t have the sense one and can’t remember what the number was……can you tell me realy quick ?
The original values are list in the chapter “Revert the change”, for sens it was 3
The below info works and is easy to do and undo.
1. Boot into safe mode
2 . gogo HKEY_LOCAL_MACHINE\SYSTEM\CurrentControlSet\Services.
3 . Find “Sense” and modify the value of “Start” to HEX “4”
4 . Do the same for WdBoot, WdFilter ,WdNisDrv, WdNisSvc and WinDefend.
To undo this, just use the value the entries had before you changed them. Write them down if you need to.
NICE!
Windows Registry Editor Version 5.00
[HKEY_LOCAL_MACHINE\SYSTEM\CurrentControlSet\Services\Sense]
“Start”=dword:00000004
[HKEY_LOCAL_MACHINE\SYSTEM\CurrentControlSet\Services\WdBoot]
“Start”=dword:00000004
[HKEY_LOCAL_MACHINE\SYSTEM\CurrentControlSet\Services\WdFilter]
“Start”=dword:00000004
[HKEY_LOCAL_MACHINE\SYSTEM\CurrentControlSet\Services\WdNisDrv]
“Start”=dword:00000004
[HKEY_LOCAL_MACHINE\SYSTEM\CurrentControlSet\Services\WdNisSvc]
“Start”=dword:00000004
[HKEY_LOCAL_MACHINE\SYSTEM\CurrentControlSet\Services\WinDefend]
“Start”=dword:00000004
Thanks for the Detailed explanation
This does not appear to work on the release version (Insider Preview) of Windows 11 (clean install from ISO).
Anti-malware service is still active after boot and present in Settings after following guide exactly.
However, as an aside, nuking the permissions for the Windows Defender parent folder seems to do the trick, but breaks Windows Updates.
Can you confirm? I’m not new to the Windows permissions system, but I could be doing this wrong.
How do I revert the permissions
Give System full control again om the Windows Defender Platform folder.