Ubiquiti has made setting up a new UniFi Network incredibly simple. You can get your new network up and running within 5 minutes. But after the initial setup, what else do you need to configure? And how do you get the best performance? We are going to walk through the complete UniFi Setup.
And when it comes to setting up an UniFi network, we also need to look at the best placement for our access points, to get the best performance throughout the entire house.
In this article
In this article, we are going through the complete UniFi setup. I will explain the different settings, and give you tips so you get the best performance out of your network.
UniFi Setup
For this UniFi Setup walkthrough, I am going to use a UniFi Express as a Cloud Controller and add an UniFi Lite access point and UniFi Lite switch to it. We are going to configure the network for a typical home network with a guest network and one normal wireless network.
The UniFi Express doesn’t support threat detection (Suspicious Activity or IDS/IDP), so for that part, we will switch over to the UDM Pro that I have running here. Learn more about the difference between UniFi Cloud Gateways in this comparison article.
We won’t are not going to configure VLANs in this article, but if you want to use VLANs, then make sure you read this article once done.
Step 1 – Initial Setup Process
The initial setup of our UniFi Cloud Gateway or Console is best done using a Bluetooth connection and the UniFi Network app. You can download the app here for Android and here for Apple. Make sure that you have the app installed on your phone.
Connect the WAN port of your Cloud Gateway or console to the internet and connect the power to start the device. The device needs a couple of minutes to power up, in the meantime open the app on your mobile.
Note
If you don’t wan’t to use the app, then connect a laptop to the network, open a browser and go to http://192.168.1.1 to complete the initial setup.
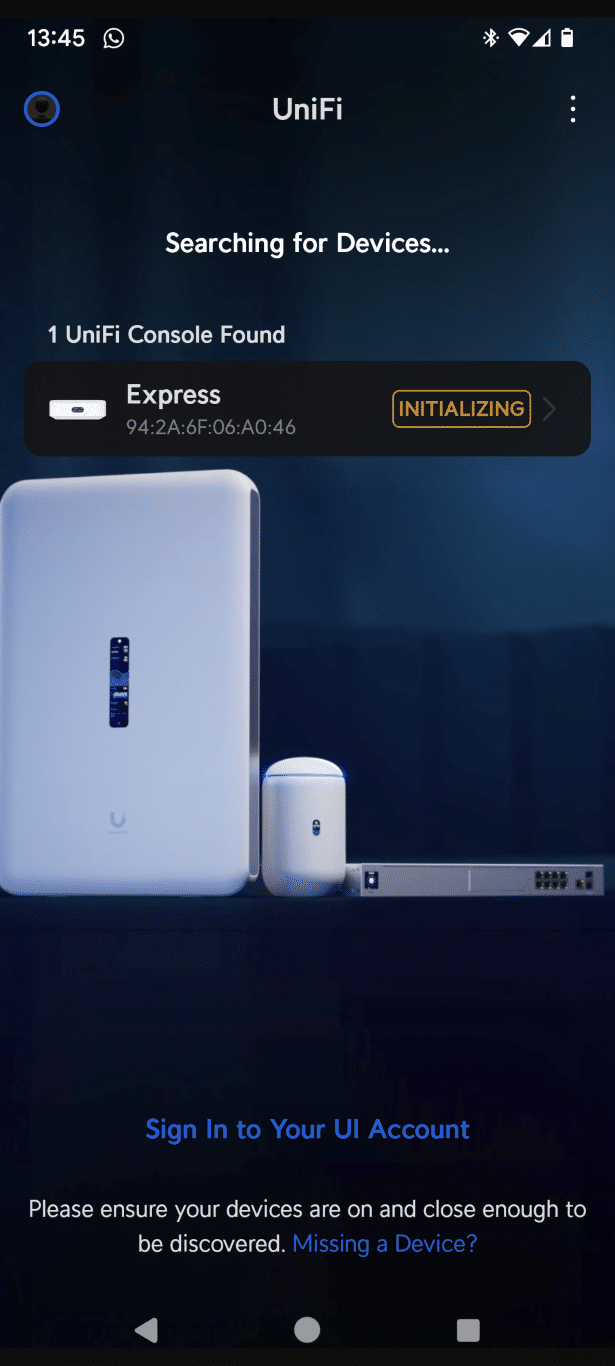
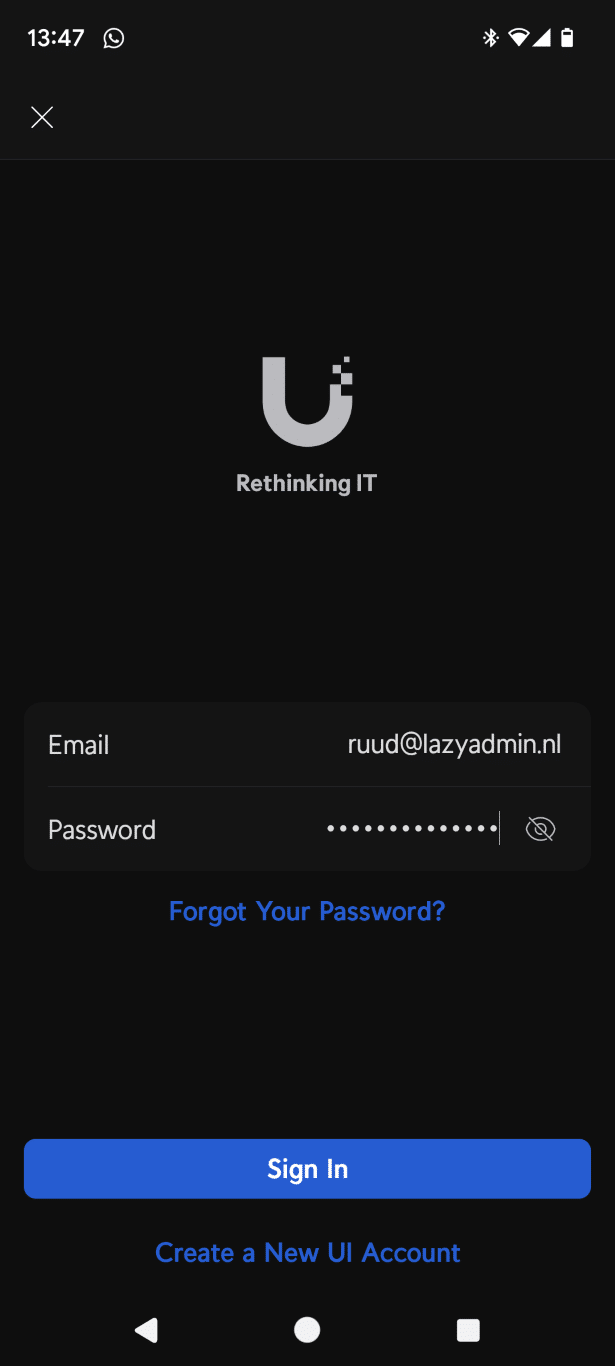

While the console is still initializing, click on Sign In to sign in to your UI Account or to create a new Ubiquiti account. This account allows you to manage your network easily from the internet and also allows you to store automatic backups of your configuration in the cloud.
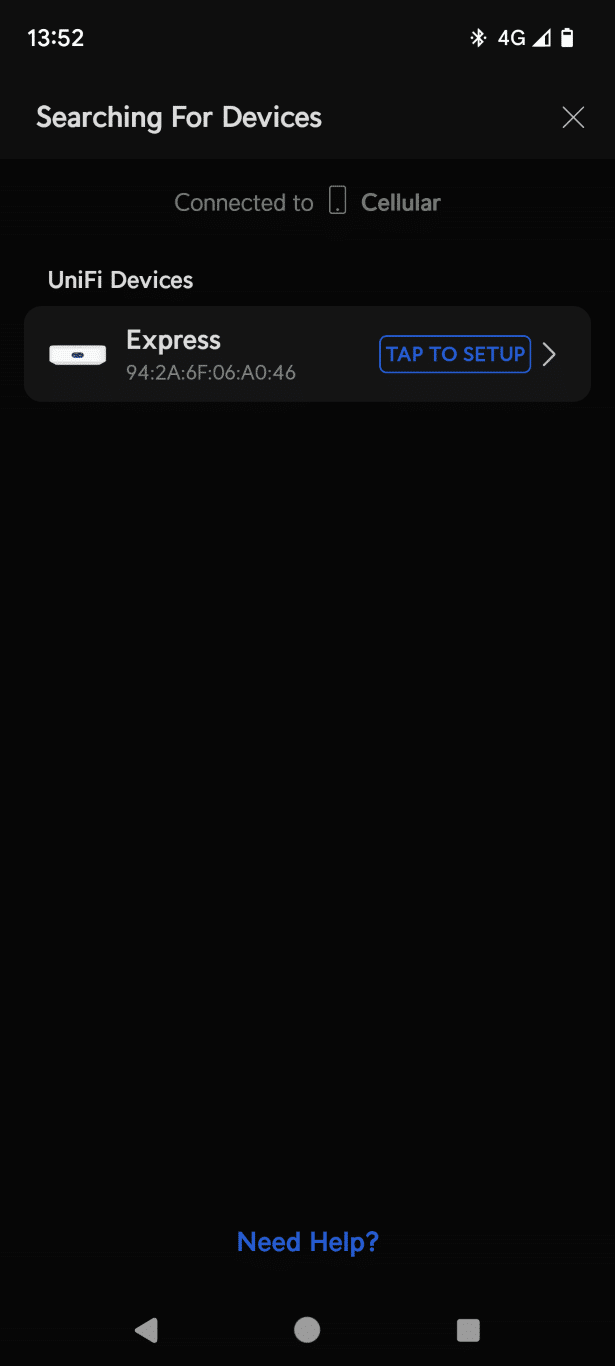
After you have logged in, you might need to click on the Plus icon to find the new console. Once it’s done with initializing, click on Tap to Setup
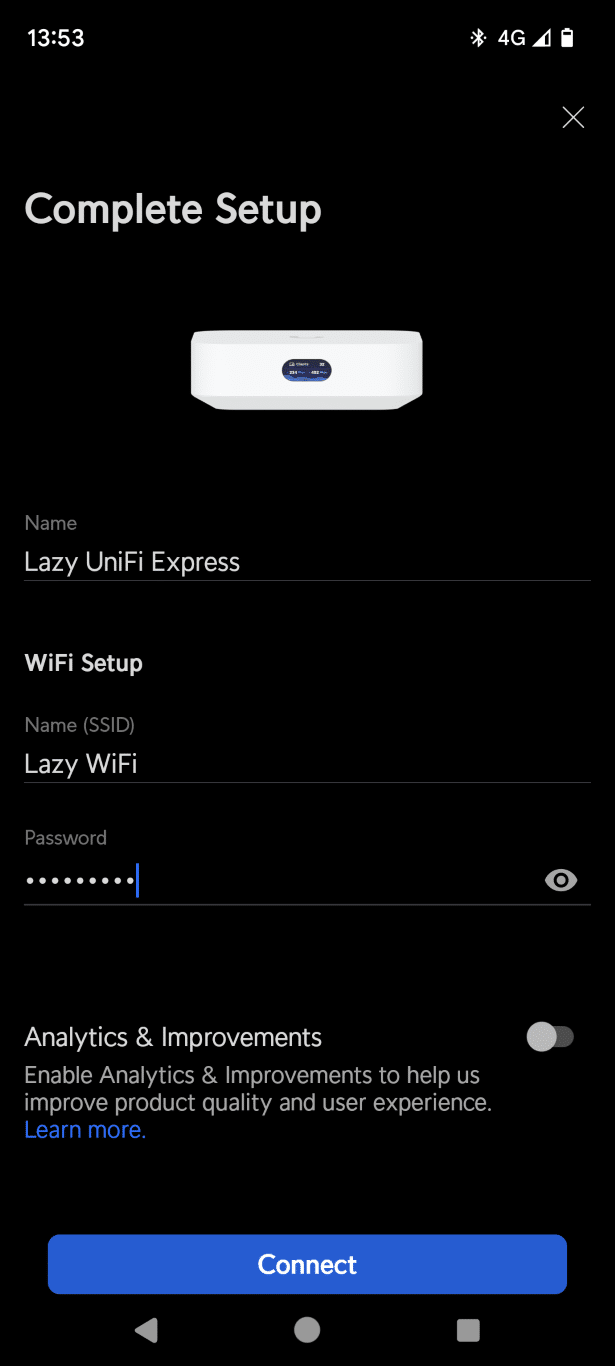
In the initial setup process of our UniFi console, we can give the console a name (or leave it default). Depending on the console type you can configure a wireless network. We can change the network later on, but it allows you to quickly connect to your network once the setup is completed.
Click on Connect when you are done and wait for the setup process to complete.
Step 2 – Update UniFi Apps and UniFi OS Settings
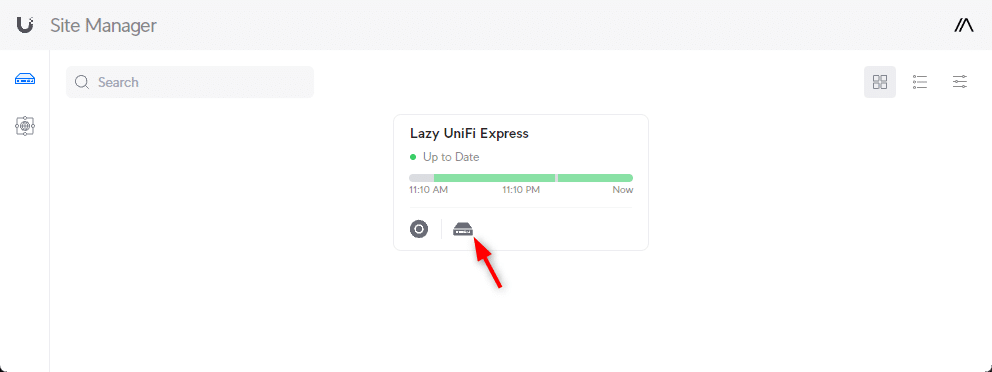
If you have created or used a Ubiquiti account in the previous step, then you can now log in on unifi.ui.com to access your console. This will open the Site Manager where you will see your console
Now the first step is to make sure that it’s fully up-to-date. At the moment of writing, UniFi Network 8.0 is released, but the console is still running on 7.x. Click on the console icon to open the console settings (UniFi OS)
It may take a minute or two before the console has checked if there are updates available, but make sure that all the applications are updated to the latest version:
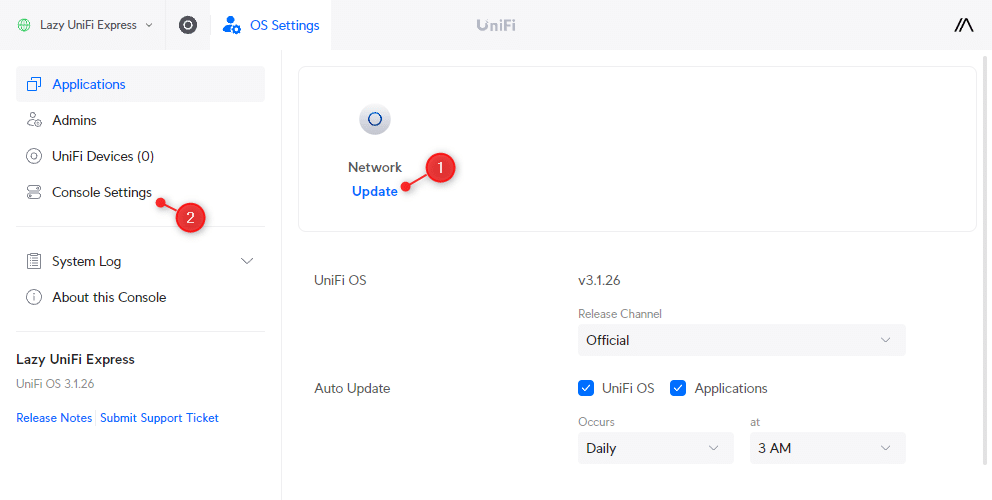
While we are in the UniFi OS Settings, open the console settings (2). Make sure that the System Config Backup is Enabled and check if the location/time zone is correct. Here you can also enable or disable the LED / LCM Screen of the console.
Especially with the UniFi Dream Router or UniFi Express, that you often place insight, you might want to turn the screen off at night or lower the brightness.
Step 3 – Adopt Devices
With UniFi Network fully updated, we can start with adopting our network devices:
- Open the UniFi Network App
- Click on Devices
- Click on Click to Adopt for each device
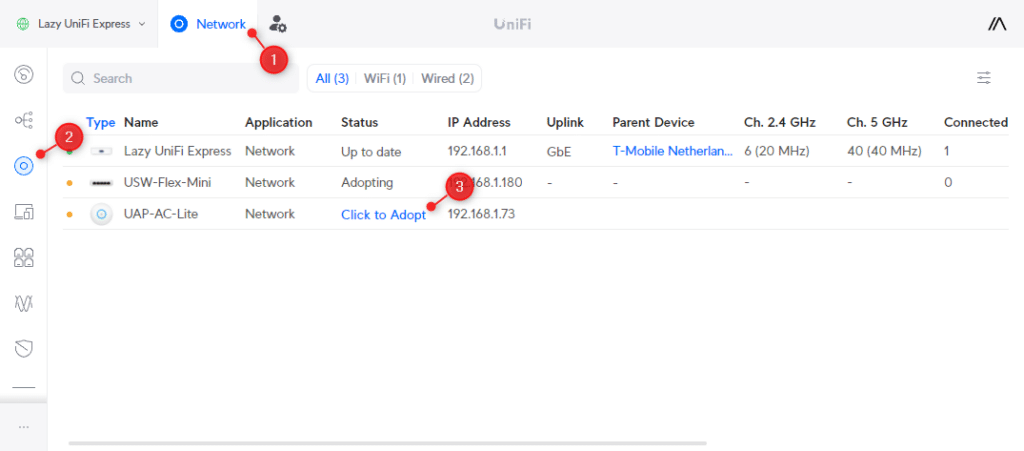
It can happen that a device won’t adopt. This happens when for example the firmware is too old on the device or when it’s previously managed by another UniFi Controller. Check out this article for more information on how to solve adoption issues.
Step 4 – Configure Wireless Networks
We are first going to create and optimize the wireless networks in our UniFi setup. Depending on the console you have, you might already have created a wireless network during the initial setup process. Otherwise, we are going to create one first:
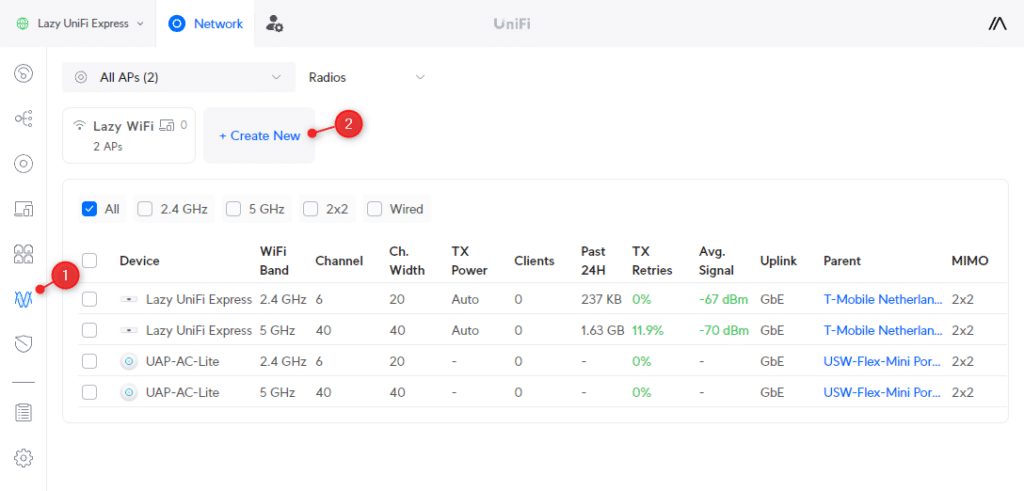
- Open the Radio Manager
- Click on +Create new
- Enter a name for your wireless network and a password
- Click on Add WiFi Network
- Go back to the Radio Manager (1)
We will create the guest network later on, for now, we will focus on our main wireless network.
Access Point Locations
There are a couple of things that we need to take into consideration when it comes to getting the best wireless network performance. It all starts with the placement of the access points. In short, all walls or other obstructions will reduce the strength of your wireless network.
Most place the access point out-of-sight in a closet, but the walls and doors will reduce the performance. Therefore it’s better to place two smaller access points in your house than one powerful one. Check out this article for more in-depth information.
2.4 GHz Radio Settings
The 2.4 GHz band is the backbone of our wireless network. It’s supported by all wireless devices, including smart home devices and older network devices. And the 2.4 GHz band is better at penetrating through walls than the 5 GHz band.
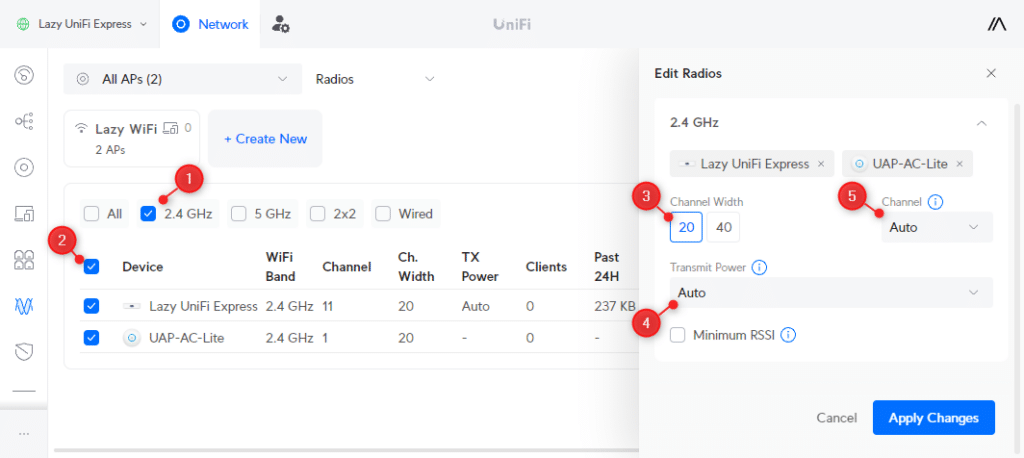
For the best performance, we want to keep the channel width at 20. A higher channel width means a faster connection, but the 2.4 GHz spectrum is really crowded, so this will only result in an unstable network connection.
- Click on 2.4 GHz
- Select All Devices
- Make sure that the Channel Width is set to 20
- Keep the Channel on Auto
- Transmit Power also on Auto
- Keep Minimum RSSI Off
UniFi does a pretty decent job of selecting the best Channels for your access points. You can manually configure them, but keep in mind that you can only use channels 1, 6, and 11. Assign the channels in such a way that they are as far away from the other AP as possible. For example, channel 1 for the ground floor and 11 for the first floor.
Note
When you live in an appartement building or configuring the network for an Office building with a lot of access points, then manual configure the channels for the best performance.
Minimum RSSI will drop the connection of a client when it becomes below the threshold. Now this might seem like a solution to improve the roaming of the devices, but it will often only result in devices losing the network connection.
A better option is to lower the Transmit Power of the access point(s). For example, keep the Transmit Power of the access point on the first floor at medium and on the ground floor at high.
Tip
For installations with a lot of access points, you want to set a custom transmit power (you can scroll down in the Transmit Power dropdown. The 2.4 GHz transmit power should be 7 dB lower then the 5 GHz transmit power. This way you will get the best roaming behavior of the clients.
5 Ghz Radio Settings
The 5GHz band allows for a higher throughput, but can’t travel as far as the 2.4 Ghz band. It isn’t very capable of passing through obstruction, resulting in roughly half the range of the 2.4 GHz network.
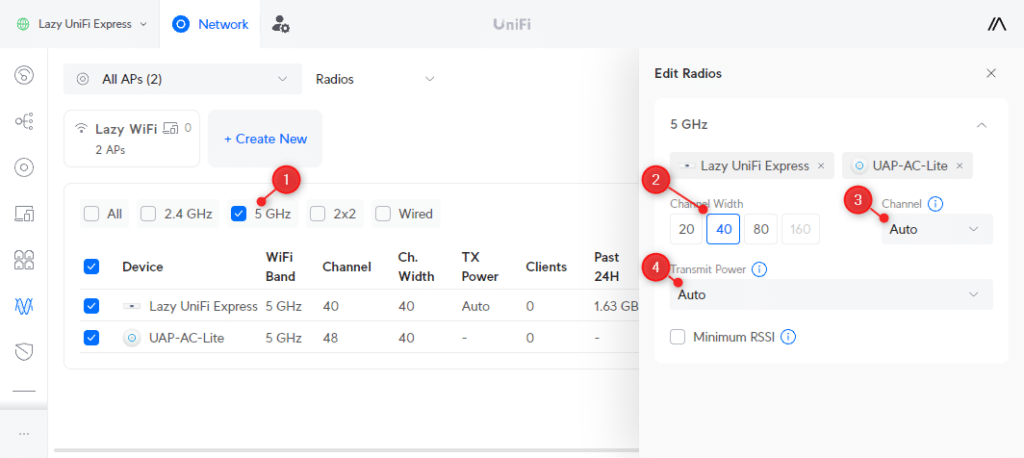
For the channel width, just like with 2.4 Ghz, a lower channel width will give a more stable network connection. Whereas higher numbers will allow for more throughput. In general, it’s best to keep the channel width at 40 for the 5 GHz radio.
When picking a higher channel width, you basically are stacking the channels together. So when you pick channel 36 with a bandwidth of 40 MHz, then channels 36 and 40 are used. This results in the following useable, non-overlapping, channels:
| 40 Mhz | 80 Mhz | 160 Mhz |
|---|---|---|
| 36 (36/40) | 36 (36/40/44/48) | 36 (36/40/44/48/52/56/60/64) *uses DFS |
| 44 (44/48) | ||
| 48 (48/153) | 149 (149/153/157/161) | |
| 157 (157/161) |
There are more options when you use DFS, but the ability to use DFS depends on your location, and not all devices support it. So if the 5 GHz spectrum isn’t too crowded, then try to use the normal channels first.
- Select the 5 GHz radio and all devices
- Set Channel width to 40
- Keep Channel on Auto
- Set Transmit Power to Auto
Again, you can set custom channels for your devices and lower the transmit power to improve the roaming of the devices. But in general, the auto setting should be fine.
Advanced Wireless Settings
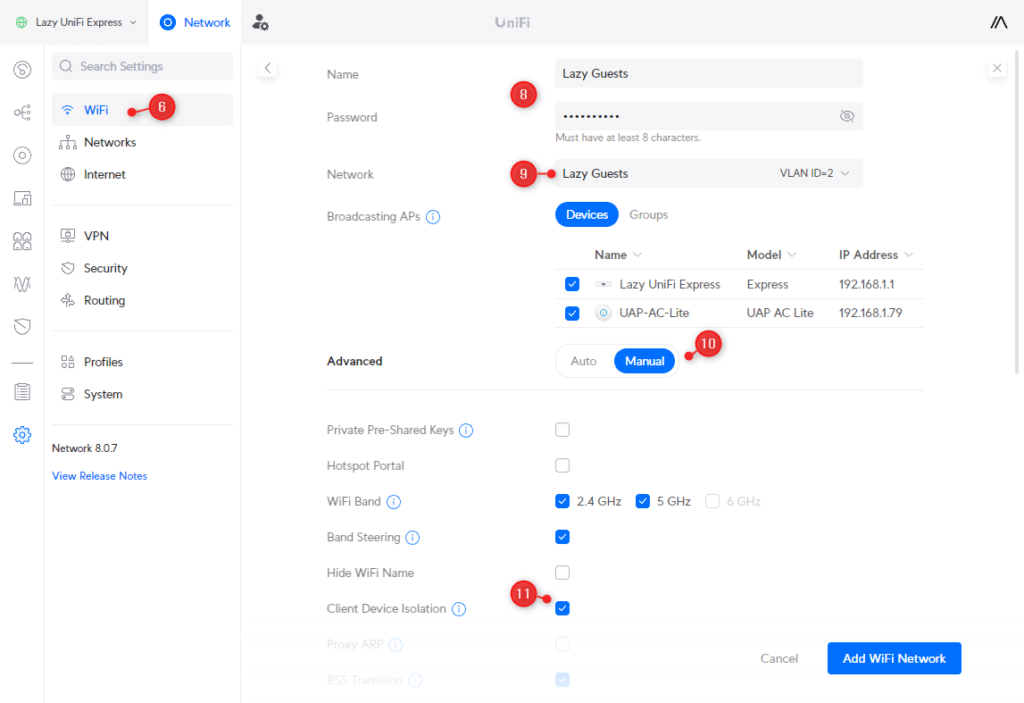
When you open the Settings > WiFi and select your wireless network, then you will have the option to enable the Advanced settings.
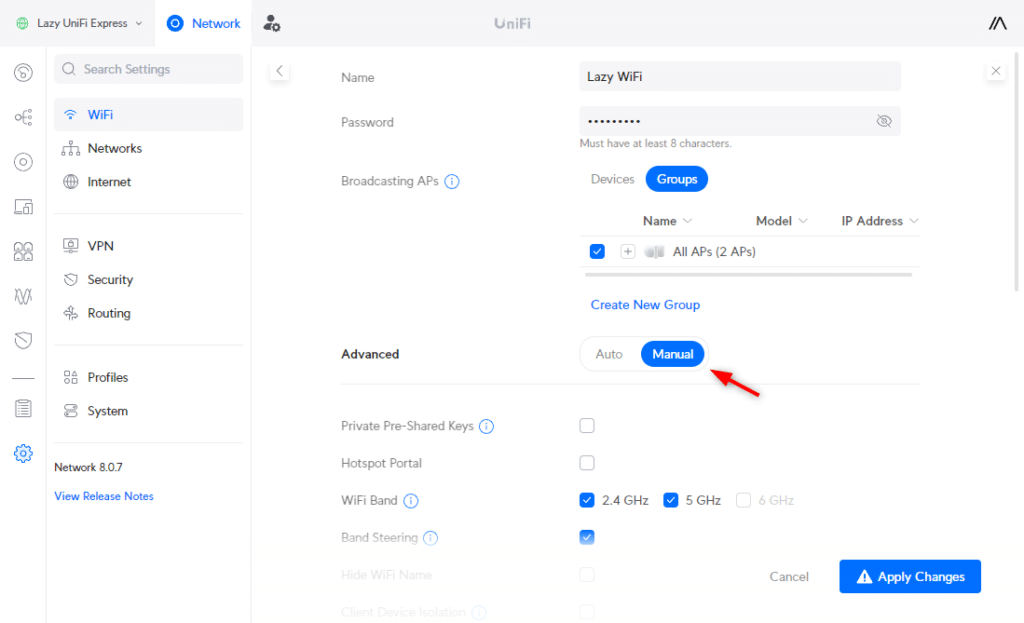
The default advanced settings are for most wireless networks perfect. Only when you have a high-density network or a lot of guest users, you might want to optimize a few settings. Also if you have connectivity problems with Sonos or Chromecast here are a few settings you can change.
I will briefly explain the settings, but you can leave them default for normal networks and just skip to the next step:
- Private Pre-Shared Keys – Allows you to use one wireless network for all your VLANs. This way you don’t need to create a separate wireless network for your cameras or IoT devices.
- Hotspot Portal – Used for quest networks. Allows you to show a branded login page and use different authentication options for guests, including Vouchers or payment options
- WiFi Band – You want to enable all WiFi bands for your network. If you have an UniFi 6 Enterprise access point you can also enable the 6 GHz band if allowed in your region.
- Band Steering – Encourages clients to use 5 GHz instead of the slower 2.4 GHz. Leave it on, but turn it off if you experience a lot of connectivity issues.
- Client Device Isolation – Enable it for Guest or IoT networks. Prevents connected devices from communicating with each other.
- Proxy ARP – Only used in high-density networks. Allows access points to proxy ARP requests which reduce broadcast traffic.
- BSS Transition – Allows access points to share network topology information with the clients. This reduces power usage for mobile devices and can help with roaming.
- UAPSD – When enabled, clients can keep their WiFi longer in sleep mode. You might want to enable this in an IoT network, where it will help save battery consumption.
- Fast Roaming – Allows clients to roam faster between access points. Enable this only when you roam a lot between access points during VoIP or Video conference calls.
- WiFi Speed Limit – Limits the up and download bandwidth for clients. Useful for high-density networks or guest networks.
- Multicast Enhancement – Improves access to register clients and converts multicast traffic to unicast. Can improve performance for smart home products like Chromecast or Airplay.
- Multicast and Broadcast Control – Restricts multi and broadcast traffic, except for defined devices. Can help reduce overhead traffic on high-density networks
- 802.11 DTIM Period – Leave at auto.
- Minimum Data Rate Control – Sets a minimum network speed that clients have to be able to reach. Setting this too low can cause connection issues. Only used in high-density networks.
- MAC Address Filter – Allows you to specify an allow or deny list based on MAC address with devices
- RADIUS MAC Authentication – Allows you to use a radius server for client authentication
- Security Protocol – WPA2 should be used as a minimum. WPA3 is more secure and needed for 6 GHZ network. Leave it on WPA2/WPA3 to support older devices as well.
- PMF – Needed for WPA3, but leave on optional when WPA3 is enabled to support older devices.
- WiFi Scheduler – Allows you to set the times when the wireless network should be turned on.
Step 5 – Networks
In the network setting, we can create and configure networks. You always have the default network, which is automatically created, but we can add additional virtual networks to our environment.
Virtual Networks are used when you want to create a separation between devices, in such a way they can’t interact with each other. For example, guests are allowed to use your internet connection, but you don’t want them to be able to reach your network devices.
Or when you have a lot of IoT devices, you should put them on a separate network for security reasons. So when a device is compromised due to a vulnerability, for example, it won’t be able to access other devices in your network.
When you open the network settings (Networks), you will see the Global Network Settings. We can leave those settings at the default values in our UniFi setup. IGMP Snooping or Jumbo Frames, for example, are only needed in specific situations, but for most home networks.
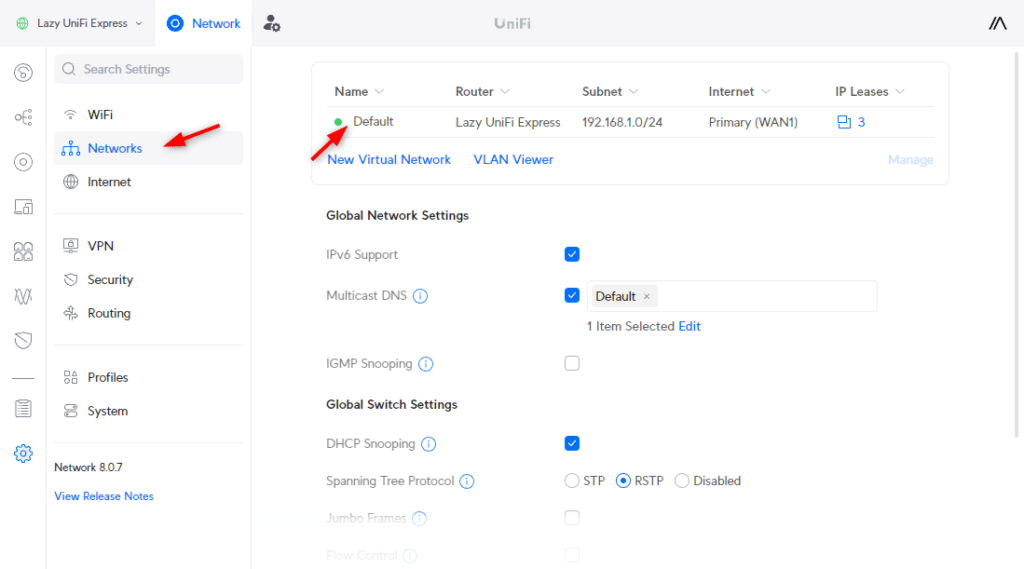
If you click on the Default network, then you can configure the network settings, like IP Range, DHCP Scope, DNS, Content Filtering, and more:
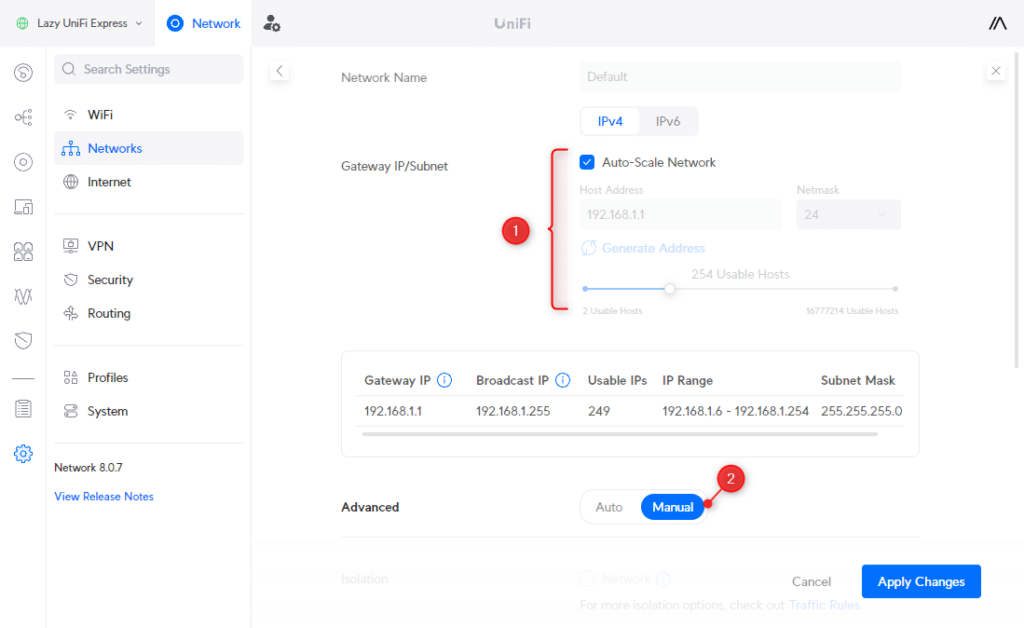
The default Gateway IP/Subnet configuration (1) is fine for most networks. It allows you to use 249 IP Addresses by default, which is enough for most small networks.
Advanced Network Settings
If you enable the Advanced settings (2), then you can change the DHCP and DNS Settings. If your Cloud Gateway supports Suspicious Activity detection, then you can also configure content filtering for the network here.
The default DHCP scope starts at 192.168.1.6 and ends at .254. This won’t give you much room for fixed IP Addresses. I prefer to configure static (fixed) IP Addresses for known network devices, like printers, smart home hubs, or solar inverters. To do this, you will have to disable the Auto-Scale network (1), after which you can customize the DHCP Range (3)

Step 6 – Optimizing Internet Settings
Even though your internet is already working, we need to optimize a few settings in our UniFi setup to get the best performance. If you open the Internet Settings, you will see the Primary (WAN1) connection. When you have a UDM Pro, for example, you see also the option to configure your primary connection and set up failover or load balancing.
There are a few things we need to configure. The most important one is to enable smart queues if your internet connection speed is lower than 300Mbps. This will prevent buffer bloat, which happens when your router pushes more data on the internet line than your connection can handle.
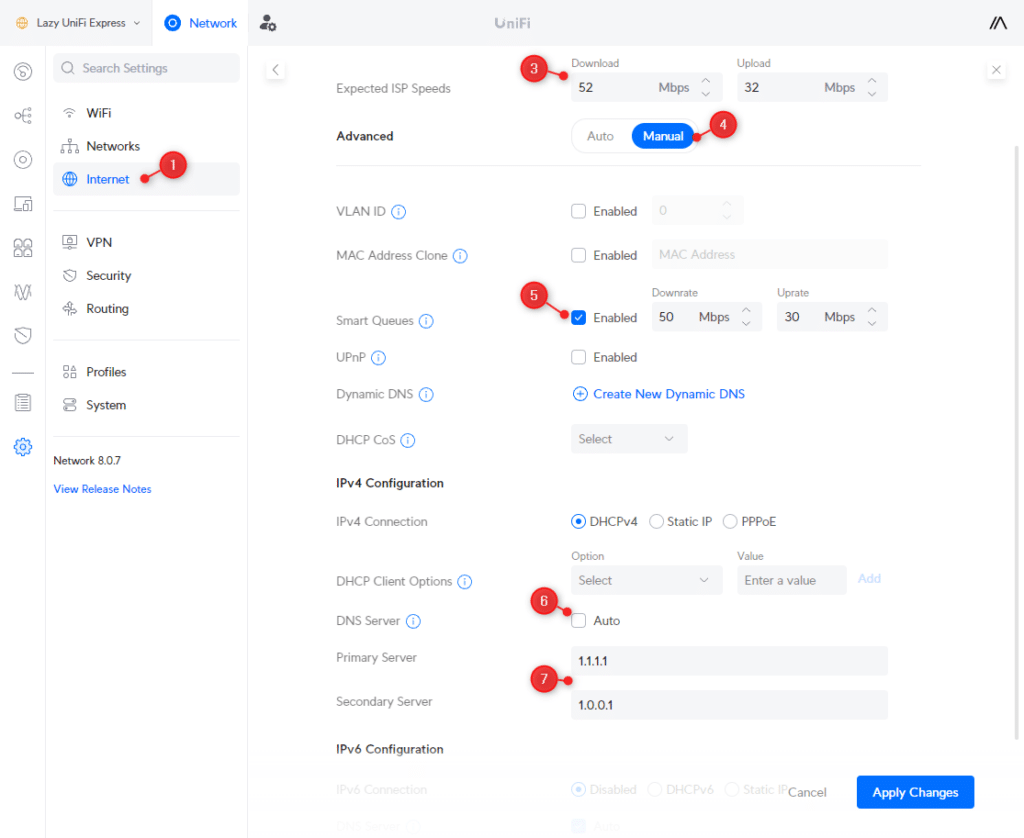
Also, we want to use a good and fast DNS server, not the one from your ISP, and configure the Expected ISP speed:
- In Settings go to Internet
- Open your Primary (WAN1) connection by clicking on it.
- Enter the Expected ISP Speeds
- Set advanced to Manual
- Enable Smart Queues when your internet connection speed is below 300Mbps
- Set your Down and Uprate a few Mbit lower than your connection speed (more info)
- Test your connection here
- Adjust the speeds until you get an A+ for Bufferbloat in the test
- Under IPv4 Configuration, disable Auto for the DNS Server
- Enter the following DNS servers (more info)
- Primary: 1.1.1.1
- Secondary: 1.0.0.1
- Click Apply Changes
Step 7 – VPN (optional)
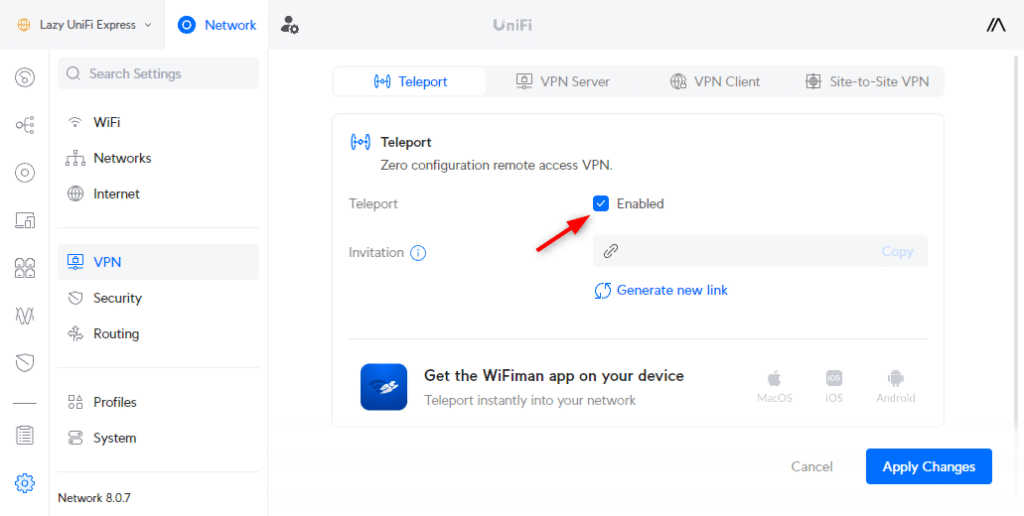
Your UniFi Cloud Gateway comes with a built-in VPN server that allows you to connect with your home network with just one click. Now you might think, when do I need this? But when you are connected to a public network and need to access your bank account for example, then it’s better to use your own internet connection.
You can read more information on Teleport and how to use it in this article. To enable it, simply Enable Teleport in the VPN Settings:
Step 8 – Security
When setting up our UniFi network setup, we will also need to take a look at the security settings. By default, the firewall will block all invalid incoming traffic. But depending on the type of Cloud Gateway that you have we can do a lot more to protect our network.
The basics are Device and Traffic identification. These two features allow you to view which devices are connected to your network, and the type of traffic is going through your network.
Traffic identification does not only show information about the type of traffic, but it also allows you to create app-based traffic rules (which we will look at in a bit).
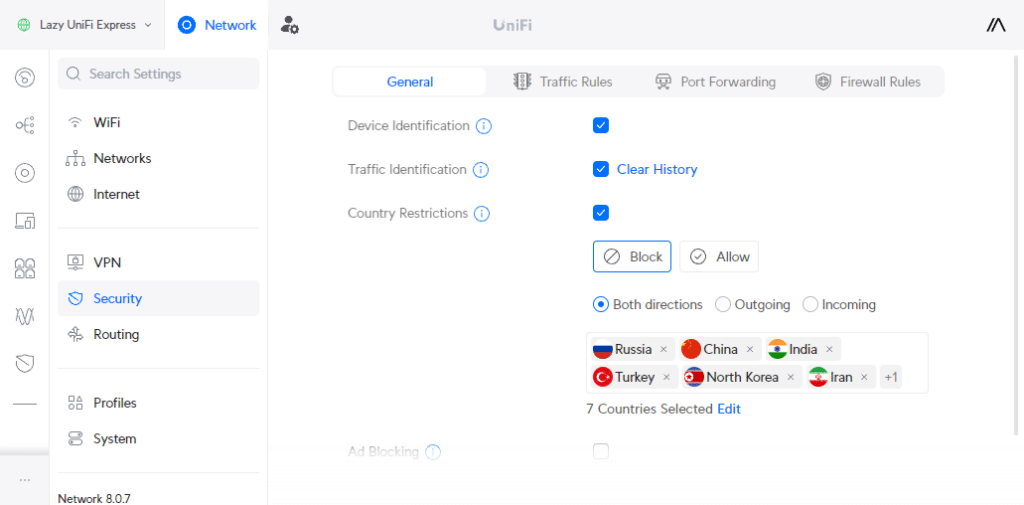
Another useful option that is available in all cloud gateways, is Country Restrictions. All traffic to and from a country listed here is blocked. Now a firewall will already block all incoming traffic. But an infected device can’t communicate with a blocked country.
For the Country Restriction, you can also go with an Allow-only approach, where you only white-list traffic to trusted countries.
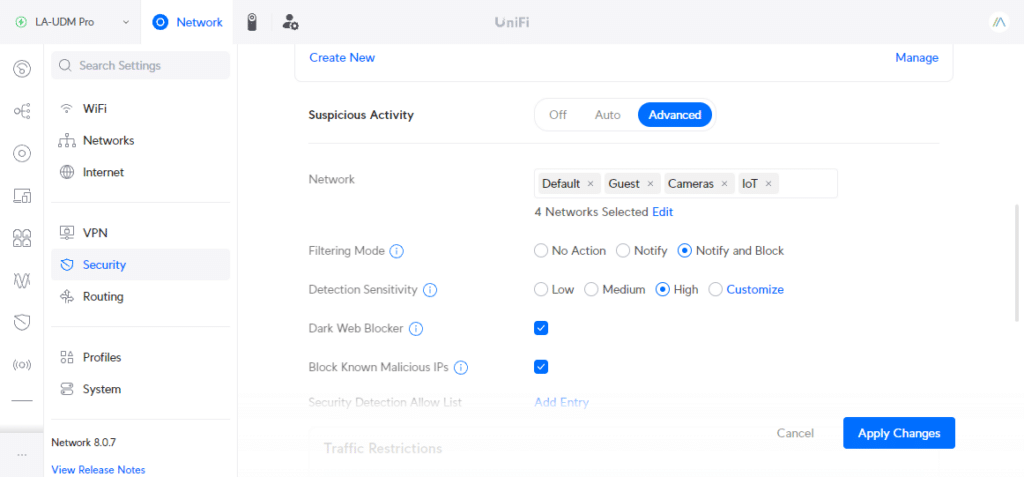
Suspicious Activity
If you have a UniFi Dream Machine, Dream Router, or UniFi Gateway, then you will also have to option to enable suspicious activity. This adds another layer of protection to your internet traffic. It will scan all incoming and outgoing traffic and check for any suspicious activity.
- Network – Select the networks you want to enable suspicious activity detection on. Select all networks if you have more than one
- Filtering mode – I recommend starting with Notify, monitoring it for a week, and then switching over to Notify and Block. You can few the detections in the System Log > Security Detections.
- Detection Sensitivity – Start with High. If any traffic is blocked that you need, then change to Customize and disable the selected detection.
- Dark Web Blocker – Enable it
- Block Know Malicious IPs – Enable it
Traffic Rules
Traffic Rules allow you to apply rules on specific traffic in your network. Explaining all traffic rule options is something for another dedicated article. But I want to show you two options that might come in handy in your UniFi network setup.
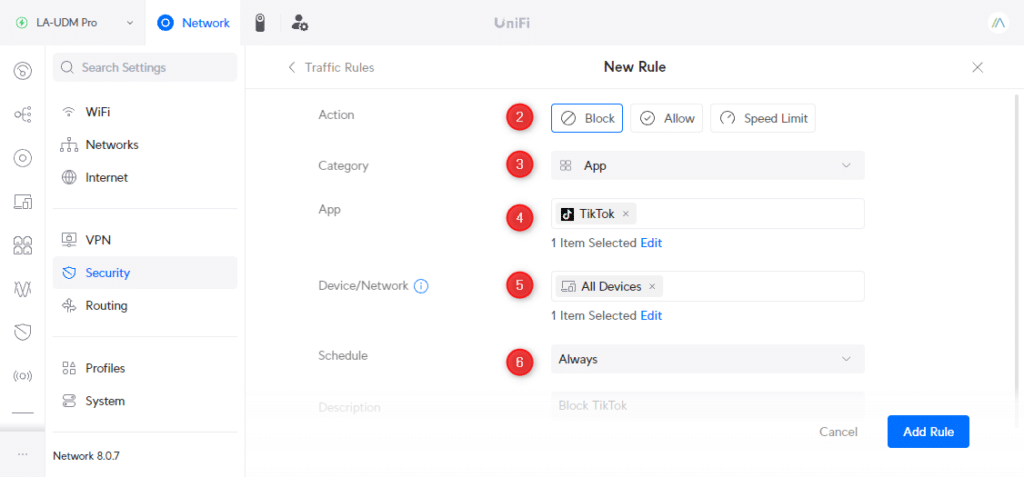
We can for example block specific apps in our network. Let’s say you have young kids and don’t want them to access TikTok. With a traffic rule, we can completely block the app in our network or only allow it during specific hours:
- Create a new Traffic Rule
- Action > Block
- Category > App
- App > Tiktok
- Device/Network > All Devices
- Schedule > Always
You can also use the traffic rule to set a speed limit on a specific device, or for a specific application. Or we can block the internet access to specific devices during a custom time range.
Step 9 – System Settings
The last step in our UniFi setup is to check the system settings. There are only a few settings we need to check/change. If you open Settings, then make sure you check the country and time format settings first.
Click on Backups and make sure that Auto Backup is enabled. I recommend changing the schedule to Weekly, so you can always revert back to a recent backup version of your UniFi Network setup.
If all your access points are connected with an ethernet cable, then you don’t need Wireless Meshing. Meshing allows access points to connect wirelessly together and extend your wireless network without the need to pull extra ethernet cables.
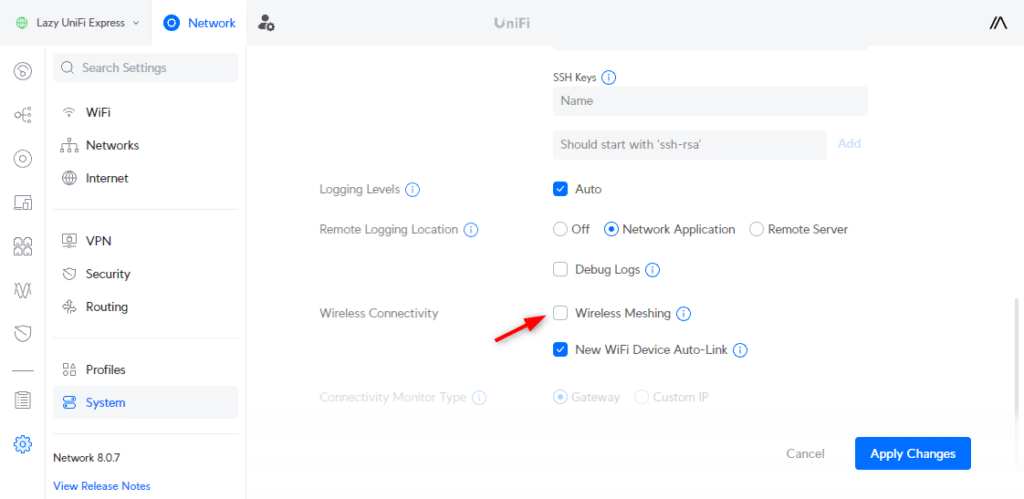
If you don’t use that, then disable the Wireless Meshing option in the advanced settings.
Guest Network
As mentioned in the beginning, we are also going to create a guest network. To do this we will need to create a new network and a new wireless network.
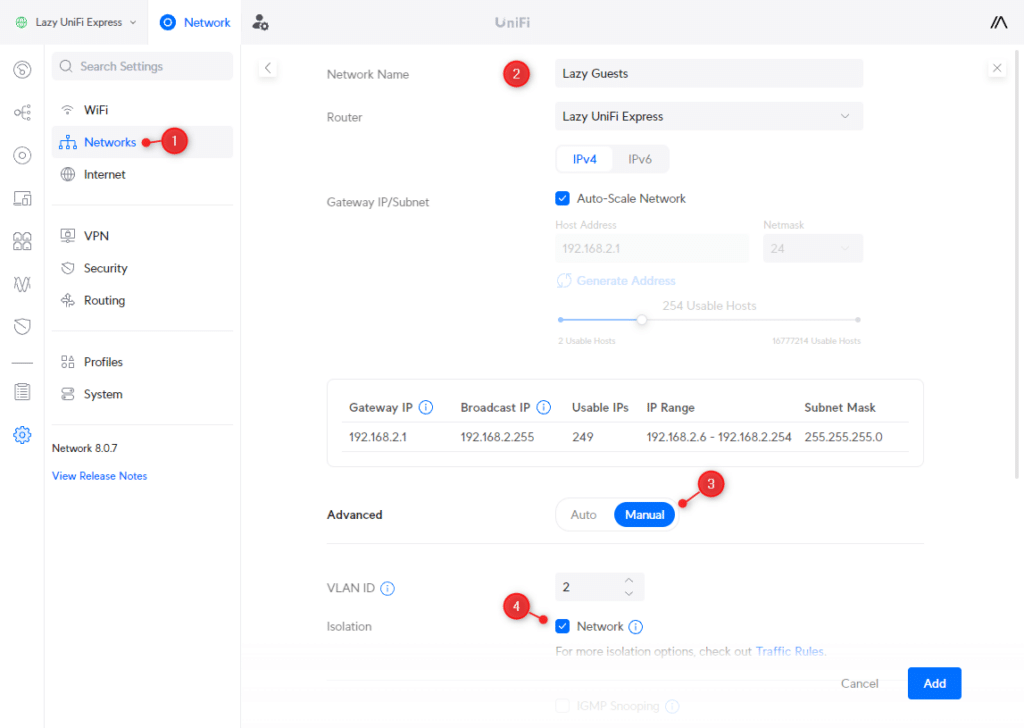
- Open Networks and click on New Virtual Network
- Enter a network name, for example, Guests
- Enable Advanced settings
- Enable Isolation
- Click on Add
- Open the WiFi Settings
- Click on Create New
- Enter a wireless network name and password
- Select the Guest network
- Enable Advanced Settings
- Enable Client Device Isolation (this will isolate the guest’s devices from each other as well)
- Click on Add WiFi
Wrapping Up
In this guide, we have gone through every important detail to set up our UniFi network and get the best performance. If you have your network up and running, and want to use VLANs for your IoT devices or cameras, then make sure you read this article as well.
If you have any questions just drop a comment below.


I am stumped and maybe you can help!
Before i set up my Express i had my ISP provided router and a D-Link switch (unmanaged 8port) and was fine, however i had to stop using my switch with my express as i saw it was capping my data around 100mbps…is there a setting or anything im missing??
What would change in the setup procedure is your ISP Modem/Router is unable to be placed in bridge mode and has an IP of 192.168.1.1?
Then just connect your Unifi Gateway with the WAN port to the modem/router and give it an IP Address of 192.168.1.2. You internal network will then be 192.168.0.x for example.
Not ideal, but it will work.
hebt u dit ook in het nederlands?
Nee, maar meeste browsers kunnen Engels automatisch vertalen.
Thank you for this.
I am new in the unifi world. I have 2 unifi express, one as a router and the other as a AP.
The devices replaces 2 Amplifi HD.
But in Amplifi HD I could manage Parental control and I could block devices of my children. As example : The devices of my son had no Internet at night.
Here in Unifi express I can not find this settings. Is there a possibility for this ?
Sorry for my bad English.
You can create a traffic rule for this:
Action: Block
Category: Internet
Device: Select device of your son
Schedule: Custom > create a schedule when to block internet.
Thank you ! And simple when you know it.
Does that work on a wired device connected to a Flex mini switch connected to the UniFy Express too or only wireless devices?
That also works on wired devices
This was the perfect guide for my new UXG-Lite setup. Thank you very much for your work!
Hello Ruud,
Great articles, thank you!
I would like to be able to setup the LAN of my second home as if it were part of my LAN at home. This in order to facilitate making backups from NAS to NAS (both Synology), access the webcam of my second home to check weather/snow conditions and get rid of getting hits to french websites in stead of dutch when using google.
-Home, USG3, cloud key2, VPN server L2TP.
-2nd home, Amplifi (configured as router, not in bridge mode, connected to hotel router, so 2x NAT – I think this is causing the restrictions I’m encountering). Although Netflix usually works flawless I would like all websites to think I’m in NL.
Can this be done with the devices I just mentioned or do I need to upgrade to for example the UNIFI EXPRESS? (I don’t want a subscription to a paid VPN, or paid teleport (option on Amplifi).
And how should my devices be configured?
Thank you in advance,
KR Constantijn
I don’t have any experience with the Amplify product line, so I don’t know if that would be possible. But with the UGS3 and a UniFi Express it should be possible to create a site-to-site VPN network.
I’m considering purchasing the newly released Unifi Express device, so this article was very informative. However, I have a few concerns about some of the seemingly uncontrollable actions of the gateway and was wondering if you had an answer or opinion.
I believe the gateway pings Facebook, Twitter and Google every two minutes. My network doesn’t or shouldn’t have access to Facebook or Twitter. I asked a friend to block these using a PiHole on his network which was problematic because it appears the gateway ignores the DNS settings for it’s own traffic and the only way was to get the PiHole working was to login into the gateway via SSH and change the etc/resolve.config file accordingly.
Once they were block however, the gateway increased the ping rate to such a degree it crashed the gateway and it had to be rebooted at which point the etc/resolve.conf file was overwritten.
Admittedly, this occurred on an older version of the firmware. However, it’s my understanding that UniFi have now implemented DoH for DNS so you can’t block the use of their DNS lookups via blocking port 53.
I would like to use some of the traffic monitoring options but am I correct in thinking these will only work if you use their DNS.
Effectively, I don’t want the gateway to access anything until a request is made. I also want to stop all telemetry not just personal stuff.
It seems a shame you need a firewall for your firewall or at least that what appears you need.
Any help would be greatly appreciated.
Yeah I don’t think this is going to work with UniFi. Maybe with an Edge router.
Awesome guide!