Unifi Protect is the video security system from Ubiquiti. Just like the Unifi Access Point and Network components, are the Unifi Camera and Protect system really easy to use. They integrate seaslessly together, but to be clear, you can use the Unifi Protect also on its own.
If we are talking about Unifi Protect, then we are talking about the security system behind the cameras. Protect is the NVR for recording the video streams, it sends out the motion alerts and allows you to control and manage your camera’s.
In this review, we are going to take a look at Unifi Protect, how to install it, and how to configure your camera’s.
Article Update 2021
Unifi Protect now supports Smart Detections and the Cloudkey now also runs on UniFi OS. This Unifi Protect Review is updated with the latest information and screenshots.
Unifi Protect Overview
Unifi Protect does a great job of finding the perfect balance between flexibility and ease-of-use. You can choose between a wide variety of cameras, which you can all install with PoE (Power-over-Ethernet) and get it up and running in a couple of minutes.
All the recordings are stored locally but can be viewed from anywhere in the world through the Unifi Protect App. What I really like is that Protect is completely subscription-free, even for the motion-alerts or the cloud access is no subscription needed.
Smart Detections
Motion detections are always hard to get write. You will get a lot of false positives, due to light reflections or shadows for example. Fine-tuning the motion detection takes a lot of time.
Smart Detection allows cameras to recognize familiar objects, in this case persons and vehicles. You will need a G4 camera from Unifi to use it. With Smart Detection enabled you can configure it to only receive alerts based on the smart detections.
Also all the detections are nicely listed on the dashboard and in the events overview.
Unifi Protect Cameras
Unifi Protect only works with Unifi Cameras. That isn’t a big deal, because Unifi offers a wide variety of models, suitable for pretty much every location. At the moment they only don’t have a PTZ camera, but that should be available soon (it’s available in the early access program right now).
All the Unifi cameras (that are available now) support atleast Full HD. The newest generation cameras, start at 4MP (1440p) and go even up to 4K. The Unifi cameras also have infrared LEDs for better night vision and some models even come with a built-in microphone.
My personal favorite from the cameras below is the Unifi Protect G3 Flex. You can mount this camera in pretty much any way you want. It comes with different adapters, for pole, wall, or ceiling mount and it’s pretty small.


Getting started with Unifi Protect
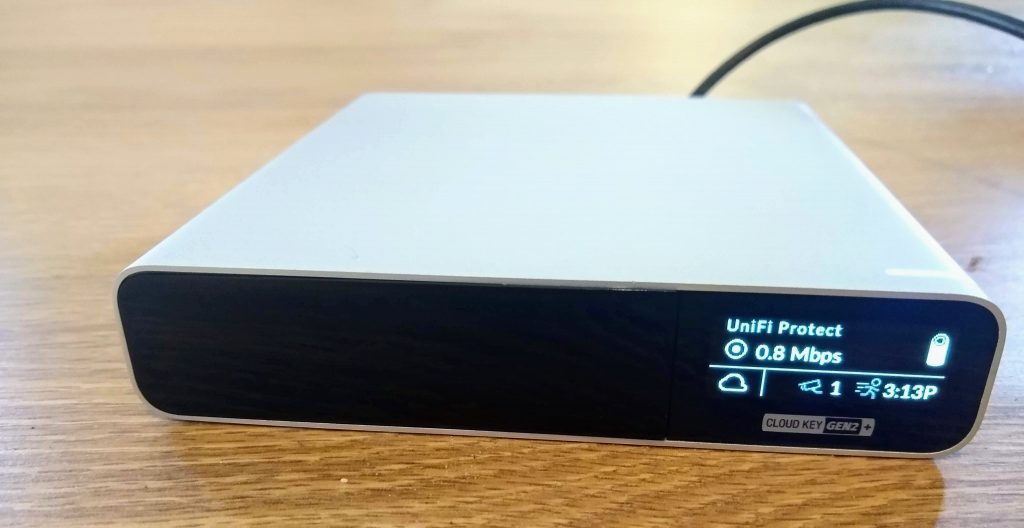
To use Unifi Protect you can choose between an Unifi Cloud Key Gen2 Plus, Unifi Protect NVR, or an Unifi Dream Machine Pro. The main difference between the three is the number of cameras supported, the total amount of storage, and if they also can run your Unifi Network controller (SDN).
| Cloud Key Plus | Protect NVR | Dream Machine Pro | |
|---|---|---|---|
| Number of cameras | 20 | 50 | 32 |
| Storage | 1TB – upgradable to 5TB | up to 24TB in Raid 5 | 16TB1 |
| SDN Controller | Yes | No | Yes |
| Price | $199 | $299 | $379 |
The Cloud Key Plus is more meant for home and small office installations. Besides Unifi Protect you can also run your Unifi SDN controller (Network Management Controller) on it.
If you get the Cloud Key Plus then it comes with a 1TB hard drive in it. You can expand it up to a 5TB hard drive yourself.
The Protect NVR is really meant for large camera installations. It comes without hard disks, so keep in mind you will need to buy those as well.
Dream Machine Pro is the powerful al in one solution from Unifi. It’s beside a controller, also your security gateway and managed switch.
Installing Unifi Protect
I am using the Cloud Key Plus, so before we can start with Unifi Protect, we first need to quickly set up the Cloud Key self. This only takes a couple of minutes.
- Click on Settings and expand Firmware
- Make sure the firmware is up-to-date
- Go to settings, and set a static IP Address for your Cloud Key.
Next, go to the controller and click on Setup Protect. This will launch the Unifi Protect app. The setup self is pretty simple and straight forward. Just walk through the 5 steps to give you device a name and set the local password.
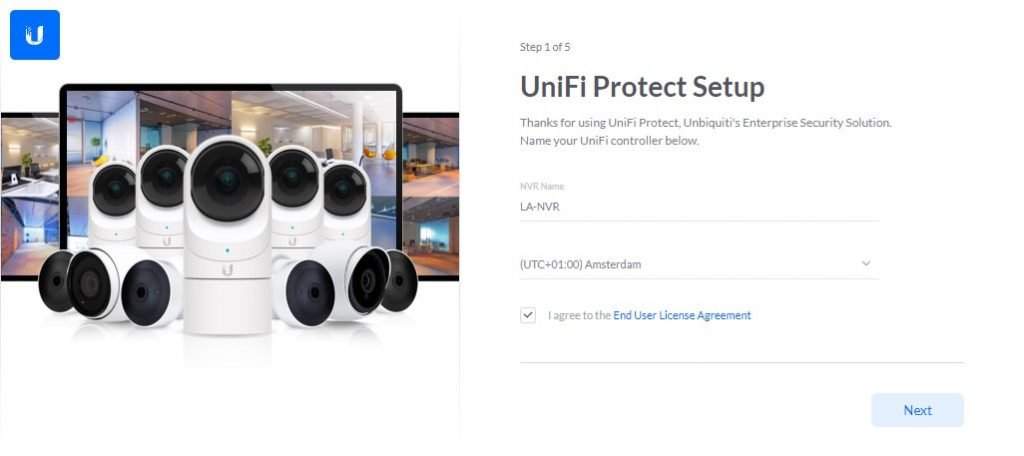
You can enable Cloud Key Location in step 4, this way you can turn alerts on or off based on your presence.
Setting up Unifi Protect
After you have opened your Unifi Protect you will see a dashboard with the latest smart detections and motion events. A great improvent the with the latest update is that you also get some stats about your recorder (CloudKey in this case), with information like the recording capacity and cpu, memory and temp stats.
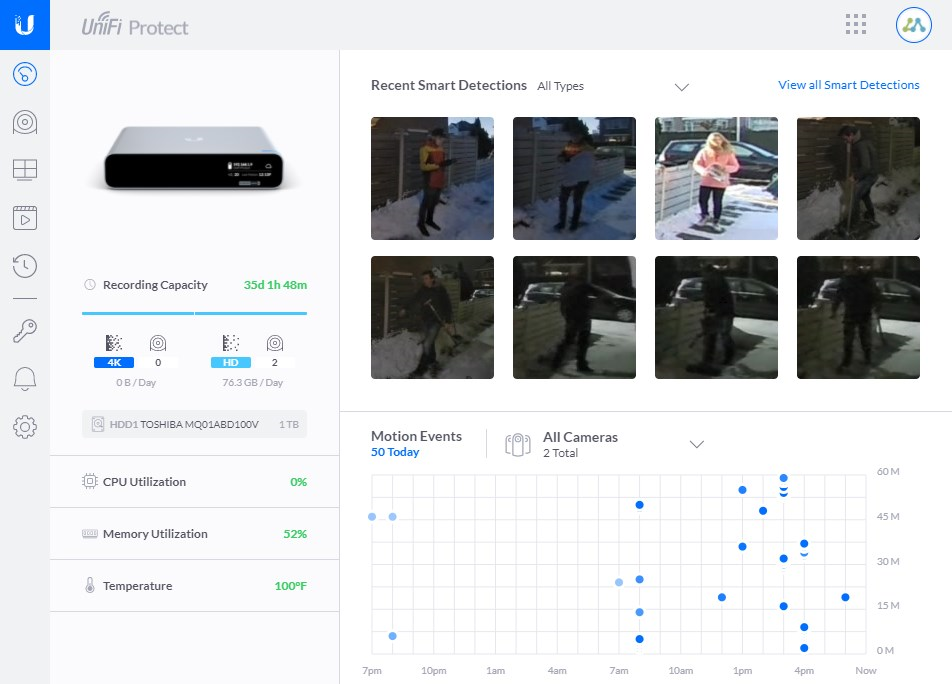
You can easily playback any motion event or smart detection by simply clicking on the event in the chart or the thumbnail on top.
In the devices tab you can see and manage all your cameras. The overview screen will give you some quick stats like when the last motion was detected, a snapshot and the link state of your device.
Most settings are pretty simple and don’t need any explanation, like status light and overlay information (I do recommend to overlay the time in your video recordings, always useful in legal cases).
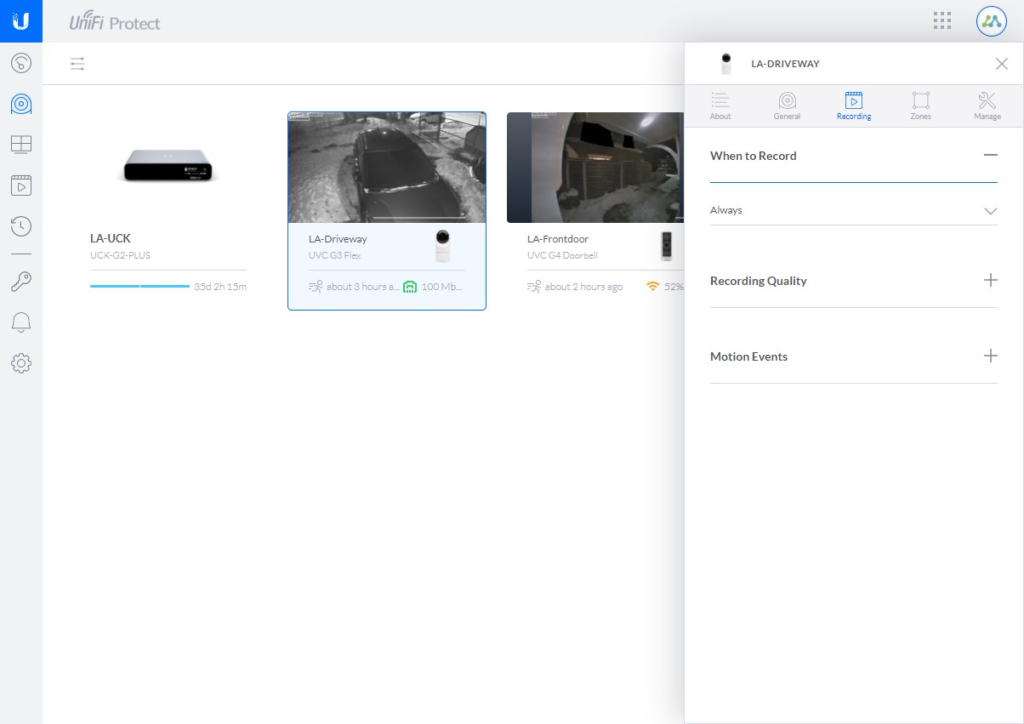
Recording settings
Under the recording tab are the more interesting options. Here we can control when the camera needs to record. The options are:
- Always
- Motion events
- Smart Detections
- Never
If you don’t have many cameras connected then you can easily set it on Always. You will have plenty of disk space in your CloudKey Plus to keep the recordings for more than 30 days if you only have a couple of cameras.
If you have more than 3 or 4 cameras and you want to keep the recordings around 30 days or more then recording motion events only is a better option (or upgrade the HDD to 5TB).
For those motion events, you can determine when it should trigger and how long it should record before and after the motion. The default values of 2s are for most situations enough. But if your camera is recording a large area than the motion zone, then it can be useful to increase the before and after time.
The motion algorithm is set on Stable by default. The Enhanced version is more like a beta version for now. It should be better than the stable, but the results vary a lot per situation. I have tested enhanced and it completely missed a person walking through the motion zone. So I recommend just testing what works best for your situation.
Smart Detections
If you have a G4 camera then you can enable Smart Detections in the recording tab. At the moment you will have two options, person detection and vehicle detection.
Motion Zones
In the zones tab, we can add Motion, Smart Detections, and Privacy zones. Privacy zones are areas that you want to block (black) out from the recordings, for example, your neighbors garden.
You can create multiple motion zones for each camera. Each zone with its own sensitivity setting. Unfortunately, you can’t add different actions to each zone. So the push or email notification that we are going to set later will apply to all the zones of the camera.
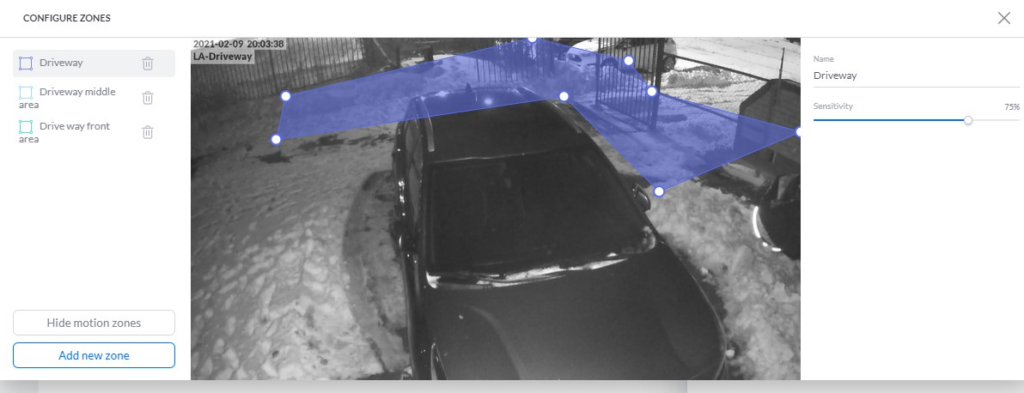
As you can see in the screenshot above, I have added multiple zones to this camera. The reasons for this is that I will need to use different sensitivity settings depening on how far away the object is, in order capture persons and not birds.
If you click Add Motion Zone you can draw an area in which you want to detect the motion. You will have to play with the sensitivity settings to see what works best for you. In this situation, I will have to keep it around 75 to detect people walking behind the car.
Smart Detection Zones
Smart Detections zones work pretty much the same way as motion zones. The only difference is that you can select what it should detect, person, vehicle, or both. Again you will need to play with the sensitivity settings to find what works for your situations or even use multiple zones.
Manage Tab
Under manage, we will find the RTSP streams and Microphone settings. The RTSP streams can be used to connect the camera to other applications, like for example the Synology Surveillance station.
Motion Alerts
Each user can set up their own preference when it comes to motion alerts. If you have installed the Unifi Protect app on your mobile phone, then you can receive a push notification, even based on presence.
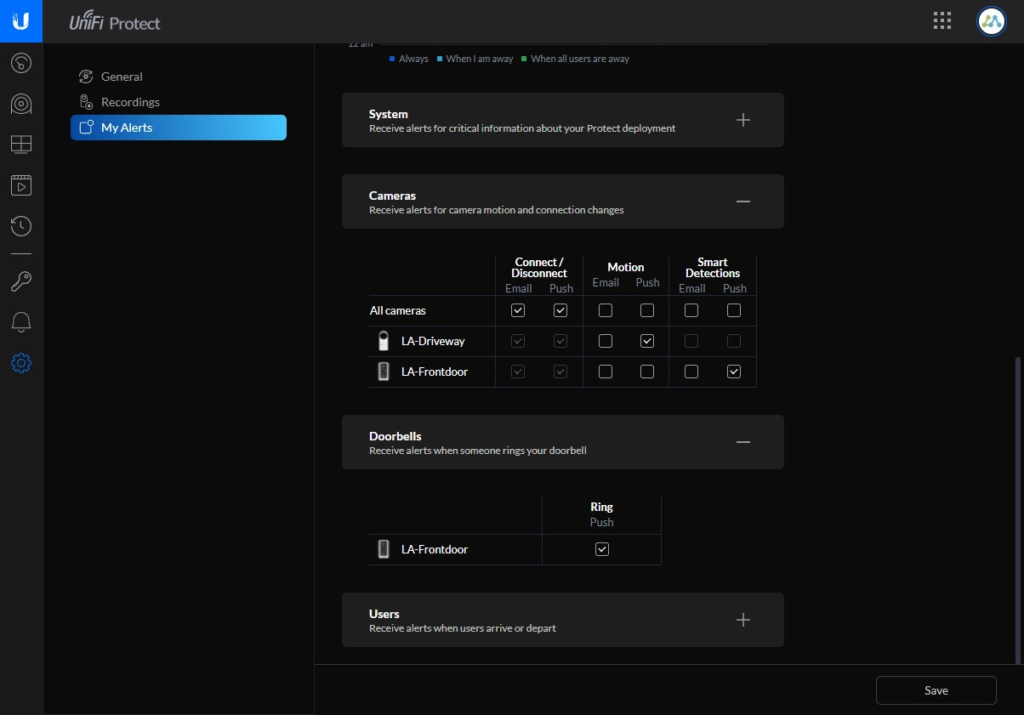
If you want to receive an alert based on Smart Detections, then you will need to set up the alerts through your browser. At the moment it isn’t possible to enable push alert based on Smart Detections in the app.
You can create different activity alerts, allowing you to get different types of alerts based on presence and time for example. By default, you can choose between the following situations:
- Always
- Never
- When I am away
- When all users are away
- Custom Schedule
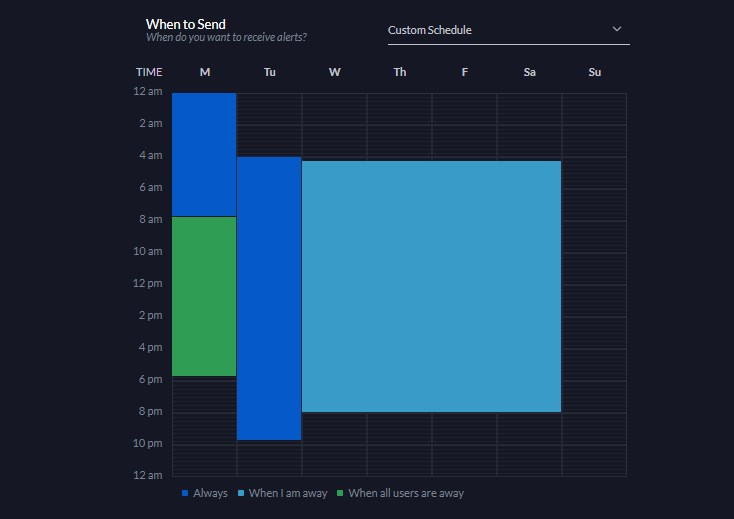
Custom Schedule
The custom schedule is actually pretty nice. You can set different actions per day and time, so that is a really nice feature to have.
Downloading and Looking back Events
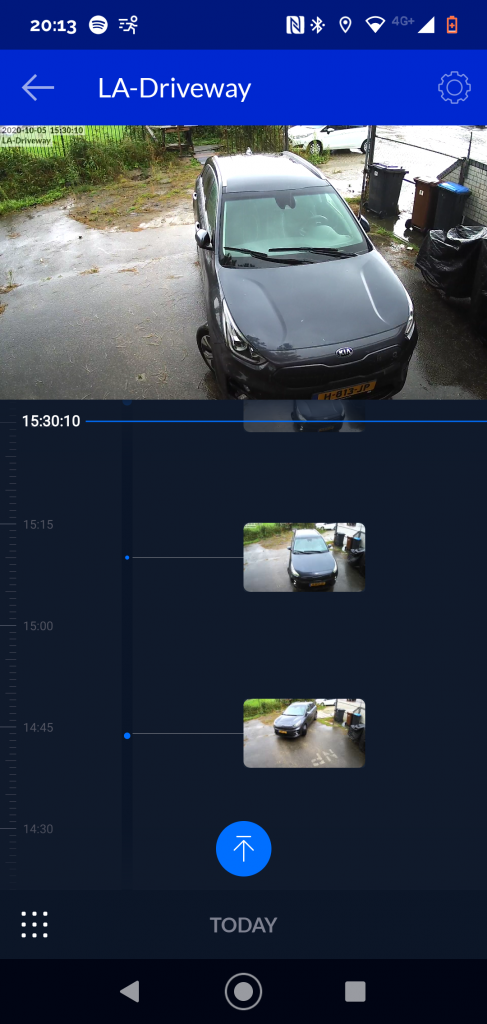
The Motion Events can be looked back in the mobile app (Activity) or online version of Unifi Protect, nothing really special at first sight.
But I noticed a feature in the online version that is really useful after you have just installed your cameras and are fine-tuning your motion settings.
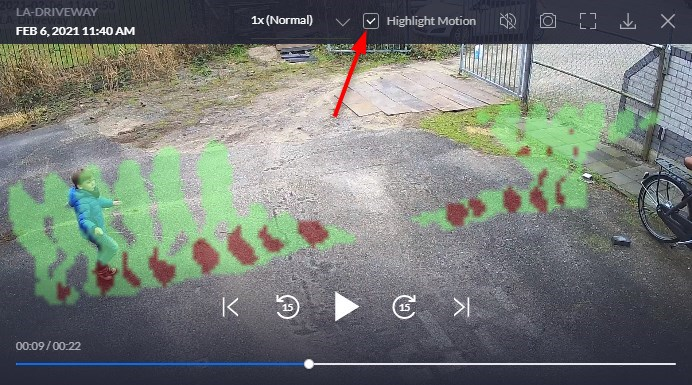
You can highlight the motion which will show the motion differences. Sometimes it are small things that trigger a motion alert and that are hard to spot.
Locking or Downloading recordings in Unifi Protect
Compared to Unifi Video, the predecessor of Unifi Protect, you can’t lock recordings in Unifi Protect. This feature was really useful in Unifi Video, when needed you could lock the recordings and prevented them from getting deleted.
Now you will need to download the recordings immediately. You can download motion events with a simple press of a button. If you want to download a couple of hours from a camera, you will have to go to the Timelapse view.
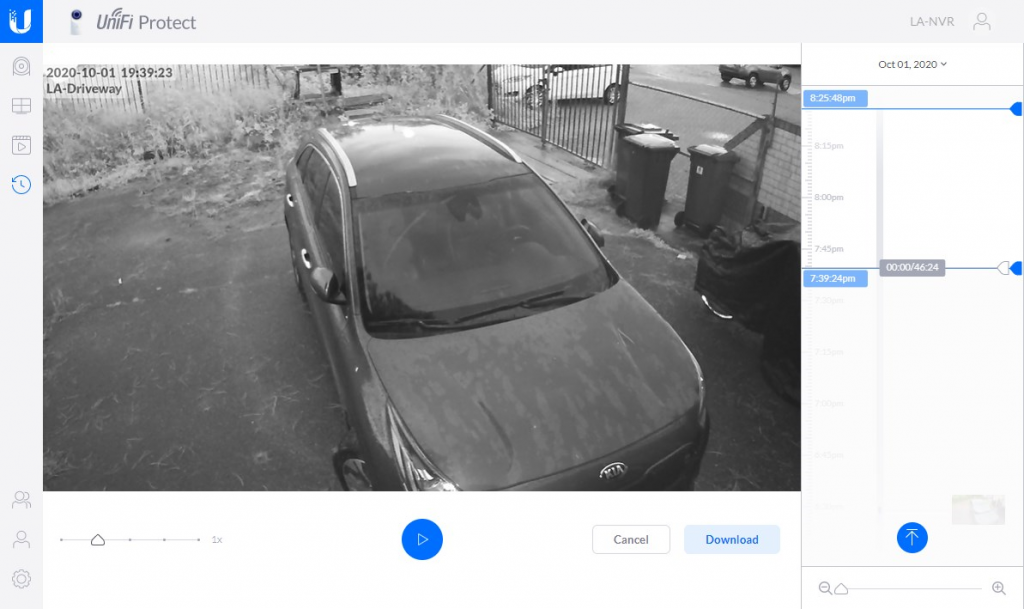
Click on the scissors icon on the right side of the video control buttons. You can now select a time range and download the footage.
Unifi Protect Settings
On the settings page, we will only find one setting that are worth mentioning. Under Recordings, you can configure the Time-Based Purge. In some areas, you are only allowed to keep recordings for an x amount of days.
With a Time-Based purge, the footage will be deleted from the hard drive once it reached the maximum limit. It’s possible that recordings are deleted earlier if you are running out of disk space.
Unifi Protect App
You can control and configure your whole Unifi Protect set up with the mobile app. I actually configured most of the Unifi Protect in the app. The only thing that is a bit hard to do, is to set up the motion zones. It can be done, but you might want to fine-tune it a bit on your computer.
You will need the app to receive the push alerts and for the location awareness. When you get a motion alert you can easily scroll through the timeline to see what happened.
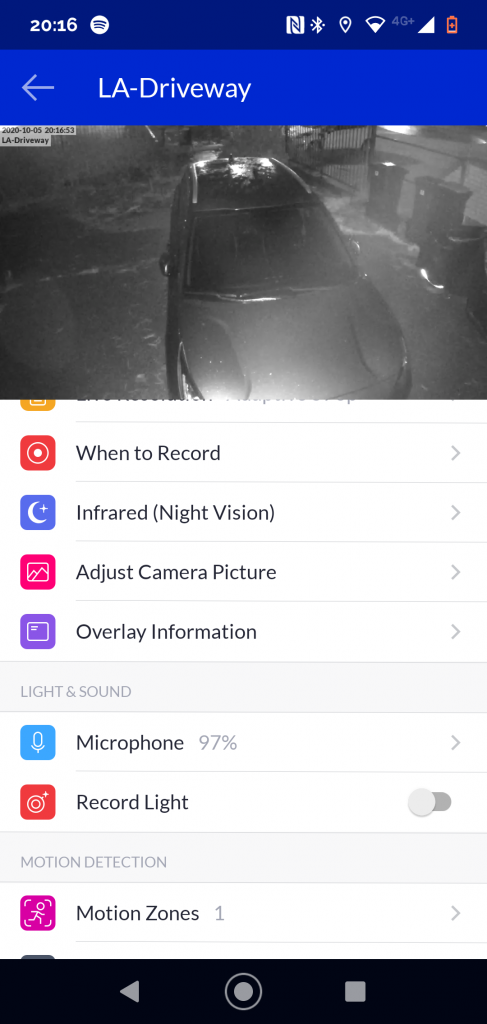
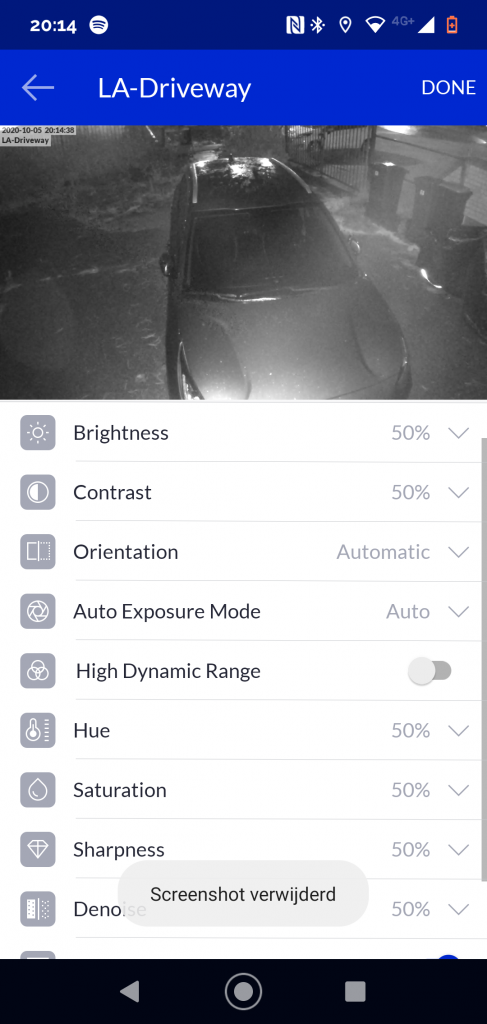
While you can do pretty much everything in the app, there are some settings that can only be done in the app or in the browser. For example, the infrared settings and adjusting the camera picture (brightness, etc) can only be done in the app.
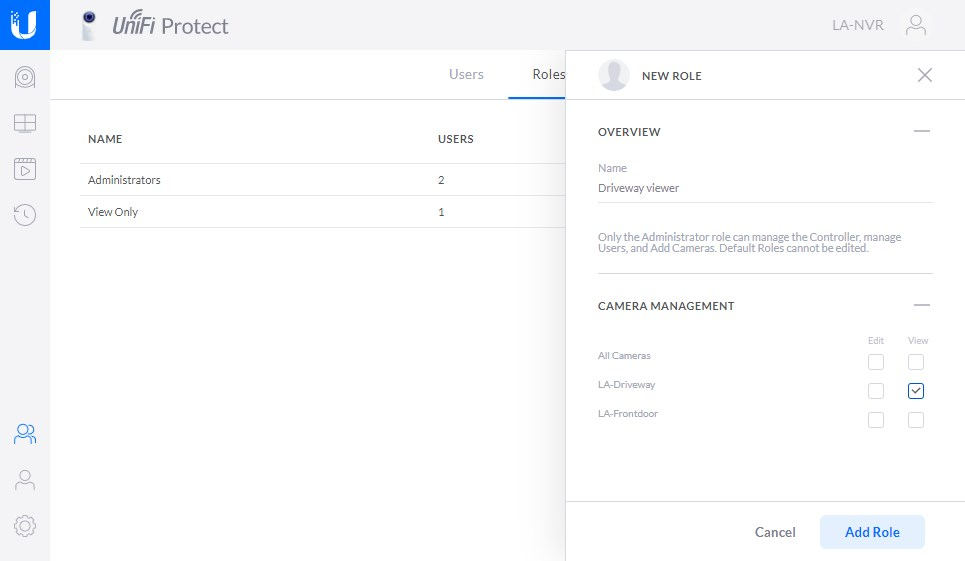
Role based users
A nice feature of Unifi Protect is that you can create role-based users and even better, you can create custom roles. You can create roles for a specific camera(s) and choose between view only or edit. The users self can have multiple roles.
Frequently Asked Questions
A couple of answer on some common questions when it comes to Unifi Protect.
No, only Unifi cameras from the second-generation (G2) and newer are supported.
The Cloud Key Gen2 comes with a 1TB hdd, but can be replaced with a 5TB if you want. The Unifi Protect NVR supports up to 24TB in a RAID 5 configuration
The Cloud Key Gen2 Plus support up to 20 cameras, the Protect NVR up to 50.
Yes, you can run both systems at the same time. But a camera can only be connected to one of them of course.
No, Unifi Protect can only be used in combination with the Cloudkey Gen2 Plus, Protect NVR or Dream Machine Pro
No, unfortunatelly thas is also not possible.
Conclusion
I am really happy with the way Unifi Protect is going. I have used Unifi Video in the past, which was also nice to work with, but the app of Unifi Protect and the ease of scrolling back through the timeline, setting up the whole system makes it really great to work with.
Yes, the motion detection could be better, but systems like Arlo and Nest are using the power of the cloud backend to analyze the snapshot, to see if it’s an animal or person for example. Unifi Protect keeps your data locally, doesn’t need any subscription and with a bit of fine-tuning, it’s a really nice video system.
UniFi is on the right way with the new smart detections. I am happy to see that also the CloudKey now supports it, the only thing I am waiting for is a G4 Flex camera to replace the G3 Flex. But the doorbell does a great job in detecting persons.
I hope you liked this Unifi Protect Review, if you have any questions, just drop a comment below.
If you want to know more about Unifi Protect, then subscribe to the newsletter below.
You may also like:


I’m looking for a solution which uploads the video to a cloud storage in case of defined motion alerts within near real time. Is there any way to achive this with Unifi Protect? Anything which can be automated by coding would be ok as well.
Unifi Protect can record on movement, that is not enough? You could try to place the Unifi NVR offsite, with a site-to-site VPN connection for example. But offloading the recording with a script is not possible. You can’t even extract the video files from the record and play them on something else.
I wrote a tool for exactly this: https://github.com/ep1cman/unifi-protect-backup
Is there any way to allow a remote Ubiquiti camera on a different LAN to be part of my Unifi Protect environment on my LAN/Cloud Key Plus?
You will need to create a Site-to-Site VPN tunnel between the two sites.
Nice article. Can you do one as well for Unifi Access and how it can intergrate with other applications like a garage door. I think this may interest a lot of people out there
Is Ubiquiti going to add the option to use Windows 10 as a NVR to integrate with UniFi Protect?
You had the option for UniFi video……why take away the option? I would like to use a normal blade server for my NVR and still have remote access with Protect since UniFi Video has reached EOL.
Thanks
No probably not. No docker images either.
Hey Ruud,
I switched from UniFi Video on a Intel NUC to UniFi Protect on a CloudKey Gen2 Plus. The 2 things I miss the most, or maybe I’m looking wrong, is the option to make scheduled motion events for recording and the possibility to record and/or move the recordings to external storage like a NAS or cloud solution. Do you perhaps know if there are in Protect as well? Cause I cannot find them :S
Both are not possible, unfortunately. You can however replace the disk in your Cloudkey Gen2 plus with a larger one up to 5TB.
Hi Rudy,
The problem with local storage is when the CK is gone/stolen then so are the files with the perps on it. I hope Ubiquiti wises up. Those 2 features we’re in Unifi Video so why it’s not in Protect is a mystery to me….
What you can do is use rclone and make a backup of the folder /srv/unifi-protect/video. The file format is .ubv, so it might be a challenge to view the files. Maybe it’s possible to restore them back to another Cloudkey, but I haven’t tested that (yet).
Thanks for the useful review. Just to confirm my understanding, I’m currently running UniFi Video with the NVR software running on my Win10 PC. It looks like UniFi Protect does not allow you to use your Win10 PC as the NVR, instead it requires one of their hardware devices, is that correct?
Hi Tim,
That is correct. You will need a Cloudkey Gen2 Plus, Dream Machine Pro, or Univi NVR.
I have a basic unifi system in my home (USG, cloud key gen 2+, us-8-60, ap pro, ap lite) and am considering switching from Arlo cameras to unifi. What is the best option for me as far as additional equipment needed. I’m going to use the g3 flex cameras. I will probably have a max of 6 cameras. Should I just buy another us-8-60? I have a shop that is about a 200ft run that is wired with cat 6 where I am using the ap lite. What would I need to add to also be able to install a camera or two in my shop?
Great article. Thanks!
I would place an us-8-60 indeed in the shop, for the AC and flex (I have exactly the same setup for my garage). For the other camera’s you will need to see if it’s worth buying an extra us-8-60 or just use PoE adapters.
Great article! I am having an issue with the location/geofencing in that my status is always ‘Away’. I have gone into the UnifiProtect web interface and reset my location address and radius, restarted my app, but no change. Any other ideas of how to get it to know that I am home?
Did you set the correct permissions for the Protect app on your phone?
I’m looking to add this to my unifi network and was curious if you can have role based user logins. For example, if I want to give a friend a logon I just want them to be able to look at video feeds.
I have updated the article a bit with the roles. But in short, yes you can create (custom) role with view only and/or edit permissions per camera.