Do you often need to email the same group of people? Then you should create an email group in Outlook. Email groups, or contact groups, allow you easily select a group of recipients in your Outlook and email them all at once.
There are three ways to create an email group in Outlook, we can create a personal group, which is called a contact list, a distribution group, or an email group that we can extend we SharePoint, Teams, etc.
In this article
In this article, we are going to take a look at the different options, and I will explain how you can create an email group in Outlook.
Contact List vs Email Group vs Distribution List
As mentioned in the beginning, there are basically three ways to create an email group in Outlook. Each of them has its own advantages and use cases. They all share the same purpose, making it easy to email multiple recipients at once.
A Contact List (Contact Group in Outlook 2019) is basically a personal email list that you can create. It allows you to add multiple internal or external email addresses to the list, which you can use to easily send an email to multiple recipients.
Distribution lists are basically the same as a contact list, with the only difference being that they are shared with your colleagues. You often can’t create a distribution list yourself, but you will need to ask your IT department to create it for you.
The last option is an Email Group. Now the name is actually wrong because an email group isn’t limited to email. When you create a new group in Outlook, you are actually creating a Microsoft 365 Group, which comes with a SharePoint site, Teams, Planner, inbox, etc.
| Contact List/Group | Distribution List | Email Group | |
|---|---|---|---|
| Personal | X | ||
| Shared with colleagues | X | X | |
| Can have internal & external recipients | X | X | X |
| Can be created by users | X | X | |
| Has an internal email address | X | X | |
| Has a group inbox | X | ||
| Comes with SharePoint, Teams, Planner | X |
Outlook Contact List (Contact Group)
We are going to start with creating a contact list. As mentioned, a contact list is a personal email group in Outlook. The group can only be used by you and you can easily add or remove email addresses from the group.
The contact list in the current Outlook application is still named Contact Group. But in Outlook Online and the new Outlook App, you will find the new name, which is contact list. I will first show how you can create a Contact List in Outlook Online and the new Outlook app, and later on how you create a contact group in Outlook.
Creating a Contact List
The method described here is for both Outlook Online and the new Outlook App.
- Open Outlook Online and click on Contacts
- Click on the dropdown arrow next to New Contact
- Choose New contact List from the dropdown menu.
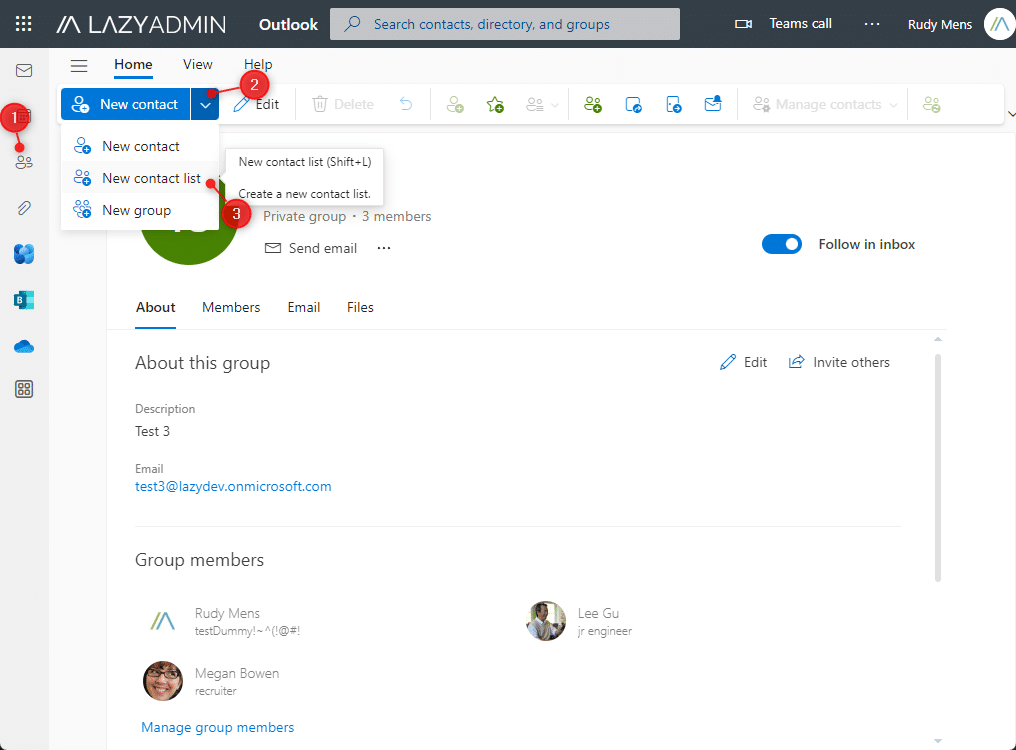
We can now give our Contact list a name. The list is personal, so you can give it any name you want. Your colleagues won’t see the name of the group. The next step is to add the email addresses to the group and click on Create when done:

You can always add or remove contacts to the list by simply click on Groups in Outlook. You can then select your list and click on Edit in the menu bar to edit the group.
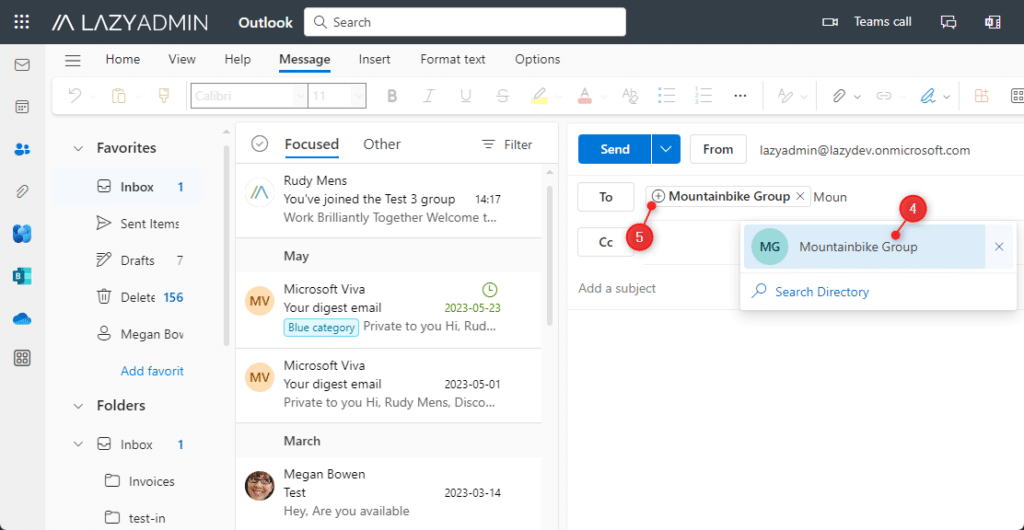
When you want to send an email to the newly created contact list, you can simply start typing the group name and select it from the suggested results (4). If you want to see who is in the group, or temporarily remove someone from the group, then you can click on the plus + icon (5) before the group name, which will expand the group and show all members.
Contact Group in Outlook
If you are not using the new Outlook app yet, then you can create a contact group in Outlook. The principle is the same as a contact list, and you will also see that a contact group created in Outlook will be displayed as a contact list in Outlook Online.
- Open Outlook and click on Contacts
- Click on New Contact Group
- Give the group a name
- Click on Add Members and choose from Outlook Contacts
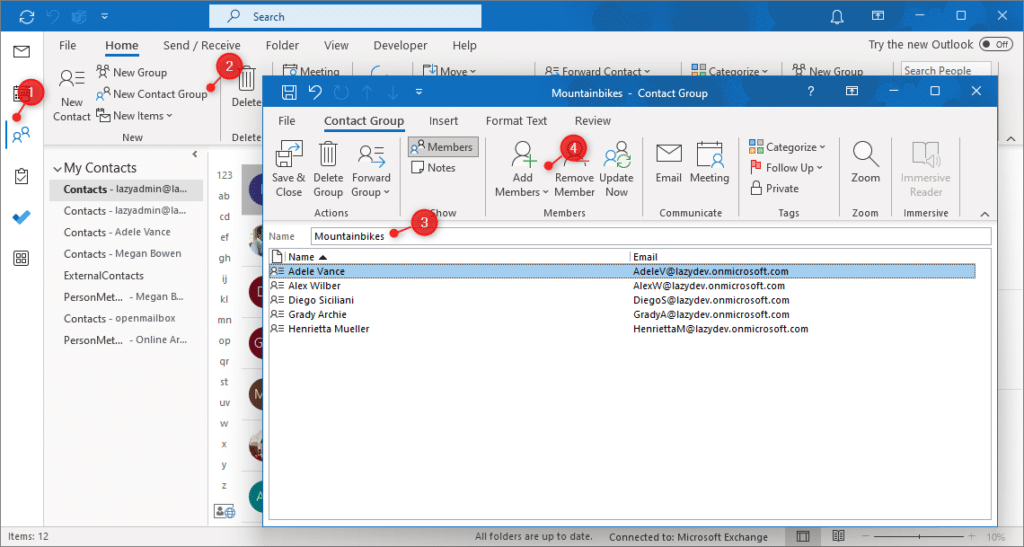
You can now select the contact that you want to add to the group. If you don’t see all contacts, then change the Address Book to Global Address List. When done click on Ok and Save & Close in the menu bar (ribbon).
Creating an Email Group in Outlook
Email groups are actually Microsoft 365 Groups. Now this doesn’t have to be an issue, but keep in mind that a Microsoft 365 Group is more than an email group. It also comes with a SharePoint site that you can use to share files, a planner, an inbox for the group, and a Teams team.
The advantage of a Microsoft 365 Group is that it can have multiple owners, can be private, and other users can use the group as well (if they are members). The method to create an email group from Outlook is the same in Outlook Online and the new Outlook app. In the current Outlook application, only the interface is different.
Again we will first look at the steps in Outlook Online and the new Outlook app:
- In Outlook Online click on Contacts
- Click on the dropdown arrow next to New Contact
- Choose New Group

The group will need to have a name (4), just like a contact list. But the difference here is that the group name has to be unique within your organization. The group will also get an email address (5). This email address can be used to email all the group members.
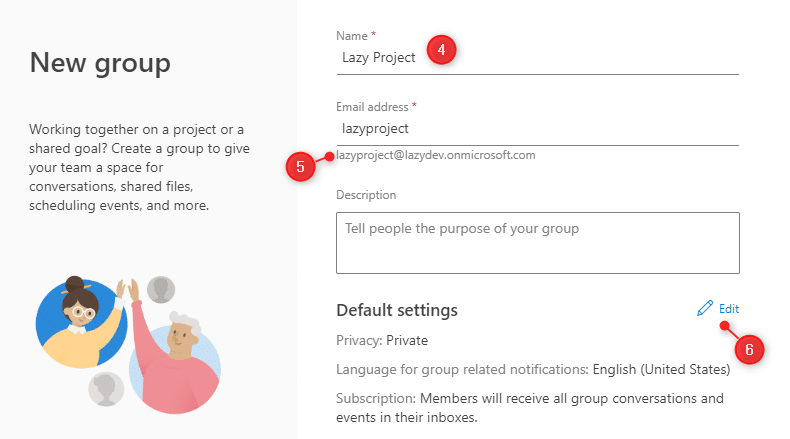
You can also change the privacy setting (6), by default, the group is private, but you can make it public as well. When it’s set to public, then everybody can join the group without approval. Click on Create when done, we can add members after you have created the group.
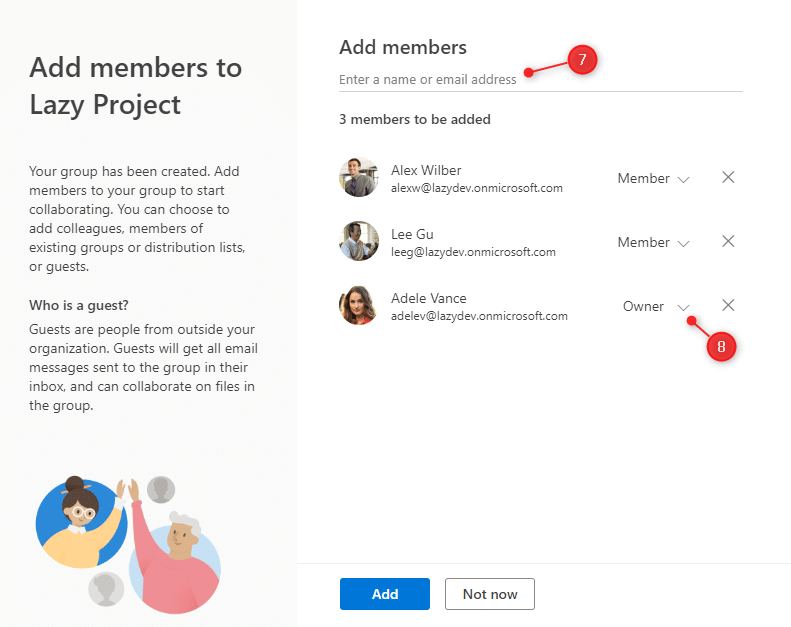
You can now add members to the group, which can be internal or external members. Simply start typing their name (7) or email address to add them. You can also change the role of members to owner (8). When done click on Add to add the members. All members will receive an email that they are part of the group and can start collaborating with each other.
Creating an Email Group in Outlook
If you are still using the current version of Outlook, then you can also create an Email Group (Microsoft 365 Group). The steps are basically the same, only the screens look different:
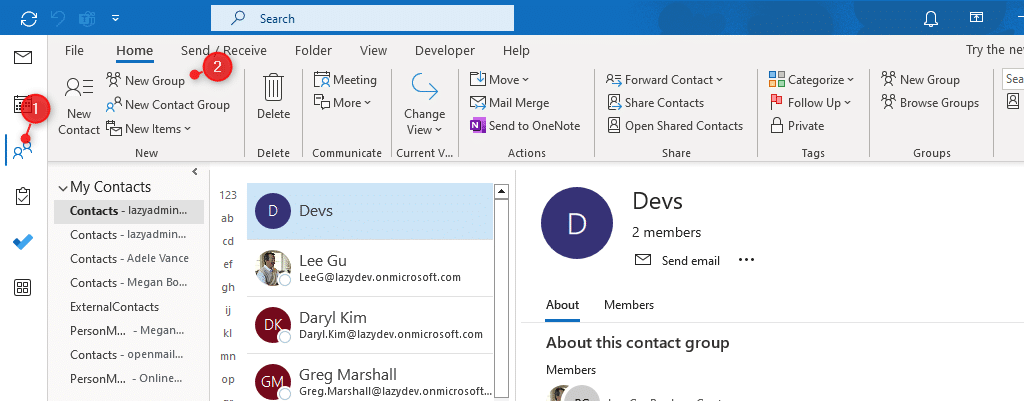
- In Outlook click on Contacts
- Click on New Group
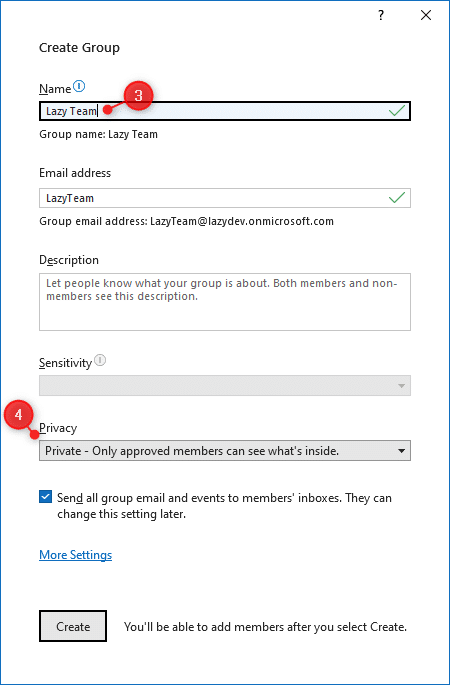
We will need to go through the same steps as with Outlook Online. So give your new email group a name (3), set the privacy setting (4) of the group (private or public), and click on Create.
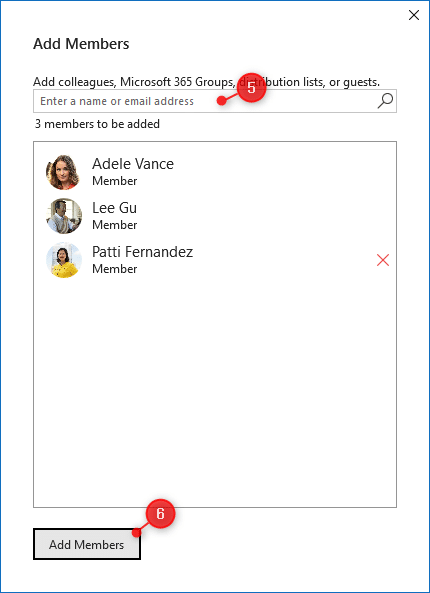
The next step is to add the members to the group. What is different here, is that we can’t change the role of the members to owner. We will have to do that later on. Simply type the name or email address (5) of the person that you want to add. When done click on Add members (6)
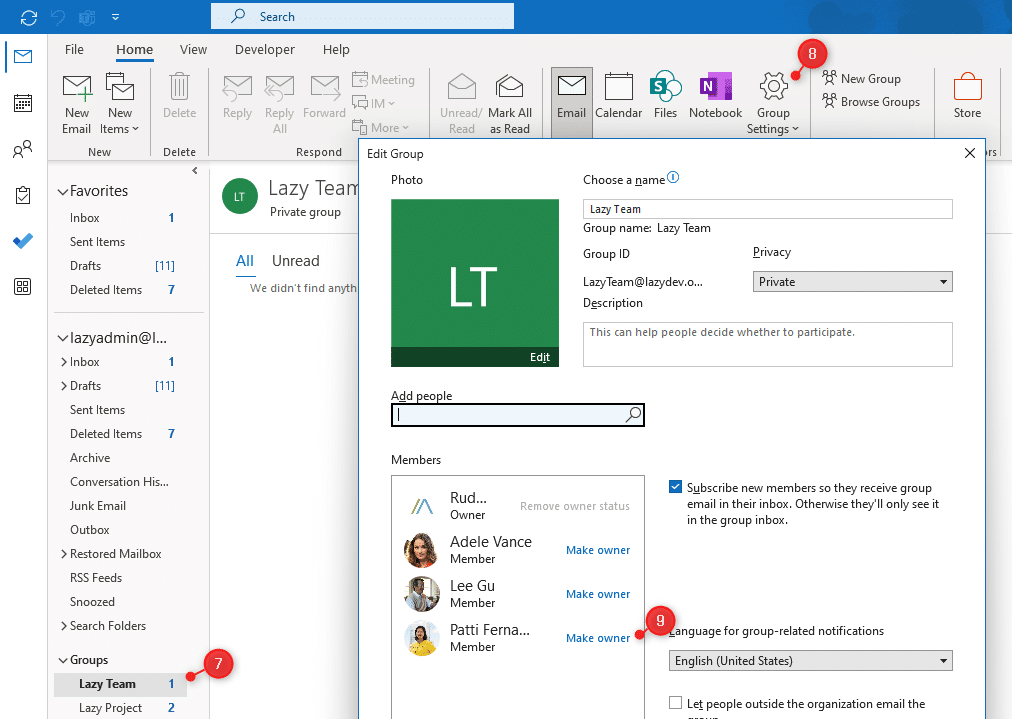
To edit the group or to make members owner of the group we will have to use the group settings in Outlook:
- Select the group in Outlook
- Click on Group Settings and choose Edit Group
- Change members to Owner
Creating a Distribution List in Outlook
Distribution Lists can’t be created in Outlook, only IT administrators can create a distribution list in Exchange Online. If you want to create a distribution list in Outlook then you will need to create a Contact List or Contract Group as described earlier in this article.
To create a distribution list we will need to open Exchange Online or the Microsoft 365 Admin Center.
- Open Microsoft 365 Admin Center
- Expand Active Teams & Groups
- Click on Add a Group
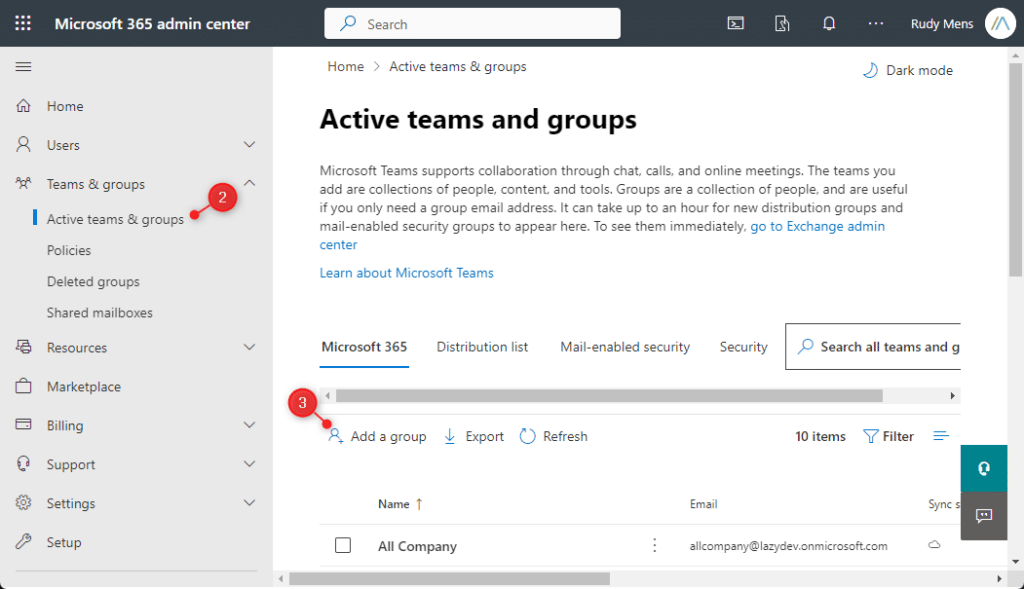
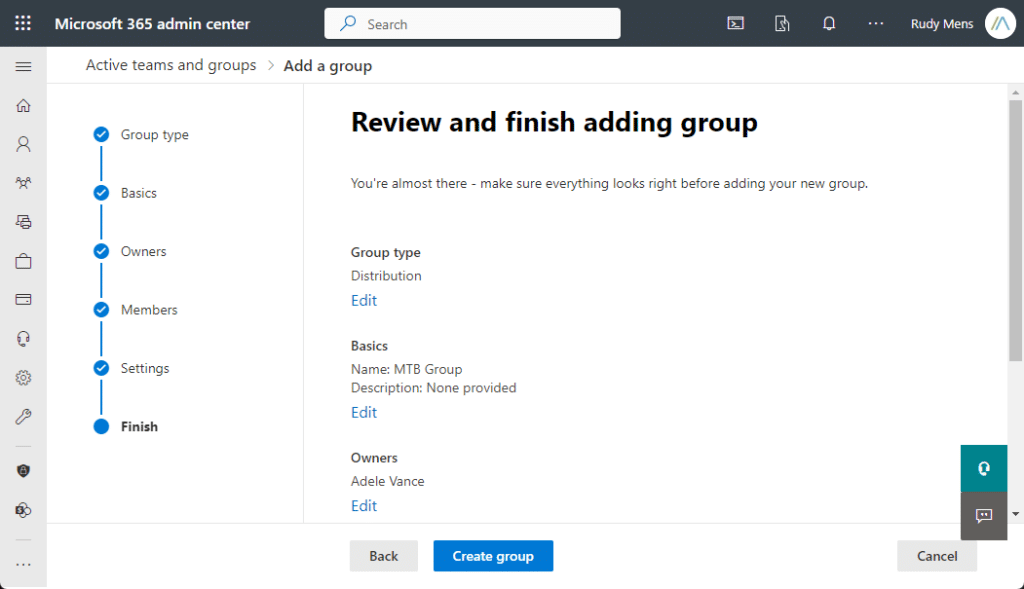
- Choose Group Type Distribution
- Give the group a name
- Set an owner of the group, owners can add or remove members, change the name and more
- Add members to the group
- Create an email address for the group
- Click on Create group
The distribution list will be available to all users in your organization. In Exchange Online you can create the distribution group under Recipients > Groups. Follow the same steps as above to create the email group.
Wrapping Up
As you can see there multiple options to create an email group in Outlook. Contact lists are the preferred method when you want to create a personal group. If you want to share the group with your colleagues, then an Outlook Group (Microsoft 365 Group) is the best option.
I hope this article helped answer your question on how to create an email group in Outlook. If you have any questions, just drop a comment below.