In some use-cases, you might want to export Office 365 mailboxes to a PST file. For example when a user leaves the organization, legal purposes, or when you want to migrate a mailbox to another mail service.
Users can export their own mailbox through the Outlook client, but also as an admin we can easily export a complete mailbox through the Office 365 Admin Center.
In this article, I am going to explain how you can export an Office 365 mailbox to pst.
Requirements to Export Mailbox to PST in Office 365
We are going to use the Content Search and eDiscovery Export Tool to export an Office 365 mailbox to PST. To use the Content Search you will need to have the eDiscovery Manager role in the Microsoft 365 Compliance center.
A global administrator doesn’t have this role by default, so first, we are going to give your account the proper permissions. You will need to be a global administrator to change permissions.
- Log in at the Microsoft 365 Admin Center
- In the menu, click on Compliance to open the Compliance Admin Center.
- Click on Roles & Scopes > Permissions
- Open the Microsoft Purview Roles
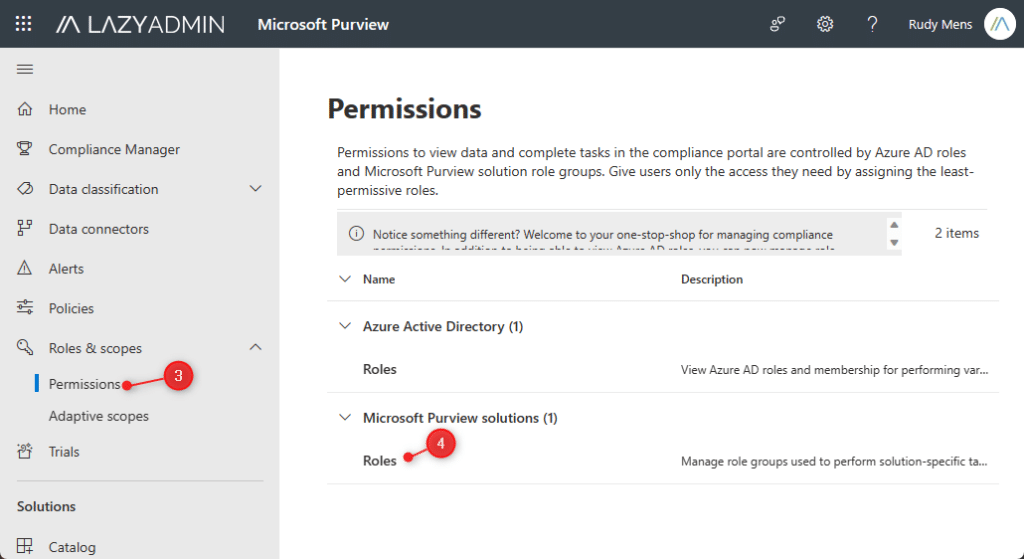
- Select eDiscovery Manager
- Make sure that the Export Role is listed in the Assigned Roles (otherwise, add it)
- Edit the eDiscovery Administrator
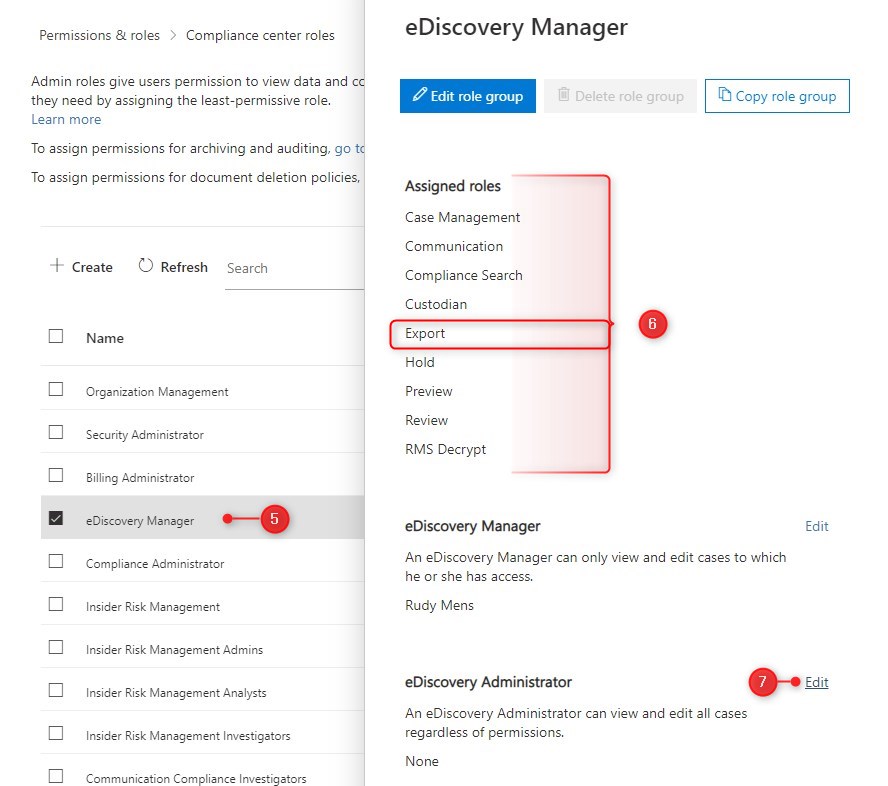
- Click on Choose eDisovery Administrator or Edit
- Click + Add
- Lookup your own account and add it to the list
- Click Save to complete

We have now the proper permissions to start a Content Search and export an Office 365 mailbox to pst. To apply the new permissions it’s best to log out, close the tab, and log back in again.
Office 365 Export Mailbox to PST
To export a mailbox out of Office 365 we first need to create a Content Search that will collect all the mail of the specified user. Then we can export the result to a PST file with the eDiscovery Export Tool.
Note
Only the browser Edge is supported to download the eDiscovery Export Tool.
Their are browser extensions available for Chrome and Firefox that solve this issue and allows you to download and use the eDiscovery Export Tool
Chome : Meta4 ClickOnce
Firefox : Breez ClickOnce
- Open the Microsoft 365 Compliance Center
- Create a new Content Search
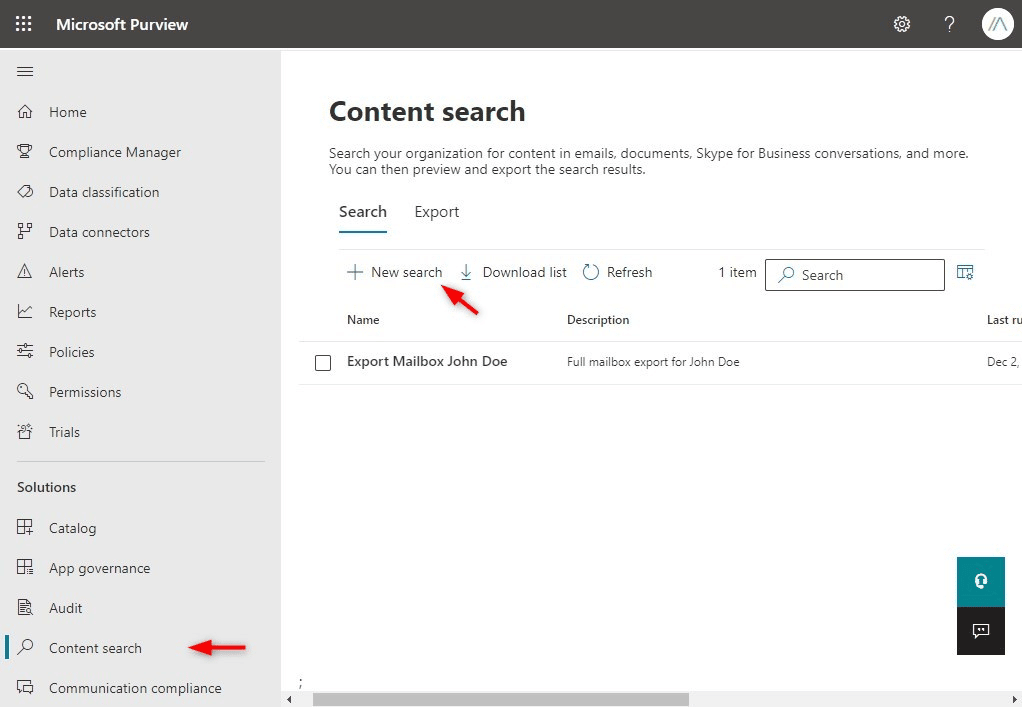
– Select Content Search in the menu under Solutions
– Click + New Search
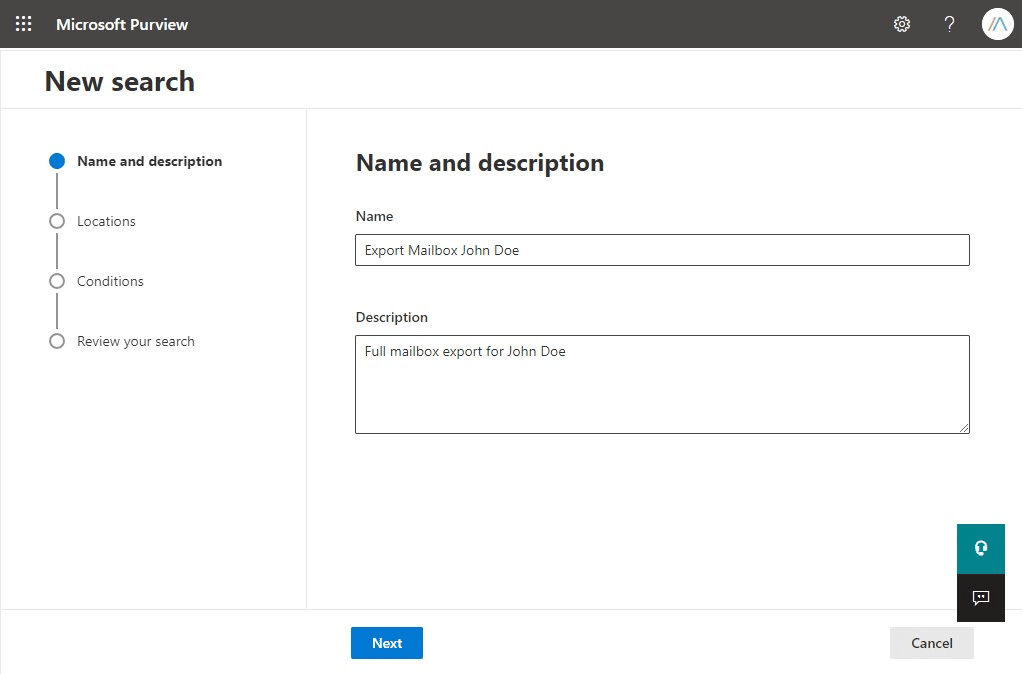
- Enter a name and description
Give your content search a recognizable name and description and click Next. This helps you later with identifying the correct content search.
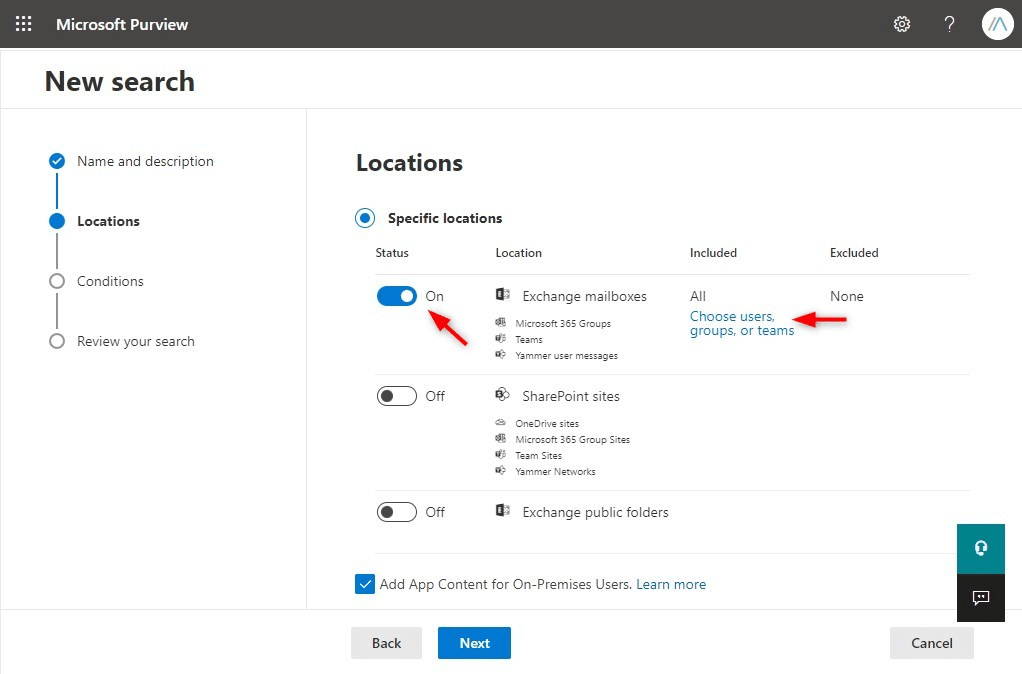
- Select Exchange Mailboxes
To export a mailbox, turn Exchange Mailboxes on and click on Choose users, groups, or Teams
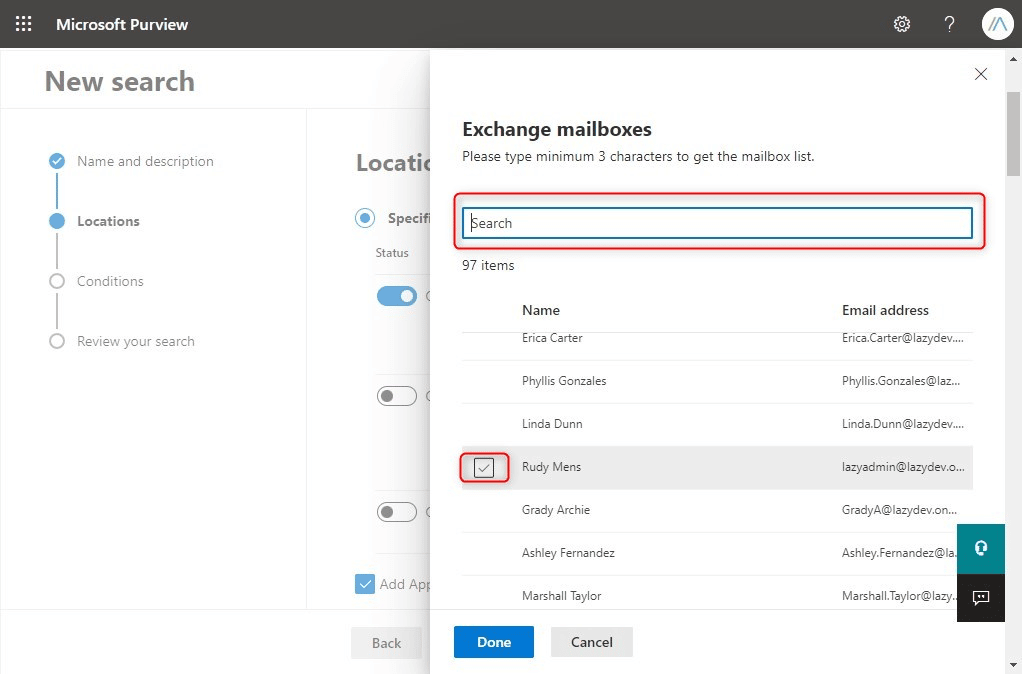
- Select the mailbox to Export
The next step is to select the mailbox that we want to export. Select or search for the correct user and click on Done
And click on Next to continue to the Conditions.
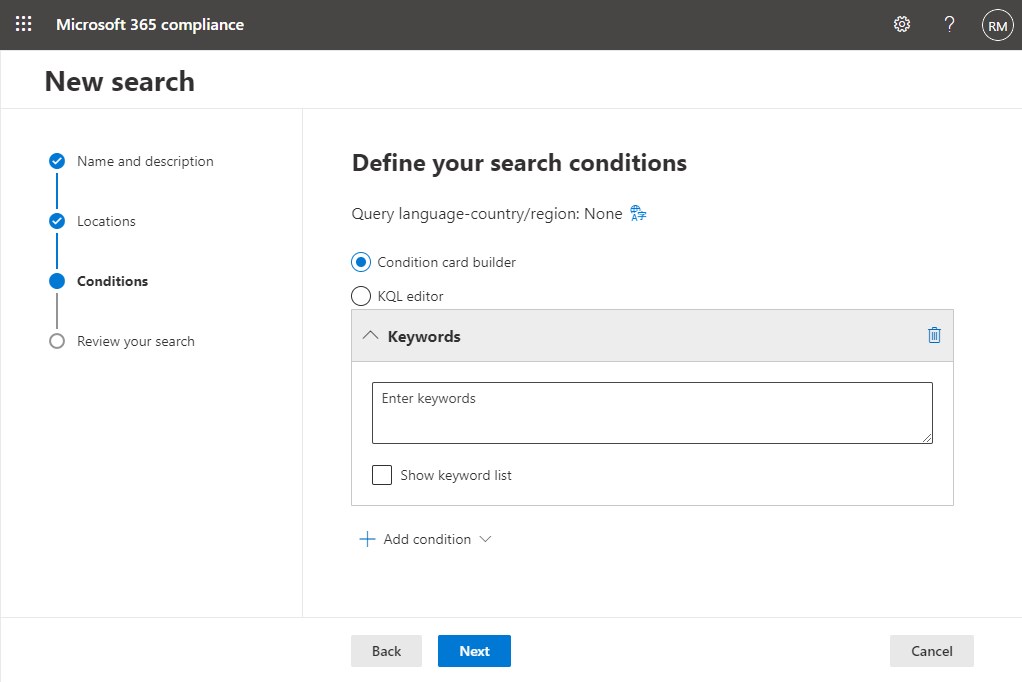
- Leave Conditions empty
We want to export the complete mailbox, so we can leave the conditions empty.
Just click Next
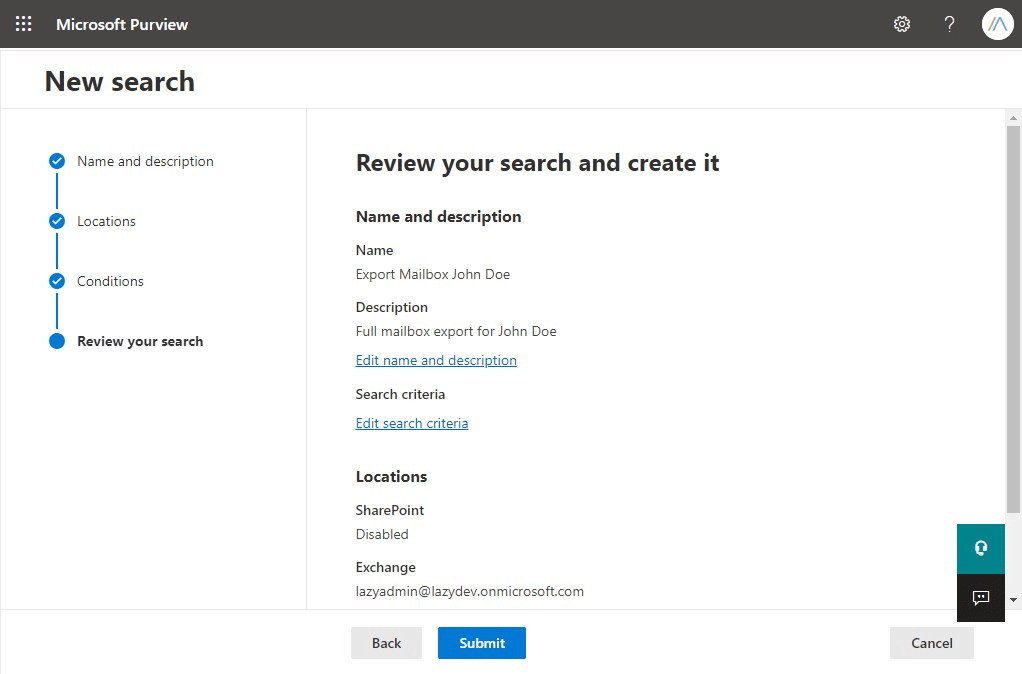
- Complete the Content Search
Review your Content Search and click Submit to start it.
Click Done to close the New Search screen
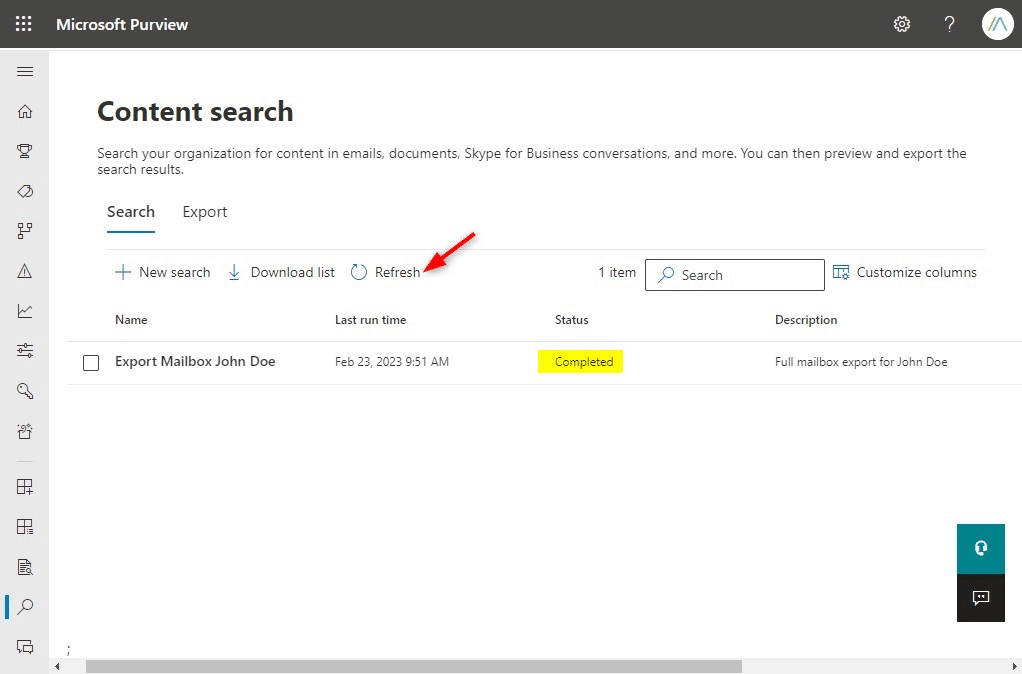
- Wait for the search to complete
Depending on the mailbox size it can take a couple of minutes to complete the content search. Wait for the status to change to Completed in the Content Search scene. (Click Refresh occasionally to update the status)
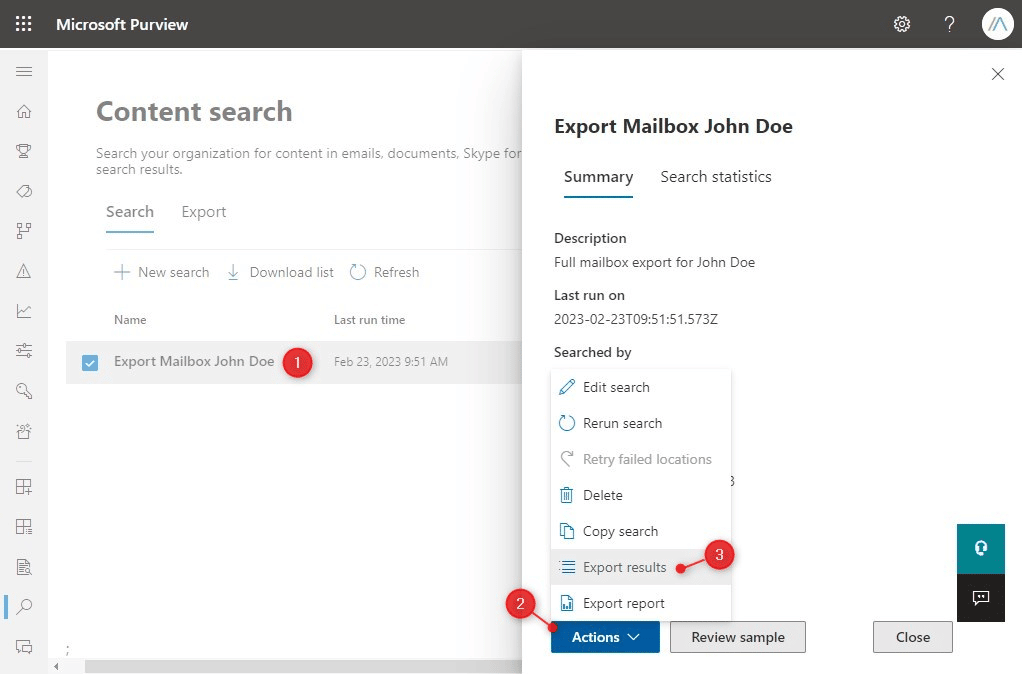
- Export the Office 365 Mailbox to PST
1. Click on the Content Search that we have just created
2. Select Actions
3. Choose Export results
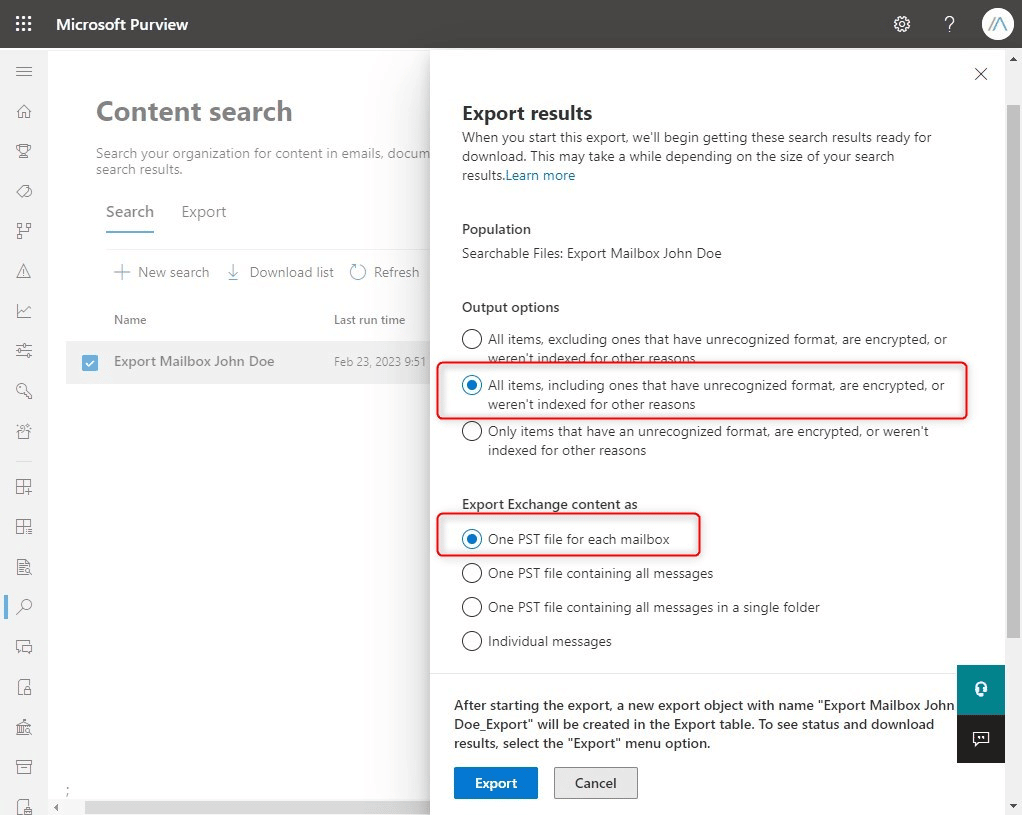
- Export Options
We can now select what and how we want to export our mailbox.
– Output Options: All items, including ones that have unrecognized format…
– Export Exchange Content as One PST file for each Mailbox.
Click Export to start the export
- Download the Office 365 export mailbox PST file
Again, it can take a couple of minutes for the download file to get ready.
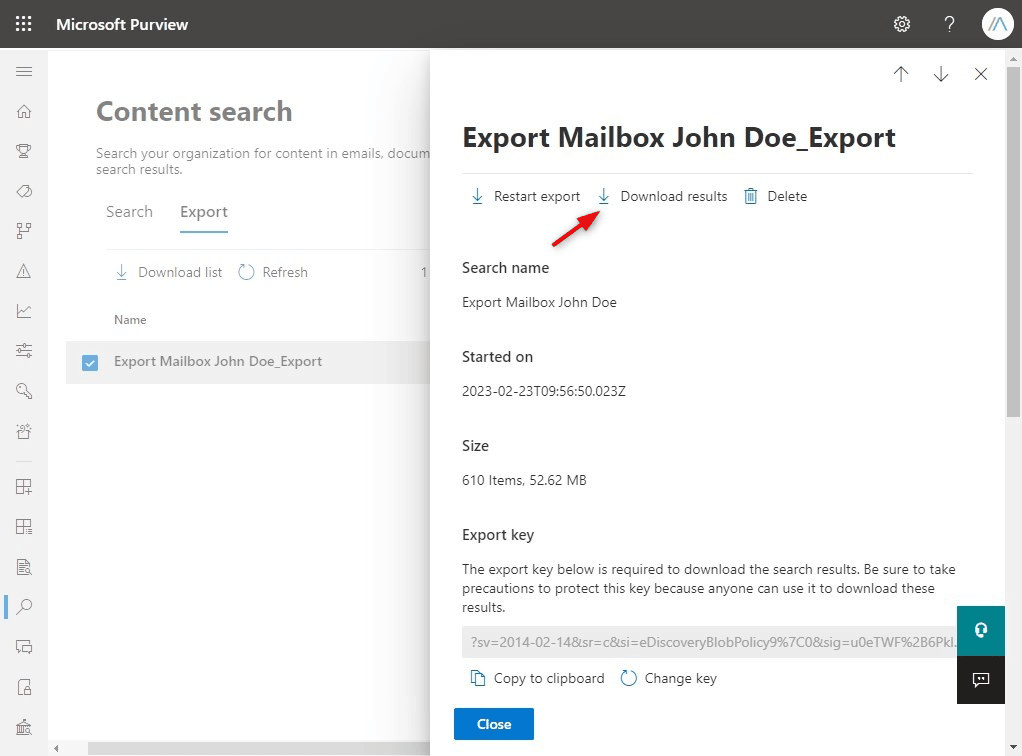
– Open the Export tab in the content search screen
– Select the Export job to view the status
It can take a couple of minutes depending on the mailbox size. You can click on refresh to update the status, and wait for it to be completed.
- Download eDiscovery Export Tool
To download the PST files we will need to use the eDiscovery Export Tool.
As mentioned earlier in the blue note, you will need to use Edge for this step or use a ClickOnce browser extension in Chrome or Firefox.
Click Download Results to download the tool
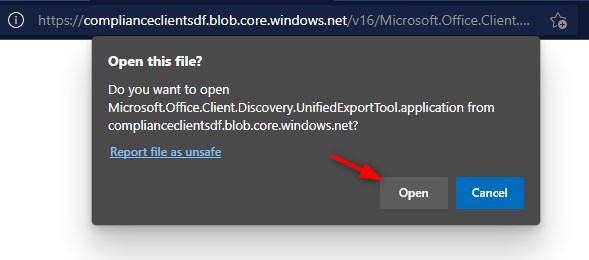
- Approve the download
A new tab will open that will download the eDiscovery Tool. Click Open in the security warning
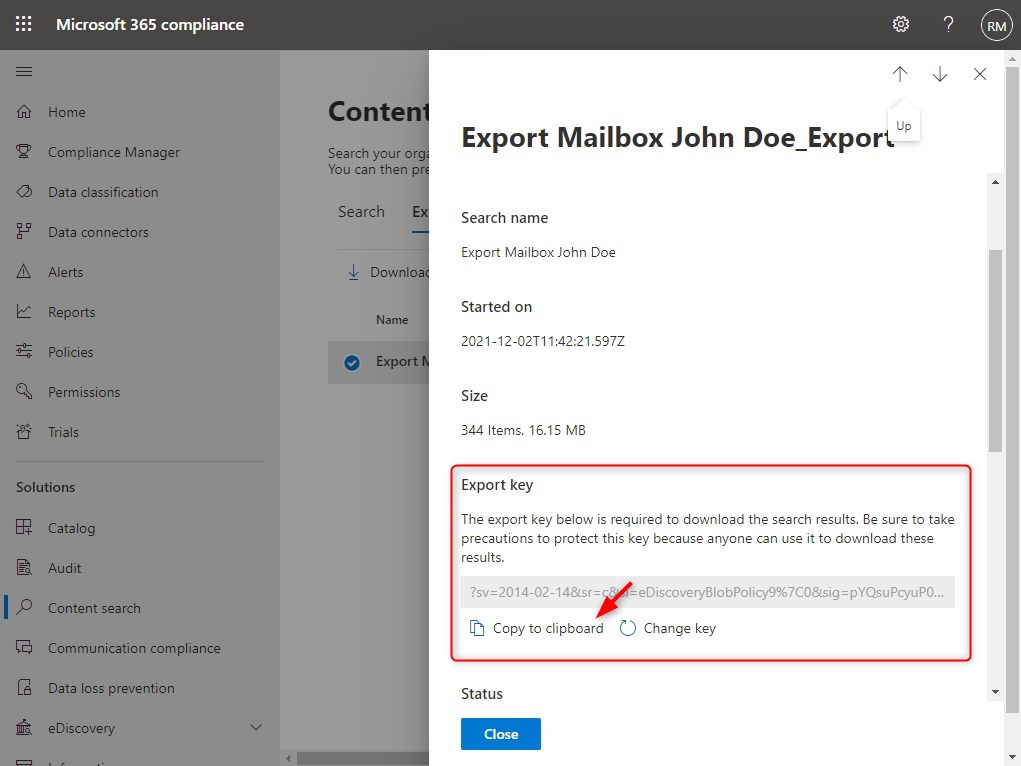
- Copy the Export Key
Before you can start the download, you will need to copy the export key from the Compliance Center.
- Download the PST File
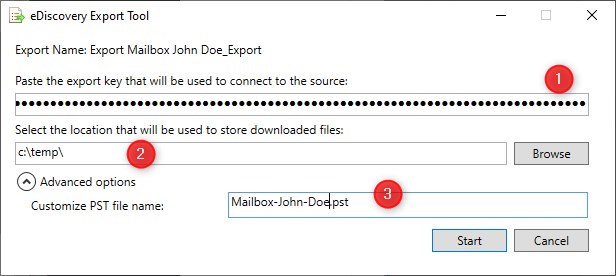
The last step is to start the download in the eDiscovery Export Tool.
1. Paste the key that we copied
2. Enter a location for the PST file
3. Expand Advanced Options and give the PST file a meaningful name
And click on Start
- Wait for the download to finish
Depending on the size of the mailbox, the download can take some time. Wait for it to
finish and open the PST file in the location that you specified.


You can also use these steps to download multiple mailboxes at once. Just select multiple users or mailboxes at step 5 and makes sure that you select one pst file for each mailbox in step 10.
Office 365 Export PST File Size Limit
The default file size of the exported PST files is 10 GB. You can increase or decrease the file size, but keep in mind that if you make it too large, to chance of file corruption increases as well. If the exported mailbox is larger than the PST limit, then the tool will split the PST file into sequentially-numbered files.
Making the file size smaller can be useful if you need to place the files on removable media.
To change the file size you will need to create a registry key.
- Close the eDiscovery Export Tool
- Create a new txt file and name it pstsize.reg (note the extension)
- Add the following content
Windows Registry Editor Version 5.00
[HKEY_LOCAL_MACHINE\SOFTWARE\Microsoft\Exchange\Client\eDiscovery\ExportTool]
"PstSizeLimitInBytes"="21474836480"
- Change the PstSizeLimitInBytes to the desired value:
| Size in bytes | Size in GB |
|---|---|
| 4294967296 | 4 GB |
| 8589934592 | 8 GB |
| 21474836480 | 20 GB |
| 32212254720 | 30 GB |
- Save the file and close it.
- Double-click the newly created reg file to import it. Click yes twice to the warnings.
You can remove the registry key to change the value back to 10 GB or change the value of the key to 10737418240.
Restart the eDiscovery tool to export the PST files in the new size.
Export or Backup Office Outlook contacts
When users leave the organization they sometimes want to take their Outlook contacts with them. Even though you can easily export them through Outlook, you could also use the Content Search method to export only the contacts.
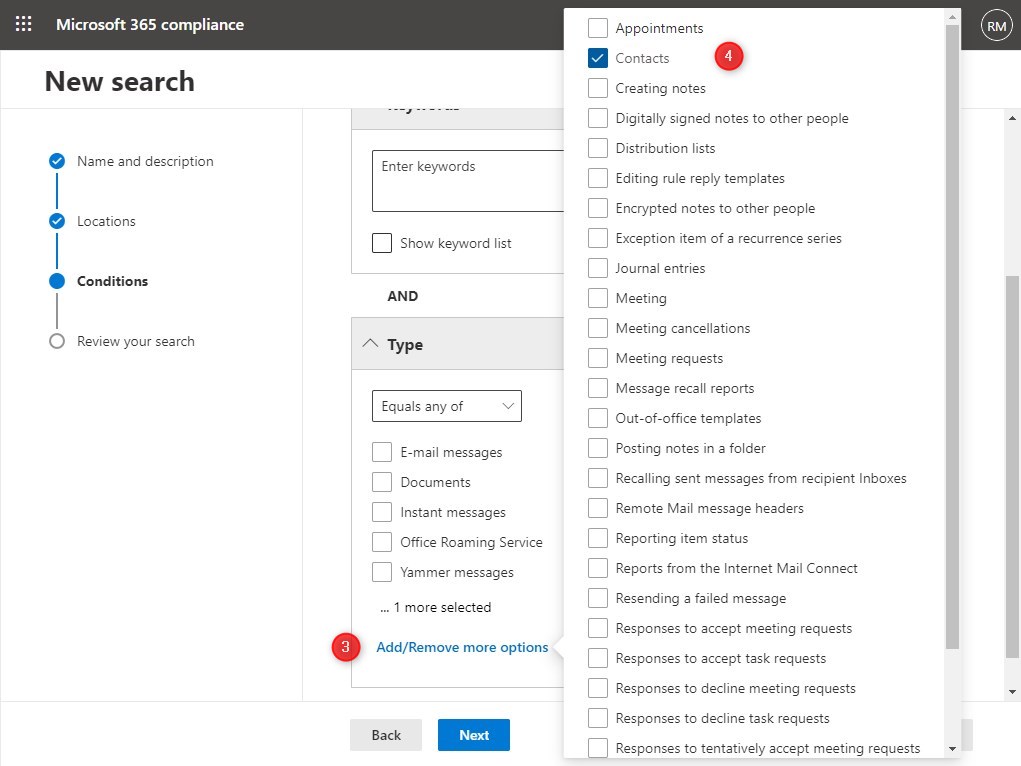
Follow all the steps described earlier, but add a condition in Step 6:
- Click Add Condition
- Select Type
- Click Add/Remove more options
- Select Contacts
Follow all the other steps to export the Outlook contact to a PST file.
Use a third-party tool to Export Mailbox to PST
There are also third-party tools available to export Office 365 mailboxes to PST files. For example, Kernel Export Office 365 to PST Tool (10% discount with code “lazyadmin”), SysTools Backup and Restore Office 365 (25% discount with code “LAZYAD25OFF“), or Stellar Exporter for Office 365. Now I am not going to do a full review of these tools, but what is great about these kinds of tools is that they give you more control and feedback about the export.
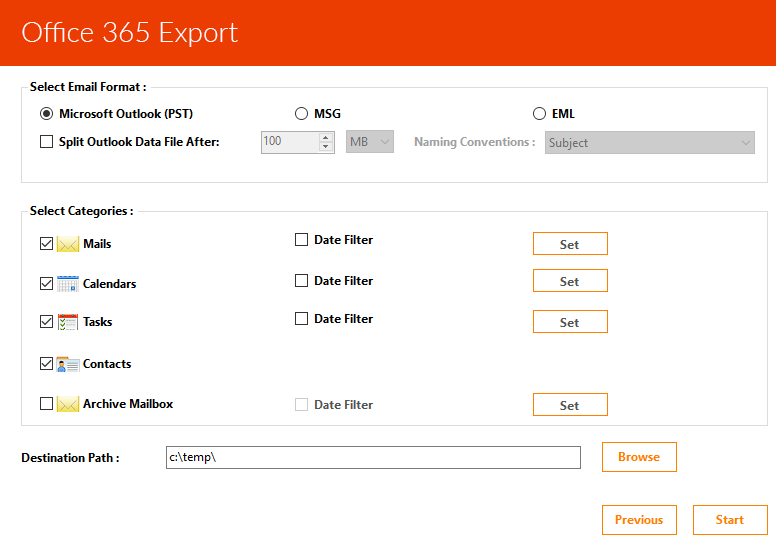
For a single mailbox is this overkill, if you have to export multiple mailboxes, or do this on a more regular basis, then this tool is a real-time-saver. It makes exporting Office 365 mailboxes to PST a lot easier.
Using PowerShell
One of the readers of this blog, Simon, has written a PowerShell script that allows you to export multiple mailboxes easily. It uses a CSV file as a list with mailboxes to export.
I haven’t tested the script, but you can find the script here in my GitHub repository.
Wrapping Up
I hope this article helped you with your Office 365 Export mailbox to PST. Keep in mind that the content search method can take some time. If you need to export multiple mailboxes to PST then using a third-party tool might be a better idea.
They are more convenient to use and don’t cost really that much.
If you have any questions, just drop a comment below.


This is great; thank you. I started downloading and then thought, does it also download the contacts? And what about the calendar? I’m looking forward to your reply. Thank you.
Yes, these are part of your Exchange Online mailbox, so will be included in the export.
Brilliant, thank you so much.
Very thank you. Help my and save me time. Worked perfect.
Hi Rudy.
Excellent article.
What about exporting softdeleted archive?
A mailbox have been deleted, but another one have been created, but impossible to restore old archive data to new Archive, because autoExpandingarchive was enabled.
Do you have a solution, please?
Another well done article by the Lazy Admin. Many thanks.
Good day. The first steps are no longer correct due to MS Admin Portal changes. It is now under Roles & Scopes > Permissions.
Thanks for pointing out, I have updated the article.
Outstanding how-to article! Clear, concise and well written. Thank-you, thank-you, thank-you!!
With your permission, I would like to incorporate much of this into one of our internal procedure documents.
As long as it internal, I am fine with it 😉
It will stay internal, thanks Rudy!
Hello Sir,
When exporting mailbox, how we can exclude the deleted /recoverable items from the export.
You can only do that by using the export function in Outlook or using a third-party tool.
Really nice post, worked well, thank you so much!
Thank you
Do you have instructions on importing a PST to an office 365 account? Importing in Outlook is so easy, but I cant find a way to to import on Office 365 without downloading additional software or having deep tech knowledge.
Here you go: How to Import PST file into Office 365 – Step-by-Step
THANK YOU! Brilliant. I was searching for hours trying to find out how to do this, and (finally) your excellent step-by-step guide with screenshots covered it very clearly and comprehensively.
It worked – bravo!
I am told this method does not export any hidden folders the user may have, is that true?
A folder can’t be hidden in Outlook. You can only remove permissions from it But that only makes sense when you have shared your inbox folder.
Hi, thanks for the beautifully outlining the whole process. I just have a question if you don’t mind answering it. Does it also contain the emails deleted by user from deleted items.
Yes, the delete items folder is also exported
Great post, If anyone is interested try this PowerShell script to reduce time.
https://github.com/ruudmens/LazyAdmin/blob/master/Exchange/Export-Mailbox.ps1
Thanks for sharing, I have uploaded your script to my Github repository, it’s a bit to big to share in the comments.
Great guide.
Certainly saved me hours or even days of time!
Thanks!
Thank you for this guide.
– I see a other screen for step 7.
– I see a other screen for step 11.
– I get a pop-up window telling me that a job is made after clicking on export in step 10.
Also Microsoft is calling the compliance system now Microsoft Purview in the upper left corner.
I’m sorry I missed the instruction for step 11 to open the Export tab. So the screenshot for 11 is the same as on my screen.
I have updated most screenshots. It’s indeed renamed to Purview. Only I don’t see any difference in Steps 7 and 11. Can you email a screenshot of what you get at those steps? I am curious about what the differences are.
Great article, Thank you
Thanks, Rudy for this article. Really happy with your write up`s
Excellent article and just what I was looking for. Followed your steps and it worked perfectly. Thank you much!
One suggestion – maybe a note under the File Size Limit that if a pst file to be exported is larger than the desired file size limit, the tool will split the pst file into sequentially-numbered files.
Thanks again.
Thanks, article updated.
Thank you for taking the time to put together a comprehensive article. It is appreciated.
Can you copy a current user PST file without the user not knowing please
What is the use case here?
Excellent Article, straight to the point and updates to the latest Interface! Thank you sir!
Very usefull content. thank you somuch for sharing your knowledge.
Ótimo artigo, nos auxiliou demais. Porém quando tentamos efetuar o passo-a-passo 10. Opções de exportação, ocorre um erro 500 e não dar andamento ao processo 11.
Poderia nos auxiliar mais uma vez?
And you are using the browser Edge?
great Article
I’d love to know how to import exported PST into a mailbox at another 365 domain. When I try to do it manually through Outlook, it doesn’t maintain the correct inbox/subfolder structure.
That is strange. And if you just open the PST in Outlook, does it then show the correct structure? You could then maybe move the folders from the PST to the inbox.
Really appreciate this article since every other articles still has the old eDiscovery archiving in place. Thank you for the thorough instruction.
This was the best most detailed instruction I’ve seen – thanks!
Thanks a ton!!! This Post really help to export pst’s from O365.
How long is the export available?
Love your posts. A great help to all the incompetentadmins (as opposed to lazy). 🙂
The content search will remain available until you delete it. So you can generate and export at any moment when you need.
Great Post. We are new to O365 and this article really helped us to export the PSTs.
Once you have successfully downloaded the export, will the user’s data that you exported stay within the 0365 admin center when you remove the user from the organization?
Thanks!
That depends on your retention policies. Export is only a copy of the data. If you delete the user, by default the mailbox will also be deleted. I thought after 30 days, but not sure about that (need to check).
But the export will remain available ofcourse.
This article is great. I’d only add that step 13 in the process needs to be performed with MS Edge or it fails.
I am trying my first 365 eDiscovery export . Before the cloud, I’d export straight from the Exchange server. After moving to the cloud, I’d connect the account to an Outlook and export from there.
My first export from 365 is going smoothly, but it’s taking over a day!! When the process started it said that the estimated time was 2 days and some, then it started going down, I didn’t take it very seriously, but I guess I should have. I started the process about 18 hours ago and it’s still running, and it says that the estimated remaining time is 1 day and 17 hours.
What’s going on??
Thank you!
Yeah, step 13 is best performed in Edge. But Firefox with the ClickOnce extension also seems to work fine.
About the speed, how large is the mailbox, and what is the download speed of your connection?
Yeah, getting that tool working was a pain since it kept wanting to use IE and I wasted time trying to get it to go. Finally got it working with FireFox after installing the clickonce extension.
When the download was done for the single mailbox I had chosen, I had 4 PST files, numbered sequentially.
I had selected one PST for each mailbox, so I’m curious why. This mailbox is over 36GB and each PST seemed to be limited to ~10GB, so I had three equal size PSTs and the fourth one was 6GB.
Is there an export file limit size?
Yes, the default file size limit is 10 GB. You can increase it, I have just updated the article with the information to increase the PST file size. But don’t make it too large, because you risk corrupt PST files.
And thanks for the ClickOnce tip, I have added it to the article.
Sorry i made a typo, I tried to say that not all browsers can be used for the Export tool. Edge works for me, Firefox not. I thought Chrome was not supported either buy I am probably wrong on that one.
A yes, that is correct. Chrome is officially not supported, but it working perfectly. Think after Edge switches to the same engine. But good point, I will add it to the article.
Nice post. The eDiscovery Export Tool isnt working in Edge. I believe Chrome or Firefox doesn’t work.
Which version of Edge are you using? I use Edge to create the screenshots and test everything, and it’s working perfectly fine here. I am using version 96.0.1054 (Help and feedback > About). Maybe a security setting in Edge that is preventing you from downloading the tool?
Also in Chrome am I able to download the tool.