SharePoint Lists allow you to organize tasks, schedule projects, or track assets for example. The advantage of lists is that they can easily be accessed by others, so everybody has the latest information.
What makes SharePoint List such a great tool, is that they are somewhat similar to Excel. You can use similar formulas for calculation, and add value-depended markup, all packed in a nice-looking interface.
In this article
In this article, we will look at how to create a SharePoint List, import from Excel, use formulas, add styling, and more.
What are SharePoint Lists
Before we are going to take a look at how to create SharePoint Lists, let’s first take a look at what they are, their purpose, and how they compare with Excel for example.
SharePoint Lists look pretty similar to an Excel spreadsheet at first. They both give you a spreadsheet where you can easily enter data in columns, add calculation and even do some formatting. But that is where the similarity ends.
Lists are mainly used for simple things, like tasks, issue tracking, or keeping track of contracts. They are feature rich, which means that you for example can easily select employees from your company when assigning tasks.
Another advantage of SharePoint Lists is that you can easily share them with your coworkers. List are stored on a SharePoint site, so everybody who has access to the site can view and easily find the list using the search function.
I think the best way to describe lists is that you can place it between a simple task list app, like ToDo, and Excel.
Good to know is that you also have the Microsoft 365 Lists apps. If you open the Lists app, you will see all available lists that are already created in SharePoint Online (and that you have access to). Lists are just another view/app to view the SharePoint Lists.
The advantage of Lists is that you can also open the lists using the mobile app, or share them easily in Teams. But keep in mind, that they are exactly the same as SharePoint Lists.
Create a SharePoint List
When you start with a blank SharePoint List it can be a bit overwhelming. How do you create columns, add markup, or even add calculations? Luckily we have a couple of options for creating a SharePoint list:
- Templates
- Blank Lists
- From Existing list
- From Excel
- From CSV
Each option allows you of course to fully customize the list later on, so the templates are often a good starting point. But also Excel is a great way to start. How often don’t you start in Excel with a list, thinking later on, I need to share this with coworkers.
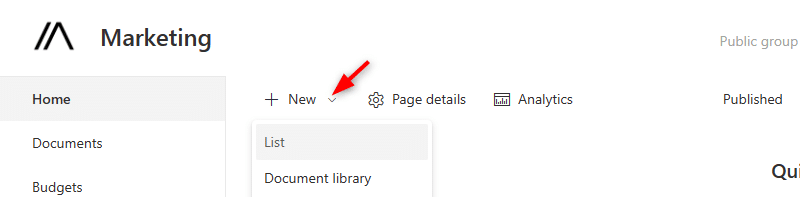
To create a new list, simply go to the home page of your SharePoint site, click on New, and select List from the dropdown menu.
Using Templates
So when you want to create a new SharePoint List, the first thing you see are the Templates from Microsoft that you can use. These templates are a good way to see the different possibilities of the lists and can also be a great starting point for your list.
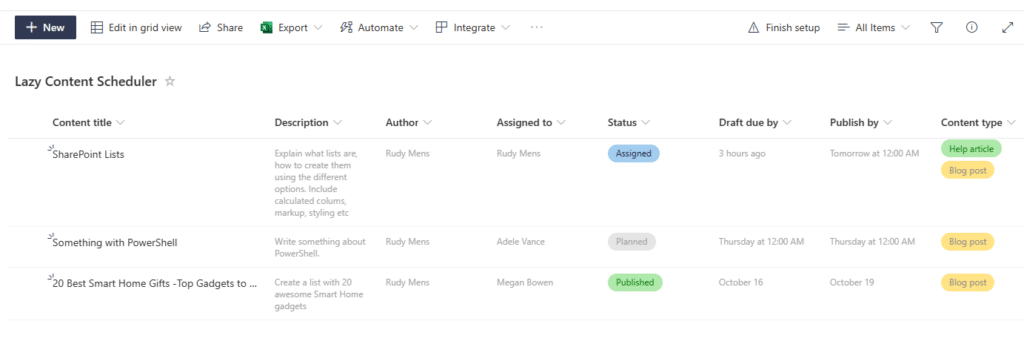
At the moment there are 14 templates from Microsoft to choose from. You can simply click on them to view an example and if you want to use the list, click on Use Template and give your list a name.
After you have created your lists, you will get an empty list with all columns and configurations from the template. For example, below you see the Content Scheduler template from Microsoft:
I will explain later on in the article how you can modify the template, add or change columns, etc.
From an Existing List
When you already have created a perfect list on another SharePoint site (or the same site), then you can use that list as a template. When you use an existing list as a template, then only the columns, views, and formatting will be copied to the new lists. So any data won’t be copied.
To use an existing list as a template, select the option From Existing list. You can then first select the SharePoint site or Team where the original list is located, and then select the list that you want to use as a template.
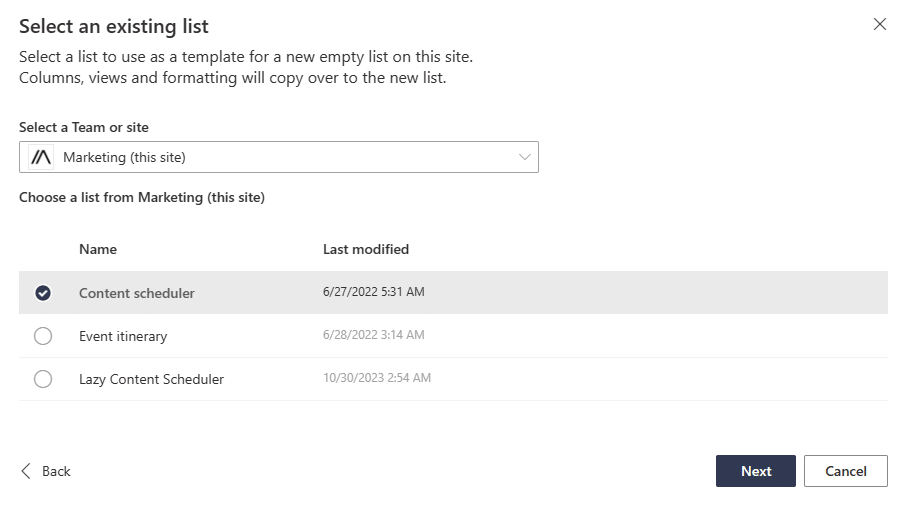
After selecting the list, you will only need to give your new list a name.
From Excel
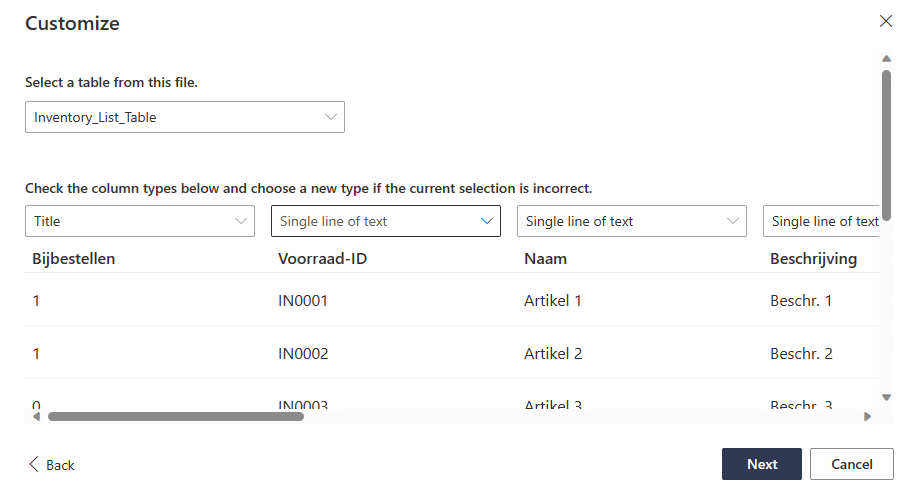
It’s possible to use an Excel file as a basis for your new SharePoint list. However, to be able to use the Excel file, you will need to make sure that it contains a table inside it. After you have selected your Excel file, you can choose which columns you want to import. Also, you will need to check if the field types are correctly recognized.
The import function will only import the columns and values, it won’t take over any formulas or formatting that you have inside your Excel file.
Using a CSV File
It’s also possible to create a new SharePoint list using a CSV file. Make sure that the CSV file is comma-separated (some use a semi-column, which won’t work) and select the file to import it to your new List. Just like with an Excel file, you will need to check the column types before you important the data.
Starting with a Blank List
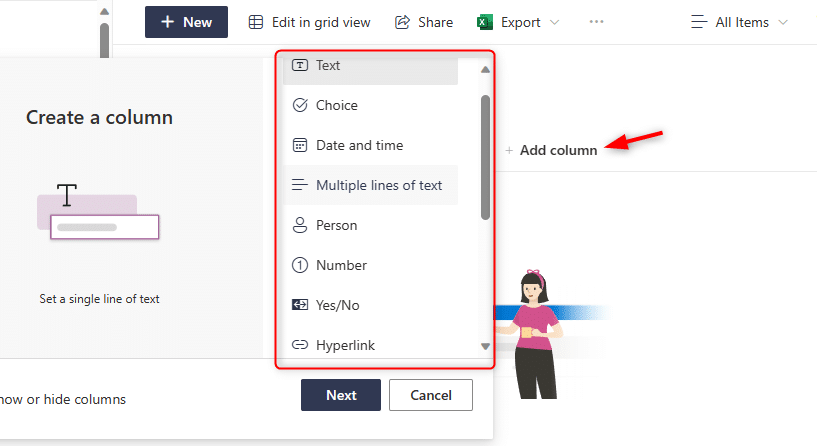
If you don’t want to use a template or file as a basis, then you can start with a blank list. This way you can add your own columns and markup to create a list that fits your needs. After you have created a new list, you will see a blank list with only one column, Title.
You can simply Add Columns to create a new column. It will show you a list of the possible column types that you can create, which are quite a lot. If you want to create a calculated column for example, then scroll all the way down and select See all column types. This will give you even more options.
In the next chapter, we will dive deeper into creating columns.
Adding or Modifying Columns
In SharePoint Lists we can add a wide variety of column types. Some are pretty straightforward, like a Text field, Number, or date and time. But others offer more advanced features or styling options.
It’s important to use the right type of column in your list. If you would store number in a Text column, then you won’t be able to sort the column correctly (it will be sorted as a string, so 1, 10, 2, 20 etc, instead of 1, 2, 10). The same goes for dates, which also don’t sort correctly in a text column.
Person columns, on the other hand, allow you to select only persons from your organization. Making it easier to enter data and adding rich features to your list.
Let’s first take a look at an overview of the different field types you can create and their purpose:
| Field type | Description |
|---|---|
| Text | Single line of text, max 255 characters |
| Choice | Selection list, either dropdown or radio buttons. |
| Date and Time | Date and time field. Users can select a date and time. Friendly format will show for example Tomorrow, or Today instead of the date. |
| Multiple Lines of text | Allows you to enter multiple lines of text |
| Person | Select a person from your organization. Optional shows profile picture |
| Number | Number field, you can set a minimum and maximum allowed value |
| Yes/No | Simple Yes or No field. |
| Hyperlink | Adds a link to the give websites |
| Currency | Choose any currency, including the currency symbol. Just like a number, you can set a minimum and maximum value |
| Location | Add location, based on address, postal code and./or coordinates |
| Image | Adds an inline image |
| Managed metadata | Allows you to select managed metadata |
| Lookup | Allows users to select a reference/row from another SharePoint List. Creates a direct link to it. |
| External Data | Can be used in combination with Business Connectivity Services |
| Task Outcome | Used in combination with Workflows |
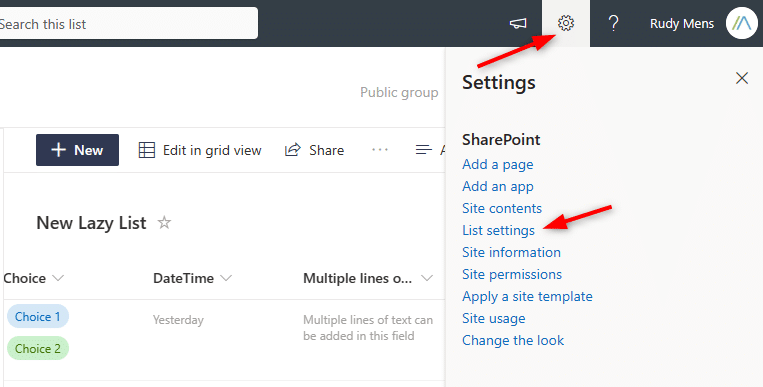
There are two ways to add columns to your list. We can use the Add Column option in the list overview, as we have seen in the previous chapter. Or we can use the List Settings options. The advantage of the latter is that it also allows us to order the columns.
To open the list settings, click on the Gear Icon (Settings) and choose List Settings:
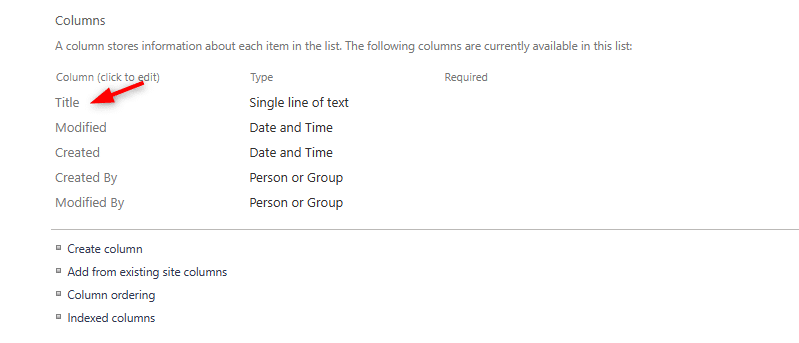
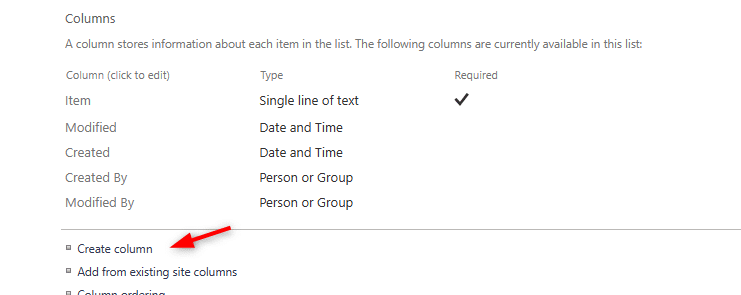
If you scroll a bit down in the list settings, you will see an overview of the Columns that are in your list. When you have created a new blank list, you will see that 5 columns are created by default. You can’t remove these (but we can hide them).
The Title column is always required, but you can rename it to something else. For the examples below, we are going to create a new list, that will track our inventory.
Modifying a Column
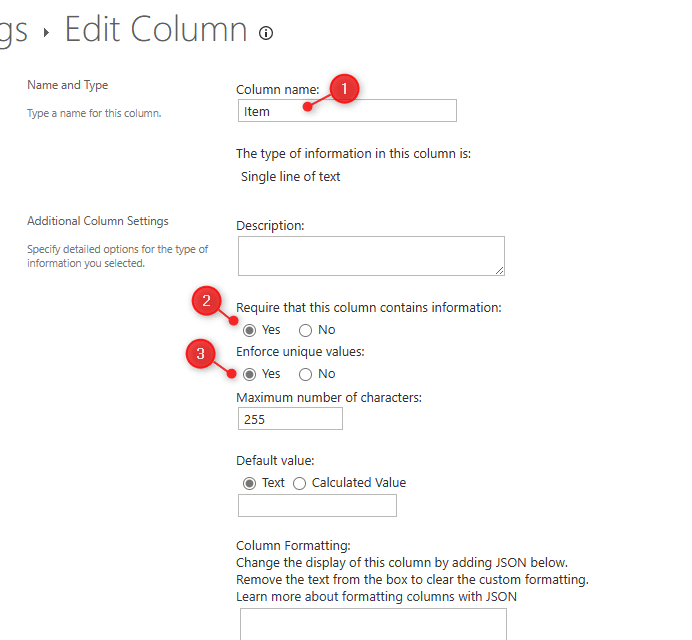
Let’s start with modifying a column. We won’t need a column title, so we are going to rename it to Item. Click on the column name to modify the column:
When you edit or create a column in the List Settings, you will have a couple of options that you can configure. We first start with renaming the column Title to Item (1). If a column needs to have information in it, then make sure you set Require to Yes (2).
Also, in this case, we don’t want duplicate items in our overview. An item can only occur once in our SharePoint List. So we set Enforce unique values to Yes (3) as well:
Create Columns in SharePoint List
We will also need to create some new columns for your inventory overview. We will be using the List Settings screen for this. Just below the Columns overview, you will see the option Create Column. Click on it to create a new column.
Here we can choose the name and type of column we want to create. Create two columns, one for the price per item and one for the items in stock:
- Column name: Price per item
- Type: Currency
- Required: Yes
- Column name: Amount in Stock
- Type: Number
- Required: Yes
You can use this method to create more columns of course, but we will keep it at these two for now.
Good to know is that there are some differences in the way you create a column. For example, when creating a choice column, if you use the List Settings way, then you can’t choose the colors for the choice items. Also, the location type column is only available in the List view, not in the list settings.
Creating a Calculated Column
In a SharePoint List, you can also create a calculated column. This value in this column will be based on a calculation of another column in the list. The formulas that you can use are pretty similar to Excel. But let’s take a look at a couple of examples.
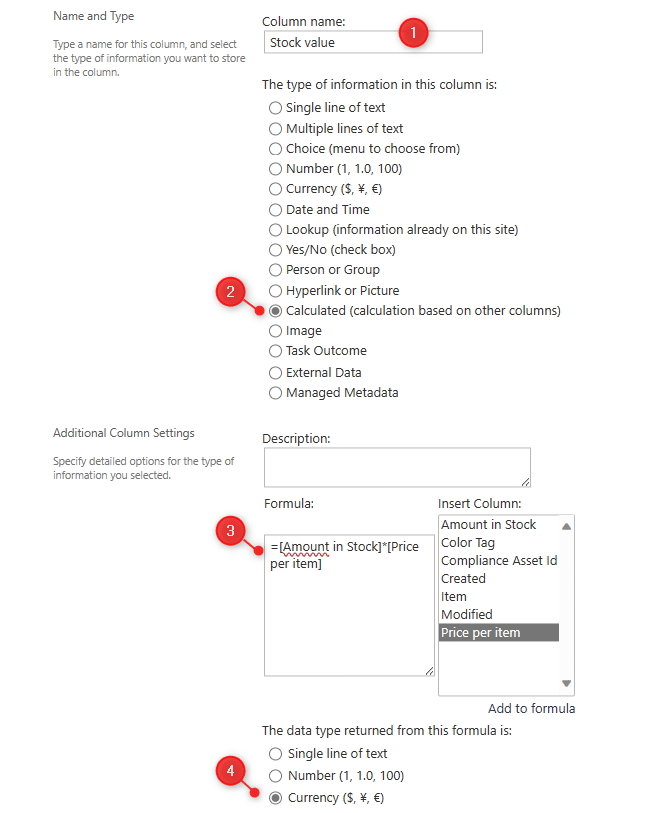
We are first going to create the calculated column that will show us the stock value. For this, we are going to multiply the amount in stock with the price per item column.
- Create a new column and name it Stock Value
- Select Calculated
- In the Formula field add the following formula:
=[Amount in Stock]*[Price per item] - Set the Date type returned to Currency
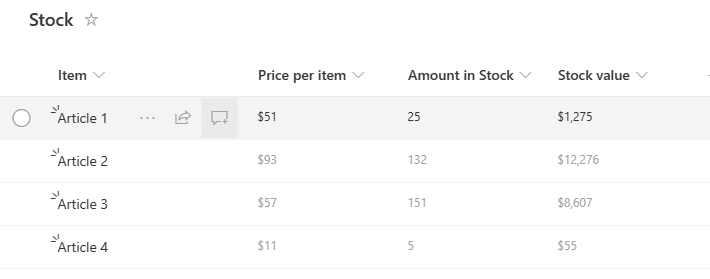
Click on Ok to add the new field to your list. If we now take a look at our list then you will see that the Stock Value is automatically calculated:
We can also for example also check if we need to order new items. Let’s say that if the number of items equals 25 or less, we want to order new stock.
To do this, we can create a calculated column, and use the formula =[Amount in Stock]<=25. We can set the return type to Yes/No. As you can see in the results below, article 1 and 4 needs to be ordered.
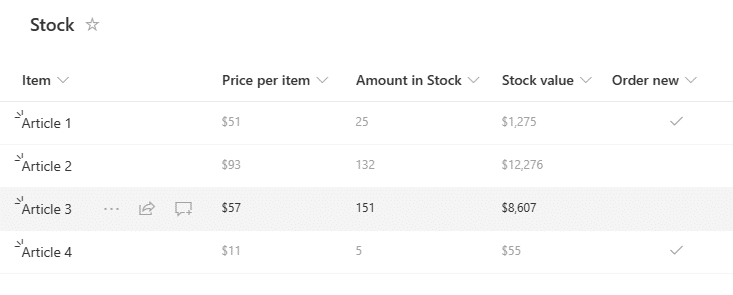
When it comes to formulas, there is a lot possible. You could even add If statements inside your formula, so for example, if the amount in stock is higher than 0, then calculate the stock value:
=IF([Amount in Stock] > 0,[Price per item]*[Amount in Stock],0)
To view all options, take a look at the documentation here at Microsoft.
SharePoint List Conditional Formatting
Conditional Formatting allows you to add color or markup to a column based on its value or another value in the row. Taking the example above, the little tickmark to order new items is easily overlooked, but with Conditional formatting, we can change the color of the cell.
So for example, we want to give the Item name a warning color when we need to order new items. To add conditional formatting, click on the column name and choose Column Settings > Format this column
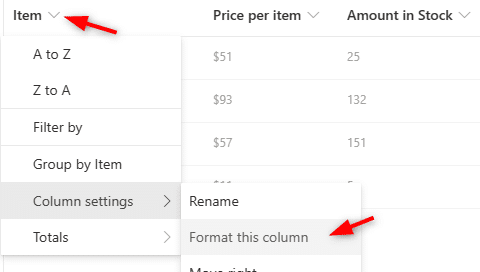
In the sidebar, we select Format Columns and make sure that the Item column is selected. In this case, the only option is Conditional Formatting, click on it to create new rules:

Click on Add a Rule to create a new rule. Rules are based on If and Or conditions. So in this case:
- If the column Order new
- is Equal to
- Yes
- then we want to show the item with a Yellow background
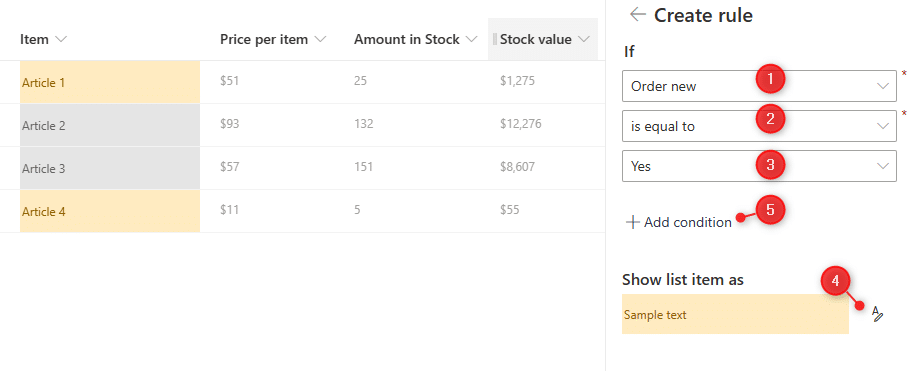
You can add more conditions or add an or statement, so if it’s not yes, then you can give it another color for example.
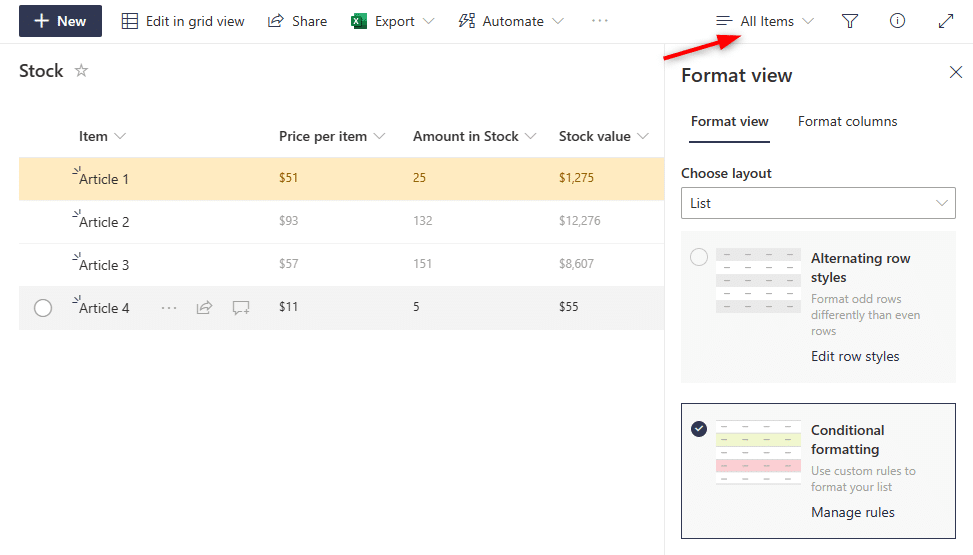
We have now added the color to a single column, but you can also use conditional formatting to style the complete row in a SharePoint List. To do this, click on All Items and choose Format current view. Here you can select conditional formatting and add a rule just like with formatting columns.
Some field types have special formatting options, like numbers for example, they can show Data Bars so you can easily see items and which items you have a lot from in stock and which do not.
Creating List Views
All SharePoint Lists have one default view that will show all the columns. But in some cases, you want to create distinct views, that only show a couple of the columns, or the items that match a certain condition.
Now you could of course use the filter option in the default view, but you will have to redo the filter every time you open the list.
A better option is to create an extra view for your SharePoint Lists:
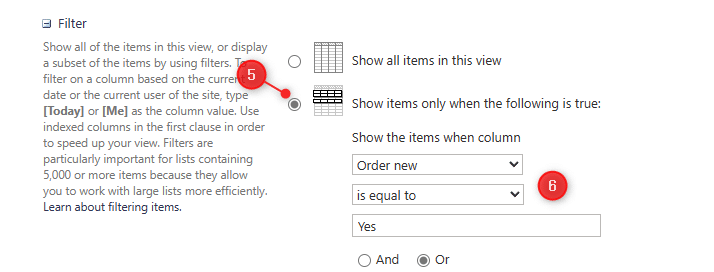
- Open Settings and select List Settings
- Scroll down to Views and click on Create View (all the way the bottom of the list settings page)
- Give your view a name
- Scroll down to Filter
- Select Show items only when the following is true
- Select the column, Order new, set it to is Equal to and as value use Yes
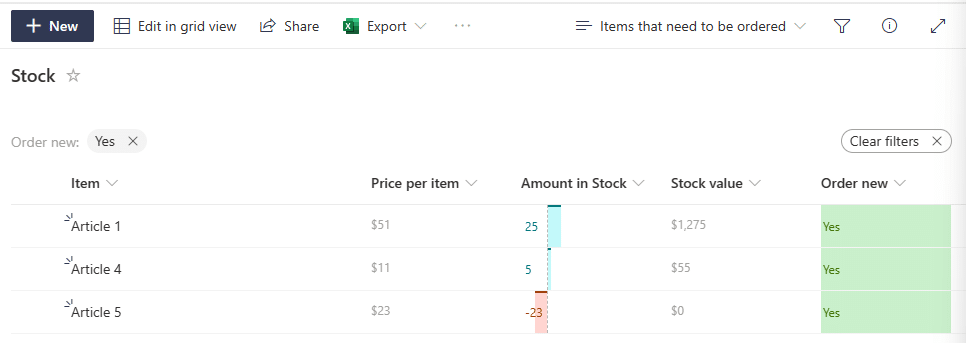
Click on Ok to create the new view. The new view will be listed in the View options menu and it will display the active filter:
Adding Data to your List
There are two ways to add data to your SharePoint list. The most commonly used method is to click on the + New button and enter all the required fields. But when add or change multiple rows in the SharePoint list, then it is often easier to use the Grid View.
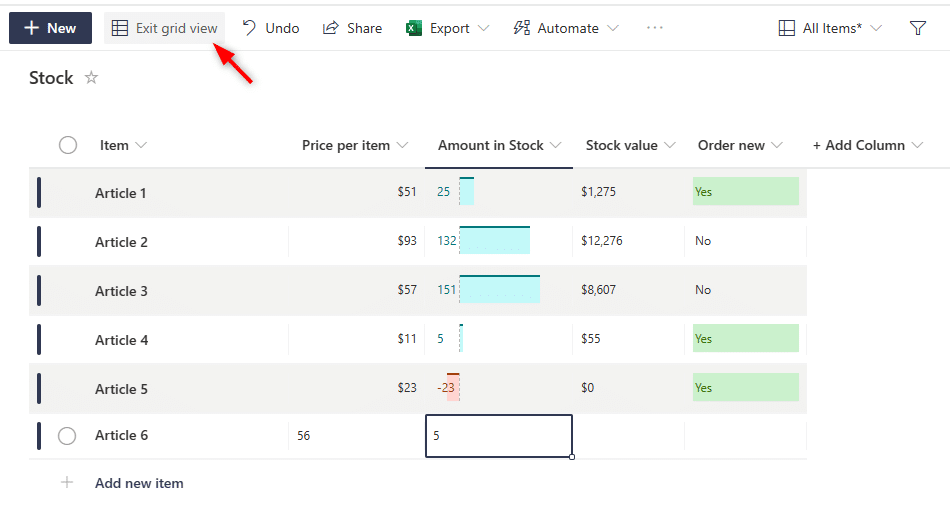
In the Grid View, you can easily navigate through all the fields using the arrows or tab key. This way you can quickly add new rows to your list or change existing values.
Sharepoint List Permissions
Permissions are the last part of the SharePoint lists that we are going to look at. A SharePoint list has in basis the same permission structure as an document library. So if you want to make the list read only, then you can use the SharePoint permissions for that. I have written an article about SharePoint Permissions, which you can find here.
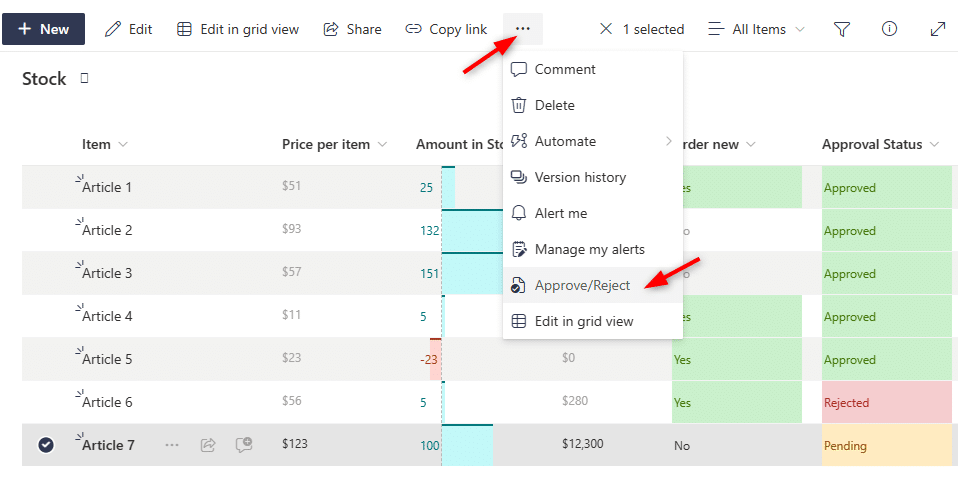
It’s also possible require approval before new items can be added to the list. This way members of the SharePoint site can add new items to the list, but only owners can approve the new list items. To do this we will need to configure the Versioning Settings in the List Settings:
- Click on Settings and select List Settings
- Open the Versioning Settings
- Set Require content approval for submitted items to Yes
- (optional) Change the draft Item security so that only owners can see draft items
When a new item is added to the list, the approval status will be set to Pending. List owners can approve items by selecting the list item, click on More Options and choose Approval/Reject.
Wrapping Up
SharePoint Lists are a great tool to quickly create a task list, or contract list for example. The formatting options allows you to easily add conditional formating and the permissions allow you to control who can add data to the list.
I hope this article helped you to get a better understanding of the posibilities of SharePoint Lists. If you have any questions, just drop a comment below.