The Microsoft Graph module in PowerShell allows you to interact with different Microsoft 365 services. But to use the module, you will first need to connect to Microsoft Graph, using the Connect-MgGraph cmdlet.
There are different options when it comes to authenticating the Microsoft Graph connection, from interactive login, to certificate-based and managed identity. The latter is great for background operations.
In this article
In this article, we will look at how to use Connect-MgGraph, the different scopes, and authentication methods.
Install Microsoft Graph Module
Before we are going to take a look at how to connect to Microsoft Graph, we first need to make sure that you have the module installed in PowerShell. The module is actually called the Microsoft Graph PowerShell SDK.
It’s recommended to use PowerShell 7 for Microsoft Graph, but you can also install and use the module in the older PowerShell 5.1 If you want to know how to install or upgrade your PowerShell, then make sure you read this article.
You can check if you have the module installed with the following command:
Get-InstalledModule Microsoft.Graph
To install the module we will be using the Install-Module cmdlet. The easiest is to install it for the current user only, but you can also install it for all users:
Install-Module Microsoft.Graph -Scope CurrentUser
If you want to know more about installing Microsoft Graph, for example, how to install only a specific module, or the beta version, then make sure you read this article.
Connect MgGraph Methods
Microsoft Graph has different methods that we can use to authenticate, but they all can be divided into two types of authentication:
- Delegated Access – Commands are executed on behalf of the signed-in user. You will need to use scopes to define which operations the cmdlet can perform.
- App-Only Access – Authentication is based on a (form of) access token, allowing Microsoft Graph to access resources without a sign-in user. Permission (scopes) are defined in the access token
For delegated access, we can use the following methods:
- Interactive Authentication – You will get a prompt to sign in with your own account.
- Device code – Used to authenticate on another device.
- Own Access Token – Authenticate with your own access token.
- Custom Application – Allows you to use an Azure AD Application and limit the sign-in to specified users or groups.
There are also different methods that you can use for App Only access:
- Certificate-based – Allows you to use a self-signed certificate
- Managed Identity – Used in for example Azure Runbooks.
- Client Secret – Uses a client secret from an Azure Application. Ideal for background jobs.
Scopes
When connecting to Microsoft Graph with delegated access, you will need to define the scopes you want to give permission for. Also with the app-only method, you will need to set the correct API permission for Graph. But how do you know which scopes you need?
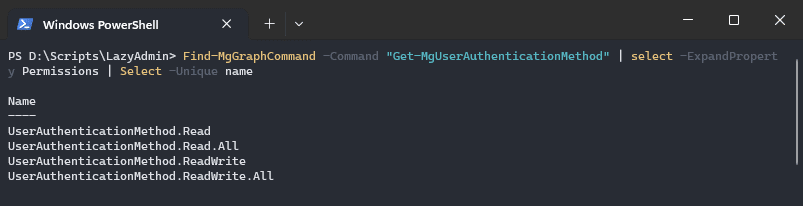
There are two methods to find which permissions a cmdlet requires, you can look into the documentation or use the cmdlet Find-MgGraphCommand. Let’s take the cmdlet Get-MgUserAuthenticationMethod as an example.
If we look in the documentation, you often will find a permission table in the description. When permissions are not listed, then we can use the Find-MgGraphCommand cmdlet or the Find-MgGraphPermission cmdlet
Find-MgGraphCommand -Command "Get-MgUserAuthenticationMethod" | select -ExpandProperty Permissions | Select -Unique name

# Or
Find-MgGraphPermission AuthenticationMethod
Another option is to use the Graph Explorer, read more about that method in this article.
Delegated Access
As mentioned, delegated access is used when you want to run a script locally or just want to interact with Microsoft Graph from your console. With delegated access, we will need to define the scope that we want to use when connecting the Microsoft Graph.
Interactive Authentication
The most commonly used method to authenticate is interactive authentication. This is the default method, so we only need to define the scopes that we want to give permission for. For example, to get all users and groups you will need to use the User.Read.All and Group.Read.All scopes:
# Connect to MgGraph with user and group read permissions
# and suppress the welcome message

Connect-MgGraph -Scopes "User.Read.All", "Group.Read.All" -NoWelcome
When you run the command, a new browser tab will open, allowing you to sign in with your Microsoft 365 credentials.
Device code
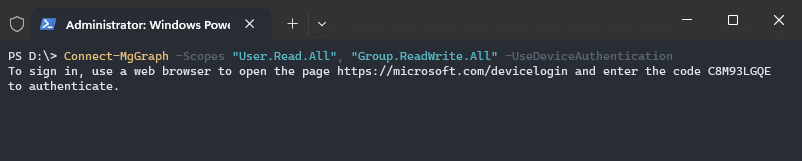
When you can’t authenticate on the device you’re running the Connect-MgGraph command on, then it’s also possible to use the device code flow. This allows you to complete the authentication process on another machine by opening the webpage https://microsoft.com/devicelogin.
Connect-MgGraph -Scopes "User.Read.All", "Group.ReadWrite.All" -UseDeviceAuthentication
Access Token
The access token method allows you to authenticate to Microsoft Graph using your own access token. This token can for example be acquired by logging in on the Microsoft Graph Explorer page.
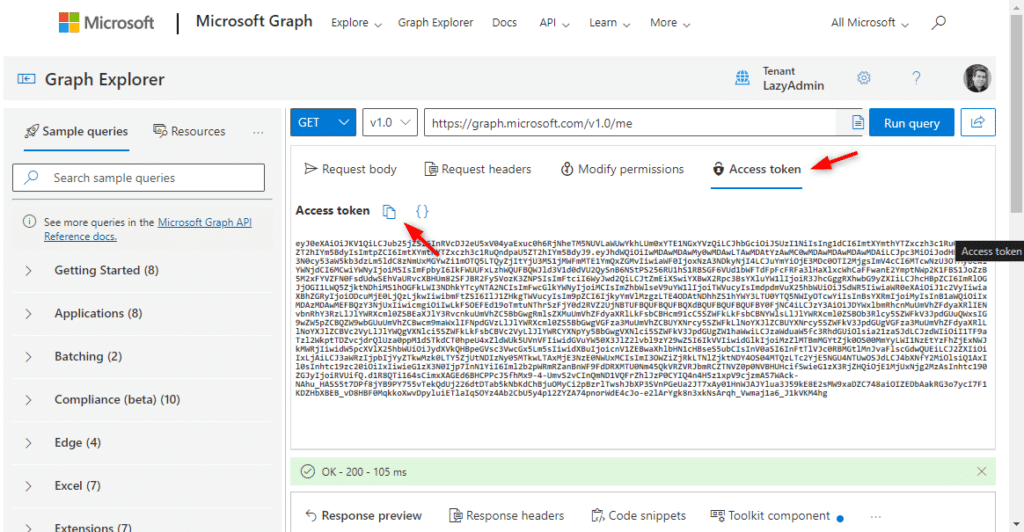
You can then copy the access token from the Access Token tab. Copy the token and paste it into the Connect-MgGraph cmdlet:
Connect-MgGraph -Accesstoken <paste-your-token-here>
Custom Azure Application
The last option for delegate access is to use a custom Azure Application. This method is great when you need to limit the access permissions to specific users or groups.
- Open Microsoft Entra > App Registrations
- Create a new Registration
- Name – MgGraph Limited Access
- Account Types – Accounts in this organizational directory only (single tenant)
- Redirect URI – Public client/native > http://localhost
- Register
- Open Enterprise Applications > Select your new application
- Click on Properties – Enable Assignment Required
- Open Users and Groups – Add the users or groups that are allowed to use the application.
Use the following connection method in your script to connect to Microsoft Graph:
Connect-MgGraph -ClientId <your-app-id> -TenantId <tenant-id>
App-Only Access
When you want to run a PowerShell script as a scheduled task on a local machine or server, then you will need to use app-only access. This allows you to create an application and only assign the permissions required for the script.
Certificate-based
The best way to authenticate a locally scheduled PowerShell script is to use the certificate-based authentication method. This method uses a self-signed certificate that we can create in PowerShell.
Step 1 – Create Self-Signed Certificate
The first step is to create the self-signed certificate. You can create the certificate on your local machine, but make sure that you have installed it in the trusted store of the machine where you want to schedule the script on.
To create the certificate, we will use the New-SelfSigendCertificate cmdlet. Specify a meaningful name and subject, so you know where the certificate is for. The certificate is valid for one year by default:
$cert = New-SelfSignedCertificate -FriendlyName "PSMsGraph" –Subject "Test Cert PowerShell MsGraph" -CertStoreLocation "Cert:\CurrentUser\My"
The next step is to export the certificate, so we can upload it to the Azure AD Application. Note the filename in the filepath:
Export-Certificate -Cert $cert -FilePath "c:\temp\PSMsGraph.cer"
Step 2 – Create the Azure AD application
With the certificate created, we can now create the Azure AD application. Here we will upload the certificate and set the required permissions. The permission requires admin consent, so make sure you have the correct permissions.
- Open Microsoft Entra Admin Center
- Expand Applications and click on App registrations
- Choose New Registration

- Enter a name for the application
- Select Accounts in this organization directory only
- Click on Register (we don’t need to enter a redirect URI)
Step 3 – Configure Permissions
With the app created, we will now need to configure the Microsoft Graph permissions that we need for our script. Permissions are the same as scopes, so if you want to know which permission to set, then you can use the same method for finding the scopes.
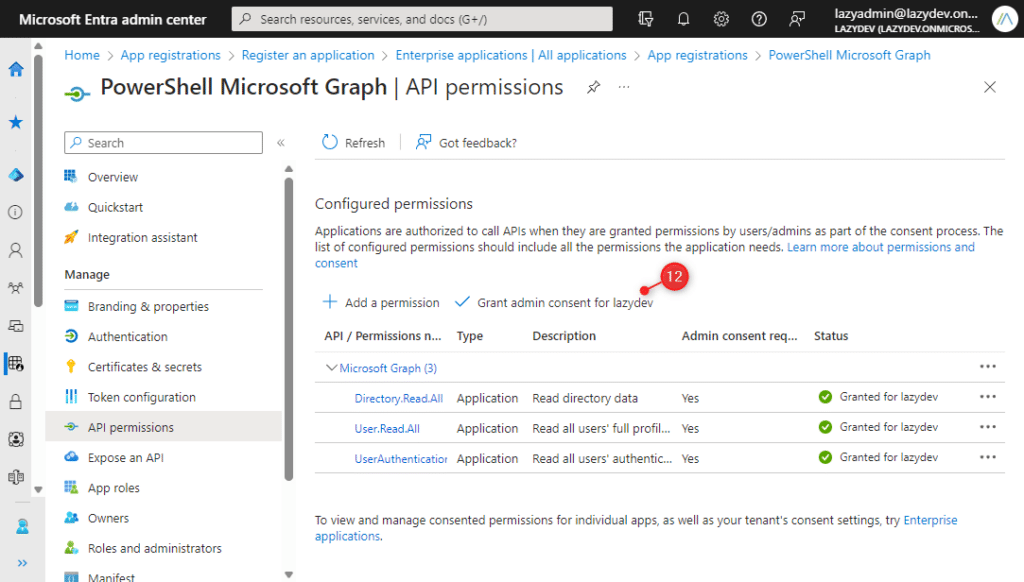
- Open the API permissions
- Click on Add a permissions
- Choose Microsoft Graph
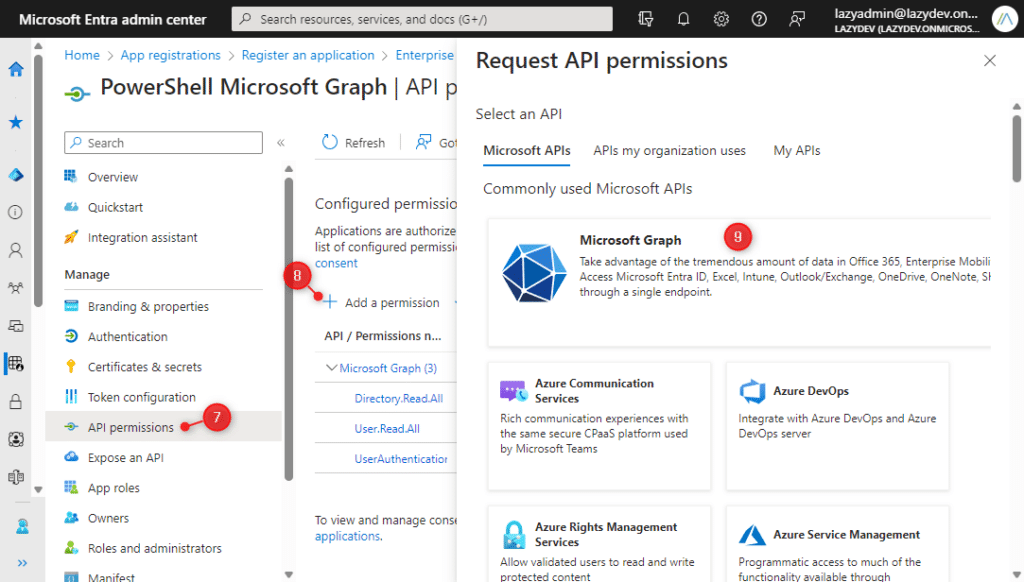
- Choose Application Permission
- Select the permission you want to add
- Click on Grand admin consent for <tenantname>
Step 4 – Upload Certificate
With the permission set, we can now upload the certificate. The certificate is used to authenticate the connection.
- Click on Certificates & secrets
- Select Certificates and click on Upload Certificate
- Upload the .cer file that we have exported earlier

Step 5 – Connect MgGraph with Certificate
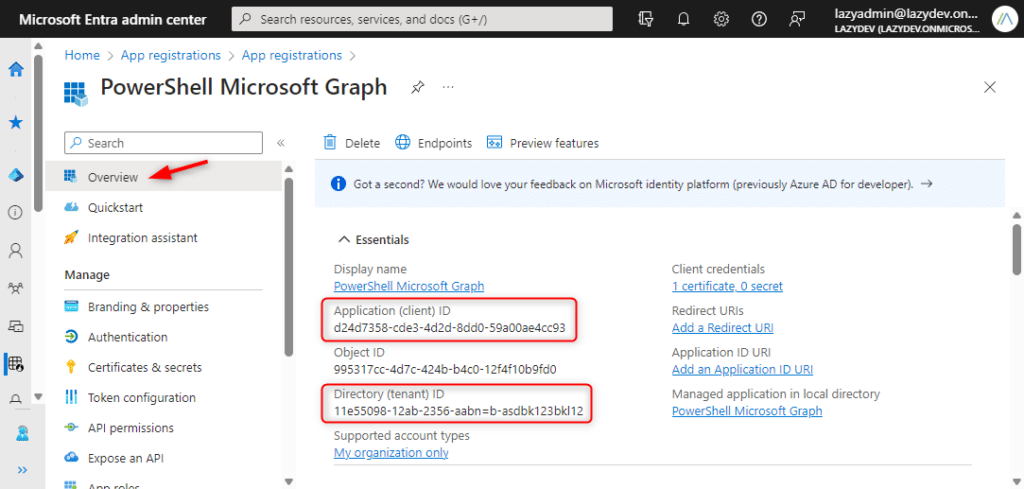
We have now created the application and certificate that we need to connect to MgGraph with a certificate. There are 3 ways to connect to MgGraph with a certificate, but for all methods we need the ClientId of the Azure App and the Tenant ID.
You can find both in the application Overview in the Microsoft Entra admin center > App Registration > <your app>
The first method to connect to MgGraph with a certificate is to use the Certificate Thumbprint.
Connect-MgGraph -ClientId "d24d7358-12ab-2356-aabbn-asd131asb" -TenantId "11e55098-12ab-2356-aabbn-asd34fgdsav2" -CertificateThumbprint "2BF6BDD0286EF8A0AS2341NLSDH1L234C"
You can find the Certificate Thumbprint in Microsoft Entra > App Registration under Certificates of the app. Or you can use the following PowerShell command to view all you self-signed certificates:
Get-ChildItem Cert:\CurrentUser\My

# Result
Thumbprint                                Subject
----------                                -------
2BF6BDD0286EF8A0AS2341NLSDH1L234C         CN=Test Cert PowerShell MsGraph
It’s also possible to use the certificate subject name for the connection, but you will need to add cn= to the subject name, just like they are listed with the command above.
Connect-MgGraph -ClientId "d24d7358-12ab-2356-aabbn-asd131asb" -TenantId "11e55098-12ab-2356-aabbn-asd34fgdsav2" -CertificateSubjectName "CN=Test Cert PowerShell MsGraph"
The last option is to use the certificate in the connect-mggraph cmdlet:
$Cert = Get-ChildItem Cert:\LocalMachine\My\$CertThumbprint
Connect-MgGraph -ClientId "d24d7358-12ab-2356-aabbn-asd131asb" -TenantId "11e55098-12ab-2356-aabbn-asd34fgdsav2" -Certificate $Cert
Managed Identity
When using a Microsoft Graph connection inside an Azure Runbook, you can use the Managed Identity method for the authentication. This will obtain an Access Token from the Azure resource, which is the most convenient way to use MgGraph inside a runbook.
You will need to make sure that you have enabled the System Assigned managed identity for your Automation account, read more about that in this article.
To connect to MgGraph with managed identity you can simply specify the -Identity parameter:
Connect-MgGraph -Identity
Client Secret
The last option to connect to Microsoft Graph with App-Only access is to use client secret credentials. For this method you will also need to create an Azure AD App, just follow steps 2 and 3 from the certificate-based authentication method.
- In the Azure AD App, open Certificates & Secrets
- Click on Client Secrets > New client secret
- Enter a description and click on Add
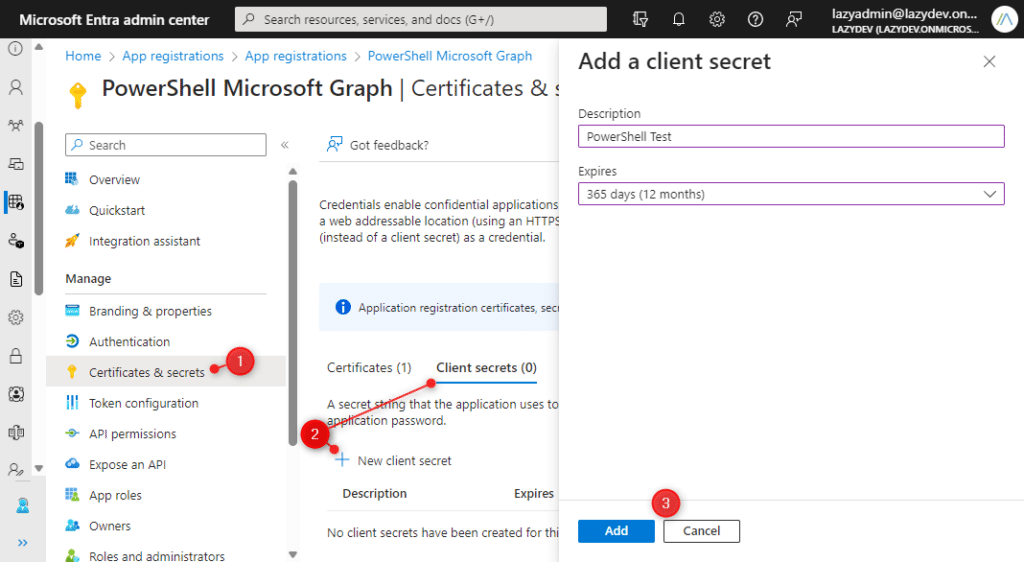
- Copy the Value (you can only view the value immediately after the creation)
- Use
Get-Credentialto create a credential object and connect to MgGraph:
# Credential = Application Client ID
$ClientSecretCredential = Get-Credential -Credential "d24d7358-12ab-2356-aabbn-asd131asb"

# Connect to MgGraph using the client secret
Connect-MgGraph -TenantId "11e55098-12ab-2356-aabbn-asd34fgdsav2" -ClientSecretCredential $ClientSecretCredential
Good to note here is that the client ID, which is used to create the credential object, is the Application Client ID (not the Secret ID !)
Wrapping Up
As you have seen, there are multiple ways to connect to Microsoft Graph in PowerShell. When working locally in your console, the interactive method is the most convenient one to use. But when you want to schedule your scripts, you will need to use either the certificate or managed identity method.
Make sure that you define the correct scopes/permissions for the connection, otherwise, you won’t be able to use the cmdlets that you need.
I hope you found this article helpful, if you have any questions, just drop a comment below.


