Sending emails from a scanner or web application can always be challenging. You don’t want to use a mailbox (with username and password) for this, but preferable an SMTP server that sends the mail for you. This is where we can use SMTP Relay in Office 365.
The problem with SMTP Authentication these days is that we want to use MFA on all our Office 365 accounts. When we create a dedicated mailbox for sending emails, we still can’t authenticate (and secure) it properly. This is also the reason that Microsoft doesn’t support SMTH AUTH anymore for new tenants created after 2020.
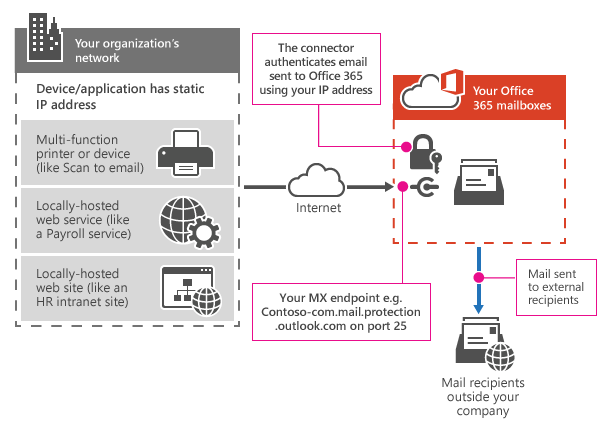
SMTP Relay, on the other hand, allows applications and devices to send email through your Exchange Online mail server. Protection is done based on your public IP Address(es), allowing only applications and devices from your network to use the SMTP Relay connection.
In this article, I will explain how you can set up an SMTP Relay in Office 365 and the difference between Direct Send and SMTP Relay.
SMTP Relay vs Direct Send in Office 365
Before we take a look at how to set up SMTP Relay in Office 365, I first want to explain to you the difference between SMTP Relay and Direct Send. Because both use the MX endpoint as an SMTP server address, but they both have their own use case.
Direct Send in Office 365 is used to deliver email to only your internal mailboxes. This means that you can’t scan a document and email it directly from the scanner to an external email address. You will need to scan it to your own mailbox, and in Outlook forward it to the external contact.
But the advantage is Direct Send is that you can use it also for third-party applications and it doesn’t require a static IP address for authentication.
SMTP Relay on the other hand can be used to send emails directly to external contacts, but only from networks (public IP addresses) that you have defined.
| Features | Direct Send | SMTP Relay |
|---|---|---|
| Send to internal recipients | Yes | Yes |
| Send to external recipients | No | Yes |
| Support externally hosted applications | Yes | No |
| Required Network Port | 25 | 25 |
| Requires authentication | None | Based on Public IP Address |
Set up SMTP Relay in Office 365
To set up an SMTP Relay we first need to know the public IP Address of the network where the device is located. If you want to use SMTP Relay for your local multifunctional (scanner), then just open the browser and visit myip.com. Note the IP Address, we will need that later.
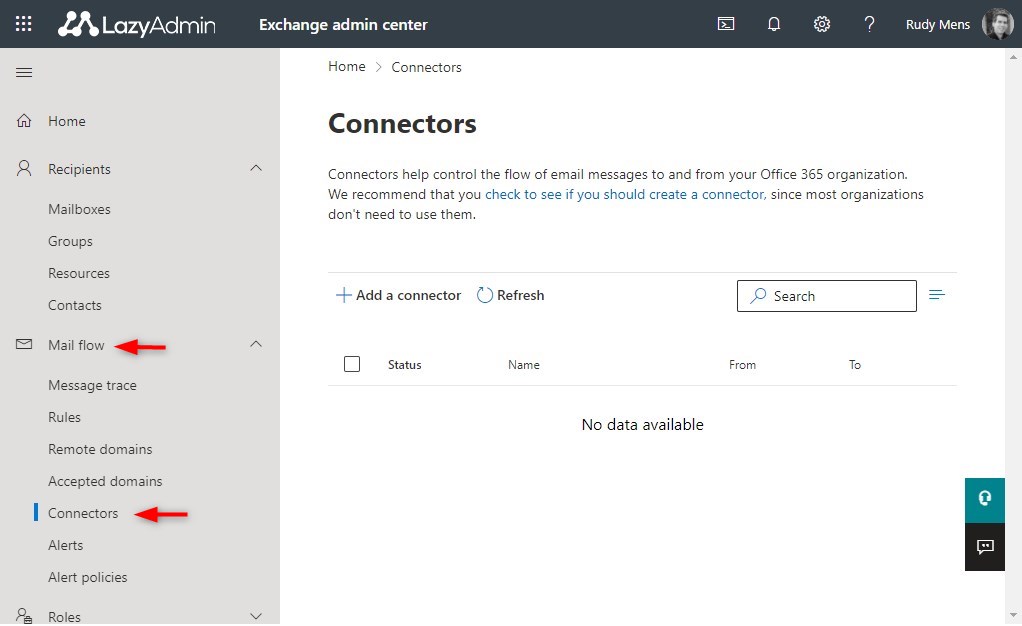
- Open the Exchange Admin Center
Log in add your Exchange Admin Center and navigate to:
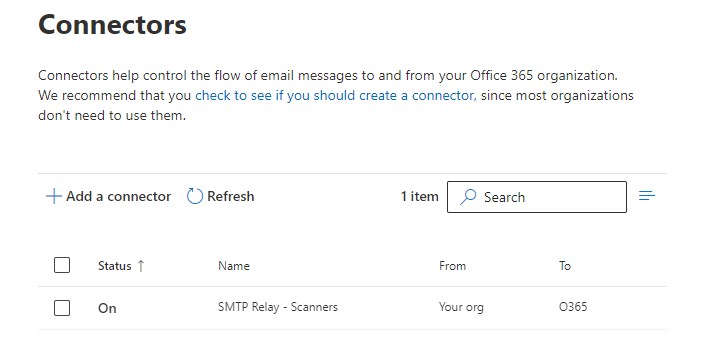
Mail flow > Connectors
- Create a new Connector
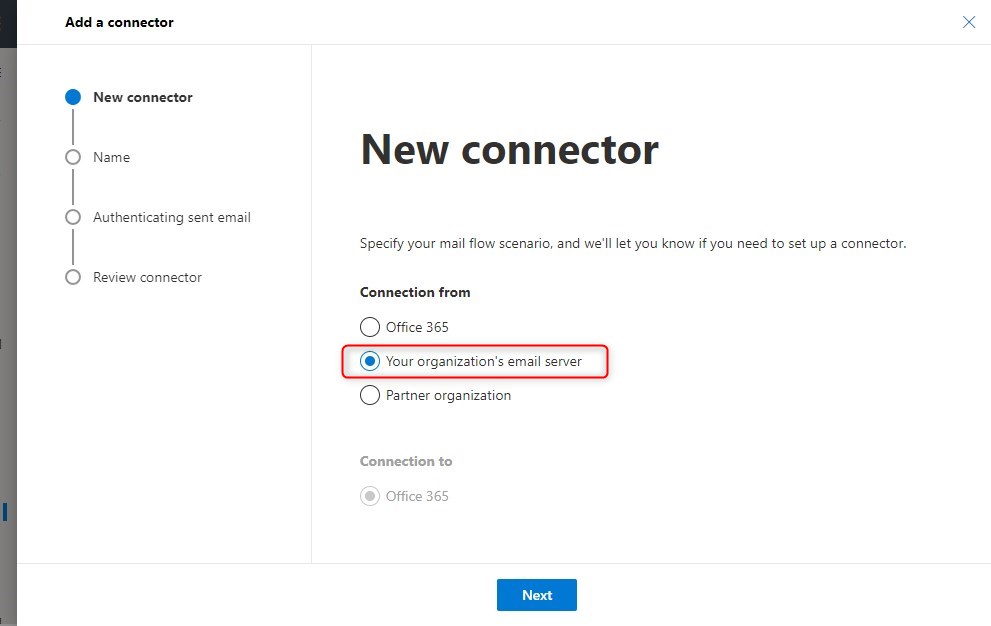
Click on Add a connector to create a new connector
and choose Your organization’s email server
- Connector name
Give the connector a recognizable name and leave the selected options on.
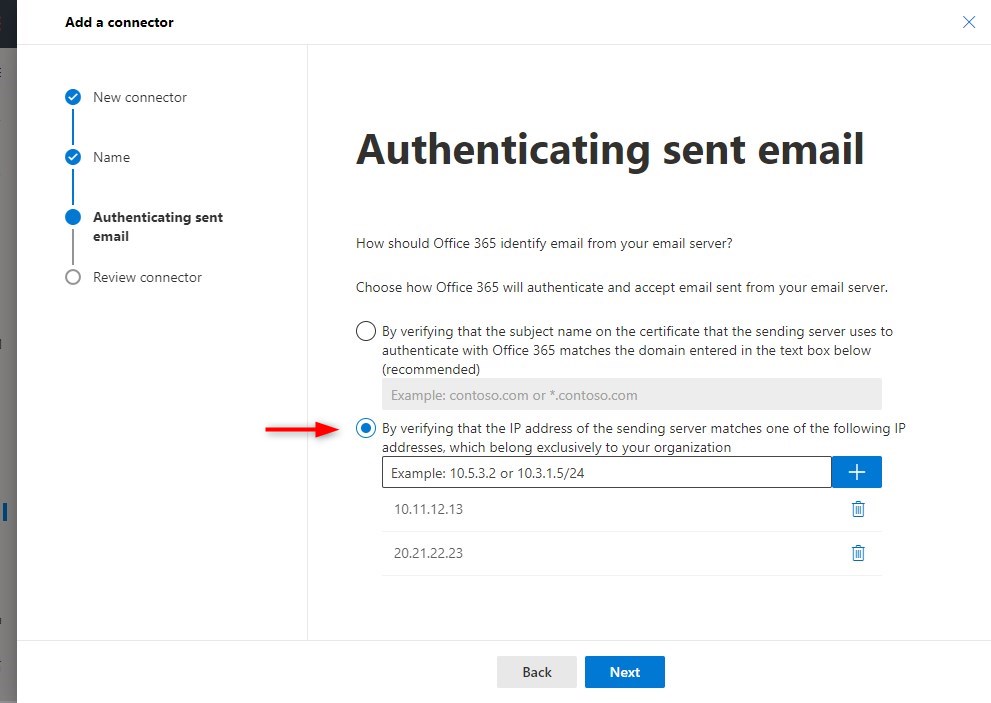
- Configure authentication
The next step is to configure the authentication that we want to use. It’s possible to use a certificate for authentication, but more common is to do the verification based on the public IP Address of the device.
You can define multiple IP Addresses for the connection (useful if you have different offices)
- Review and create the connector
The last step is to review your settings and create the connector. Double-check the IP Addresses and click on Create connector.

To use the connector we will need to look up the MX record for your Office 365 tenant. The value of the MX record is used as SMTP Server Address in your device.
- Open the Microsoft 365 Admin Center
- Expand Settings and click on Domains
- Select your domain
- Click on DNS records
- Open the MX record (by clicking on it)
- Note to Points to address or value field
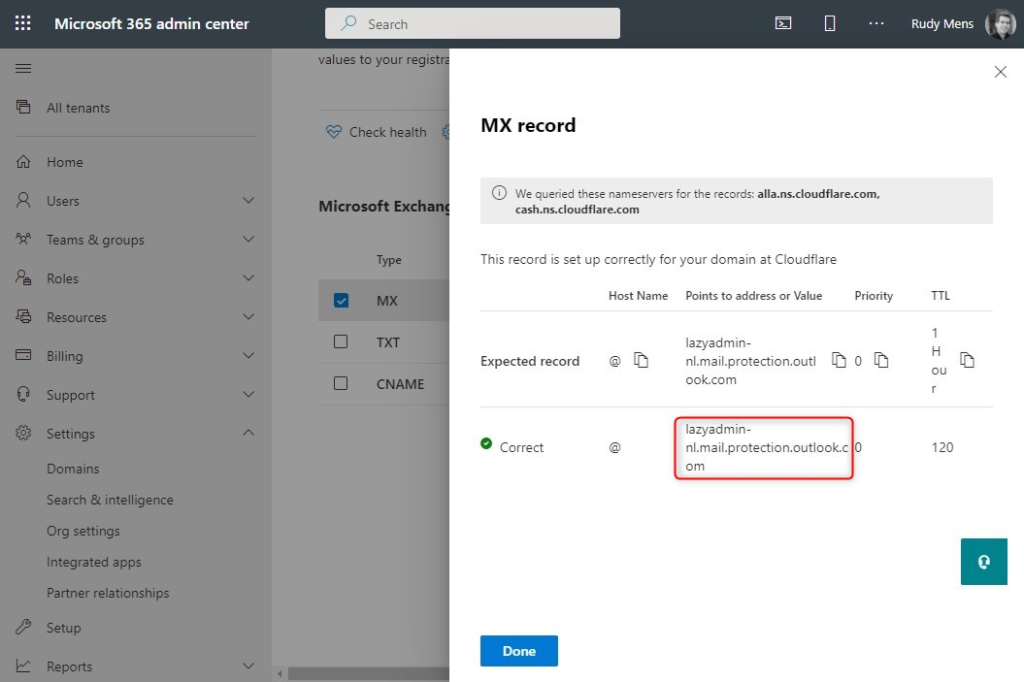
The format of the value is pretty standard:
# MX Record structure
<your-domain>-<domain-extension>.mail.protection.outlook.com

# For example:
# lazyadmin-nl.mail.protection.outlook.com
Use this address in your scanner or application as SMTP Address.
Update your SPF Record
To prevent the mail from ending up in the spam folder, we will need to edit the SPF record. The SPF record identifies which endpoints (servers) are allowed to send emails on behalf of the domain.
By default your SPF Record looks like this:
v=spf1 include:spf.protection.outlook.com ~all
We are going to add our Public Ip Address to it:
v=spf1 ip4:10.11.12.13 include:spf.protection.outlook.com ~all

# or for mutliple IP Addresses:
v=spf1 ip4:10.11.12.13 ip4:20.21.22.23 include:spf.protection.outlook.com ~all
Keep in mind that DNS changes can take a couple of hours to apply. But after that, you should be able to send emails using your newly created SMTP Relay Connection.
Edit SMTP Relay Connection
You can use one SMTP Relay connection to send emails from multiple IP Addresses. So you don’t need to create a connection for each branch office that you have for example.
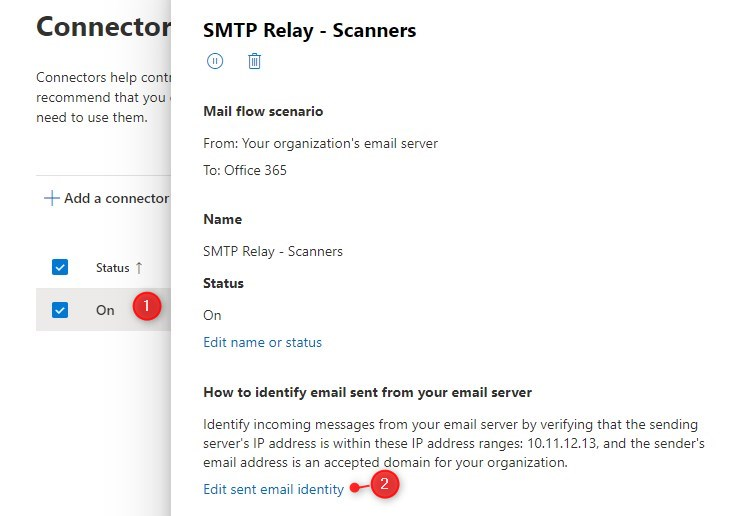
To add an IP Address to an existing connection, we can simply open an existing one:
- Click on the connection
- Click on Edit send email identity
- Add or remove IP Addresses from the connection
Using PowerShell to create SMTP Relay Connection
You can also use PowerShell to create an SMTP Relay connection in Office 365. This is especially useful when you need to create the same SMTP Relay connection in multiple tenants or if you just love to use PowerShell.
Make sure that you are connected to Exchange Online. You can read more about connecting to Exchange Online in this article.
There are a couple of parameters that we need to set:
| Parameter | Description |
|---|---|
| Name | The name of the connector |
| ConnectorType | Partner: External partners or services. OnPremises: Your on-premises email organization. |
| SenderDomains | Use * to allow all domains in your tenant |
| SenderIPAddresses | Your public IP Address(es) |
| RestrictDomainsToIPAddresses | Set to true to only allow connection from your sender IP addresses |
You can find all parameters with their description in these Microsoft docs.
So to create the SMTP Relay connector in Office 365 with PowerShell we can use the following code:
New-InboundConnector -Name "SMTP Relay POSH" -ConnectorType = 'OnPremises' -SenderDomains * -SenderIPAddresses 10.11.12.13 -RestrictDomainsToIPAddresses $true
Or a bit more readable:
# Set the parameters
$parameters = @{
    Name = 'SMTP Relay POSH'
    ConnectorType = 'OnPremises'
    SenderDomains = '*'
    SenderIPAddresses = '10.11.12.13','20.21.22.23'
    RestrictDomainsToIPAddresses = $true

}

# Create the SMTP Relay connector
New-InboundConnector @parameters
Wrapping Up
Keep in mind that you can’t SMTP Relay or Direct send for bulk emails. Microsoft applies reasonable limits to the connection and throttling to protect Microsoft 365 services.
Make sure that you configure the SPF records correctly because this will prevent your emails from ending up in the spam folder.
I hope you were able to create your SMTP Relay connection in Office 365 with this guide. If you have any questions, just drop a comment below.


Thanks for the article. If we add our Public IP to the SPF records, those IPs will be expose to the internet. What is the alternative? we should not be advertising our IPs ranges to the world?
Yes it would, but it’s a minimum risk.
This is a fantastic post, thank you! Setting up this SMTP relay means we can use our Konica Minolta Bizhub MFD’s scan-to-email function with an M365 account.
IYou said that you can’t bulk with SMTP relay.
Why the exchange admin wizard says SMTP Relay is recommended for more 10k emails to external?
Because there are limits applied on how many emails you can send: https://learn.microsoft.com/en-us/office365/servicedescriptions/exchange-online-service-description/exchange-online-limits#sending-limits
Check also the first note.
nice article
This was the most helpful article I’ve found for SMTP Relay. Microsoft is sketchy but this lays it out nicely! Thanks for taking the time to post!
If an email is sent over the Internet via relay, is it that the email body is not encrypted and can be intercepted. I need to know as some of our applications send customer specific order data. So this may not be best option if that’s the requirement?
If TLS is enabled on the SMTP connection, then the body is encrypted, more info here.
Hello – I am trying to set up a relay & connector for my on site All-in-one as well as for my database to use to send emails out. I do NOT host my own email server. We use Office365/Exchange exclusively.
Can you tell me when I create the New Connector will there need to be 2 separate connectors?
Also – In the “CONNECTION FROM” my choices are:
Office 365
Your organization’s email server
Partner organization
In the “CONNECTION TO” my choices are:
Your organization’s email server
Partner organization
Which do I choose?
Thank you for any help you can provide!
Trisha
Fenton, Missouri
One connector will be enough. Connection From is your organizations email server. In this case the printer and database are both the mail server. Connection to is not applied in this case.
Thanks for this article, it really helps. The situation I am dealing with is related to a Toshiba MFP. Connectivity tests to the SMTP server works fine from the MFP, but when trying to scan to email it always fails. Question on the process this process, No on prem exchange server is setup on my case. This client has all email services managed on the cloud. On step 2, “Create a new Connector”, should I select option Office 365 instead? How this selection will change this process? Thanks!
If you select Connection from Office 365 then the connector will only work from applications inside the Office 365 environment. So that is not an option in your case. Aren’t there any spam filter that might block the email?
I could see from header there is delay 5-10 minutes when sending emails thru smtp on prem relay to cloud.
May I know what caused the delay?. is this normal?
Is there any option to fix that issue?
Are you sending a lot of emails through the relay connector? Because then there is a chance that you are getting throttled. Otherwise, a good method to find the cause is the analyze the mail headers using MX toolbox.
Hi Rudy,
Thanks for creating this. I found it helpful.
Just wanted to add below script here for audience to test the configuration that they have made via PowerShell.
Test Office 365 SMTP relay
Test that everything is set up correctly and that email relays through Office 365 successfully.
Run PowerShell as administrator.
To
From
SmtpServer
$EmailMessage = @{
To = “username@domain.com”
From = “no-reply@domain.com”
Subject = “Test email”
Body = “Test email sent using Office 365 SMTP relays”
SmtpServer = “yourdomain.mail.protection.outlook.com”
Port = “25”
}
Send-MailMessage @EmailMessage
The output should not give you an error, and the email will arrive in the inbox you added in the To field.
Thanks for sharing!
I used this articel for our scanner. But i became this error: 550 Authenticated Relay not permitted. Any idea, how i can fix this? Thx.
Are you scanning to your own domain or external?
Hi,
This solution works great ! Thank you but after january 2023 will it will be the same ?
https://techcommunity.microsoft.com/t5/exchange-team-blog/basic-authentication-deprecation-in-exchange-online-september/ba-p/3609437
You don’t authenticate, the authorization is done based on IP address. So it should work after Jan 2023 as far as I know.
HI all
thank you for this guide.
But im having an error when sending to external domain adress:
Mailbox unavailable. The server response was: 5.7.64 TenantAttribution; Relay Access Denied [PR2FRA01FT012.eop-fra01.prod.protection.outlook.com]
Have you checked this article?
Hey,
I’m trying to use relaying through Exchange Online with a non accepted domain.
I get an error 451 4.4.62 Mail sent to the wrong Office 365 regionAttr35
I dont get this error when using an accepted domain as Sender.
Of course, I create the connector and added the public IP address. Any idea?
Have you checked this article?
Yes, but it don’t find any Information about this error.
On another tenant, it just works fine with the same settings.
Sorry, did not see the link first. Yes, I have checked this article and I’m sending to mytenant.mail.onmicrosoft.com
Hello Rudy,
How do we check what emails have been sent from the above SMTP Connector? For instance, if we use the same email address to send emails, it doesn’t show in Outlook that what emails were sent. Is there a way to check this?
Regards,
Ashton
Have you tried the message trace in Exchange Admin center? You can filter on IP Address which might work in your case
Hello Rudy,
I get the below error message when I use the new SMTP host address.
The mail could not be sent to the recipients because of the mail server failure. (Sending Mail using Account 4 (2022-09-16T16:03:26). Exception Message: Could not connect to mail server. (A connection attempt failed because the connected party did not properly respond after a period of time, or established connection failed because connected host has failed to respond x.x.x.x:25).
Any idea?
I have TLS 1.2 enabled.
Probably port 25 blocked
Good article Rudy. The question I have is that neither of these seem to be optimal for an externally hosted cloud application wanting to send external SMTP on your organisations behalf (having looked at your Direct Send vs SMTP Relay table). Do you have a recommendation for that scenario? Case in point, a Legal Case Management System with externally hosted cloud components, which send SMTP messages to external address when your organisation is using Exchange Online.
I assume that you don’t have a dedicated public IP Address at the hosted cloud component? SMTP Relay could be an option, but you might want to protect it:
What you could try is the following, create in Exchange Online a new rule under Mail flow. Make sure that you enable advanced options
– Apply this rule if: Sender’s IP address is in this range – enter the IP of the cloud app
– Do the following: Delete the message without notifying anyone ( might want to use another option first for testing)
– Except if : The senders address include – enter the email address from your company that the cloud app uses.
I haven’t tested it, but something like this might do the trick for you.
Thank you Rudy for the reply, that is very much appreciated. I will have to take a look into this. I have a sneaking suspicion that the 3rd party cycle a dynamic IP, but I will check.
That logic is worth testing seeing as SMTP Relay is the only one that will allow for external sending from our tenant. The filter looks like it’s effectively locking down which email addresses can hit the relay (protecting it from abuse) whilst also allowing the EOL SMTP relay to send onto an external email. Certainly a starting point. I think our biggest challenge will be technical governance approval because we should be getting the 3rd party to use an OAuth method but they are technically limited in what their application can do.
Thanks for getting back to me 🙂
Hello,
After adding the SMTP new address. How do we know which email it will use to send emails? Because there is no way to add the specific email address in the connector.
Also, Does the new SMTP address acts as a username and password to send emails?
The relay address is used as SMTP server address. You can define any address in the From field, usernames and passwords are not needed because authentication is done based on the sender’s public IP Address.
Hi Rudy,
Will SMTP Relay still work after Microsoft phases out of basic authentication for Exchange Online from October 1st this year?
According to the documentation SMTP AUTH will still be possible but it is not clear to if this also affects SMTP Relay. What is your information?
According to this service description, Microsoft won’t disable basic authentication for SMTP auth at this time. Clients will need to support OAuth first.
I have this installed on 3 costumers but for some reason it does not work anymore
Telnet did work before but even that does not work anymore
telnet ”domain”-nl.mail.protection.outlook.com 25
All three customers have the same provider? Maybe the port is blocked?
no,
One is my own @ my house (I have business premium license)
2 customers completely different places in the country.
The funny thing is telnet to 587 (smtp.office365.com) works fine, and telnet to smtp from the ISP to port 25 works just fine to, but not “telnet ”domain”-nl.mail.protection.outlook.com 25”
I have a web app that i am trying to use smtp relay with. I have created the appropriate DNS records for the domain name and my app uses the correct MX record spec for sending mail. I have the cname specified as well. Along with a SPF record. I built a domain connector in exchange as well as an IP connector. I continue to receive this error when sending: 550 5.7.64 TenantAttribution; Relay Access Denied. Any help would be appreciated.
Seems to be a problem with the TLS certificate
Any ideas why my email still goes to junk when sent via the relay?
My spf ip4 settings look good.
Mail can also go to spam based on the content. Think you have two options here, set up DMARC, to help with the verification. Or whitelist the sender
We in the end migrated to Mailgun for all transactional SMTP/emails to leave those out of the Microsoft system completely. So far that has worked great for us.